Development Environment Setup
This document describes how to set up the development environment for ESF, which consists of the following components:
-
JVM (Java JDK SE 8)
-
Eclipse IDE
-
ESF Workspace setup
The ESF development environment may be installed on Windows, Linux, or Mac OS. The setup instructions will be the same across each OS though each system may have unique characteristics.
The local emulation of ESF code is only supported in Linux and Mac, not in Windows.
JVM Installation
Download and install JDK SE 8 from the following links as appropriate for your OS.
For Windows and Linux users, the JDK can be downloaded from the following link: Java SE 8 Downloads. Use the latest version of Java SE Development Kit and download the version appropriate for your system.
For additional information regarding the installation of Java 8 on all supported operating systems, see JDK 8 and JRE 8 Installation Guide.
Eclipse IDE
The Eclipse IDE is an open source development tool that consists of an integrated development environment (IDE) and a plug-in system for managing extensions.
Installing Eclipse
Before installing Eclipse, you should choose directory locations for the Eclipse install and its workspaces.
The following points should be kept in mind regarding Eclipse installs and workspaces:
The directory location of the Eclipse workspaces should be chosen carefully. Once Eclipse is installed and workspaces are created, they should never be moved to another location in the file system.
There may be multiple installs of Eclipse (of different or similar versions), and single instances of each install can be run simultaneously; but there should never be more that one instance of a specific install running at the same time (to avoid corruption to the Eclipse environment).
Each workspace should be used with only one Eclipse install. You should avoid opening the workspace from more than one installation of Eclipse.
For the purposes of this guide, only a single Eclipse installation will be covered.
Download the current distribution of Eclipse for your OS from https://www.eclipse.org/downloads/packages/. Choose the Eclipse IDE for Enterprise Java Developers.
The zipped Eclipse file will be downloaded to the local file system and can be saved to a temporary location that can be deleted after Eclipse has been installed. After the file has been downloaded, it should be extracted to the Eclipse installs directory. The following screen capture shows the installation in Linux using an eclipse\installs** directory. The Eclipse executable will then be found in the eclipse\installs\eclipse** directory. This installation will be different depending on the operating system.

Because there may potentially be future Eclipse installs extracted into this location, before doing anything else, rename the directory, such as eclipse\installs\juno1\.
Once you begin using this Eclipse install, it should NOT be moved or renamed.

Installing mToolkit
An additional plugin, mToolkit, is needed to allow remote connectivity to an OSGi framework on a ESF-enabled target device. To install mToolkit into Eclipse, use the following steps:
- Open the Help| Install New Software... menu.
- Add the following URL as an update site based on your version of Eclipse
- Eclipse Mars and older: https://esf-website-resources.s3.amazonaws.com/mtoolkit/mtoolkit-mars
- Eclipse Neon and newer: https://esf-website-resources.s3.amazonaws.com/mtoolkit/mtoolkit-neon
- Install the "mToolkit" feature (you need to uncheck the Group items by category checkbox in order to see the feature)
- Restart Eclipse. In the menu Window| Show View | Other, there should be an mToolkit| Frameworks option. If so, the plugin has been installed correctly.
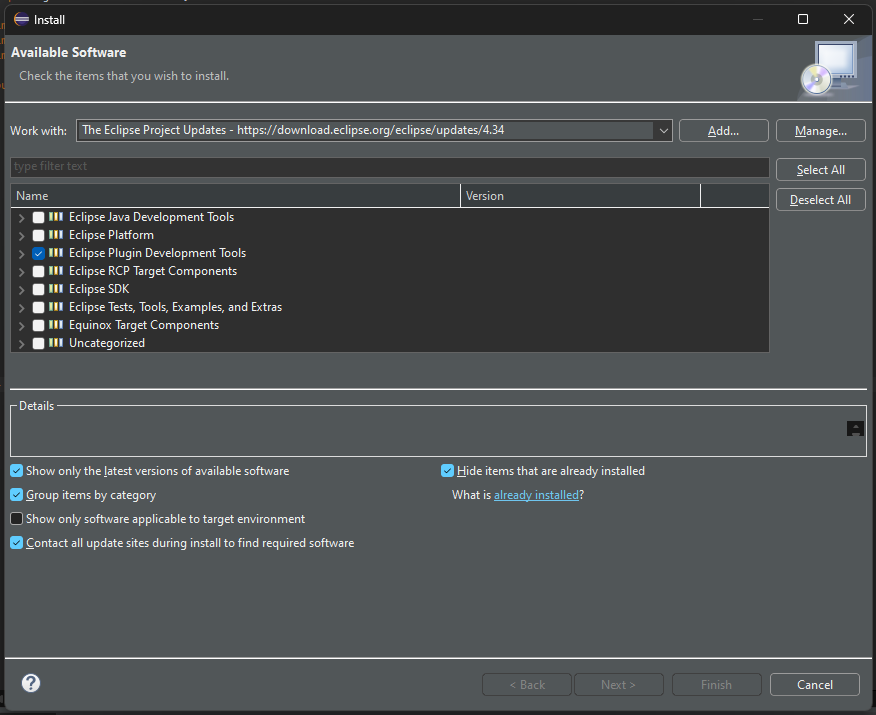
Installing Eclipse Plugin Development Tools
To create a Component Definition you will need the Eclipse PDE package, to install it click on Help and Install New Software....
In the form that appears on the screen under Work with: select The Eclipse Project Updates.
Select Eclipse Plugin Development Tools and proceed with the installation.
Workspaces
Creating an Eclipse Workspace
Run Eclipse by clicking its executable in the install directory.
When Eclipse is run for the first time, a workspace needs to be created. A single workspace will contain all the Java code/projects/bundles, Eclipse configuration parameters, and other relevant files for a specific business-level product. If the Use this as the default option is selected, the designated workspace becomes the default each time you run Eclipse.
If a workspace has not already been defined, or if you are creating a different workspace for another development project, enter a new workspace name. The workspace should be named appropriate to the project/product being developed.
Once you begin using a particular workspace, it should NOT be moved or renamed at any time.
Otherwise, select an existing workspace and click OK. After Eclipse is running, you can select the Eclipse menu File | Switch Workspace | Other to create or open a different workspace.

After the new workspace opens, click the Workbench icon to display the development environment.

Importing the ESF User Workspace
To set up your ESF project workspace, you will need to download the ESF User Workspace archive from The ESF Download Page. This download requires the username and password obtained through the free ESF registration site at http://esf.eurotech.com.
From the Eclipse File menu, select the Import option. In the Import dialog box, expand the General heading, select Existing Projects into Workspace, and then click Next.
Now click the Select archive file option button and browse to the archive file, such as user_workspace_archive_3.1.0.zip.

Finally, click Finish to import the projects. At this point, you should have four projects in your workspace. The four projects are as follows:
-
org.eclipse.kura.api – the core ESF API.
-
org.eclipse.kura.demo.heater – an example project that you can use as a starting point for creating your own bundle.
-
org.eclipse.kura.emulator – the emulator project for running ESF within Eclipse (Linux/Mac only).
-
target-definition – a set of required bundles that are dependencies of the APIs and ESF.

Eclipse will also report some errors at this point. See the next section to resolve those errors.
Workspace Setup
This section will guide the users to configure the development workspace environment.
JRE Configuration
The latest Eclipse IDEs require and configure, by default, a Java 11 environment.
In order to be able to leverage and develop using the new workspace for ESF, the user will be required to perform a one-time operation to specify to the IDE a Java 8 JDK.
Opening the Eclipse preferences and selecting the Installed JREs in the Java section, the user has to select an installed Java 8 instance.

After applying the configuration change, the user will be prompted to align also the compiler options. To do so, selecting the Compiler entry in the Java section, the user has to select 1.8 from the list of available Java versions.

After applying the changes, the user will be prompted to recompile the environment.
Target Definition Setup
Click the arrow next to the target-definition project in the workspace and double-click kura-equinox_3.16.0.target to open it.

In the Target Definition window, click the link Set as Target Platform. Doing so will reset the target platform, rebuild the ESF projects, and clear the errors that were reported. At this point, you are ready to begin developing ESF-based applications for your target platform.
Prepare the Emulator
In order to run the ESF emulator environment, the user needs to modify the kura.properties in the org.eclipse.kura.emulator project. The file is located in the src/main/resources folder.
Primary network interface
In the kura.properties file, the user needs to change the kura.primary.network.interface property with the value of one of the interface names obtained executing the command: ``ìp addr show```(this command is not available in Mac OS X).
The user will see something like:
1: lo: <LOOPBACK,UP,LOWER_UP> mtu 65536 qdisc noqueue state UNKNOWN group default qlen 1000
    link/loopback 00:00:00:00:00:00 brd 00:00:00:00:00:00
    inet 127.0.0.1/8 scope host lo
       valid_lft forever preferred_lft forever
    inet6 ::1/128 scope host
       valid_lft forever preferred_lft forever
2: enp0s3: <BROADCAST,MULTICAST,UP,LOWER_UP> mtu 1500 qdisc pfifo_fast state UP group default qlen 1000
    link/ether AA:BB:CC:DD:EE:FF brd ff:ff:ff:ff:ff:ff
    inet 10.0.2.15/24 brd 10.0.2.255 scope global dynamic enp0s3
       valid_lft 86355sec preferred_lft 86355sec
And needs to update the kura.properties file with:
kura.primary.network.interface=enp0s3Device Management Services to Ignore
It may be required to update the kura.properties file adding the console.device.management.service.ignore property in it in order to have correctly displayed in the cloud platform the list of services configuration.
The user can add the following line to its kura.properties file to solve the issue.
console.device.management.service.ignore=org.eclipse.kura.net.admin.NetworkConfigurationService,org.eclipse.kura.net.admin.FirewallConfigurationService