Terminal Client and Server Services
The ESF Terminal Client and Server services is an ESF add-on bundle that allows to pass data between a device connected to a gateway serial port and a remote network host. In other words, it allows to transfer serial data over TCP/IP. In the following sections, the two services will be described in detail. At the end of the page, a tutorial on serial port virtualization will be presented.
Terminal Server
The ESF Terminal Server service can accept and manage multiple TCP connections, forwarding data between network and a serial port in specified direction. It can be configured as follows:
- ts.enabled - enable the Terminal Server service
- ts.monitor.rate - the TCP connection monitor rate in seconds
- ts.inactivity.timeout - the inactivity timeout in seconds on the TCP connection. If set to 0, Terminal Server will not timeout
- ts.data.direction.mode - select Data Direction Mode. It can be Bidirectional, net-to-serial or serial-to-net
- ts.net.protocol.port - is specifies the transport protocol (TCP or UDP) and the port used for the connections (e.g. tcp:1025 or udp:1025)
- ts.net.allow.multiple.connections - if set to true, it allows multiple connections on selected network port
- ts.log.level - it specifies the log level used to report messages on the log file
- ts.serial.port - the serial port used to connect to an external device (e.g. 1-3.2 or /dev/ttyUSB0)
- ts.serial.baudrate - the baud rate used to communicate with the serial port
- ts.serial.data.parity.stop.bits - the data, parity, and stop bits (e.g. 8-N-1)
- ts.serial.flow.control - the flow control for serial connection. It can be None , RTS/CTS, or XON/XOFF
- ts.serial.raw - enable raw mode, thus passing input and output almost unprocessed
- ts.serial.extra.options - any extra socat options specified by the user
Warning: Service to use with care!The TerminalServer bundle interacts with the Linux Socat service that runs as root.
A misconfiguration of the service or not correct use of it, can lead a local or remote user to execute arbitrary Linux commands as root user.
Correct definition of the TerminalServer configuration, associated with a strict limitation of the ESF admin users and firewall configuration can effectively mitigate the associated risks
Multiple instances of Terminal Server can be configured using Create a new factory component button under Services. To create a new instance of Terminal Server:
- Open the New Factory Component dialog window by clicking the Create a new factory component button.
- Set the Factory field by selecting the com.eurotech.framework.terminal.service.TerminalServer
- Set the Name field by entering a name of this new instance of Terminal Server.
- Click the Apply button to create a new factory component.
Terminal Client
The ESF Terminal client service can initiate connection to specified IP address and network port and transfer data between serial port and remote host in specified direction. Network connection is initiated as specified in the tc.connect.mode configuration parameter. In other words, Terminal Client can be configured to launch network connection at startup and maintain it continuously, or to launch network connection only when specified dial string (e.g. ATD123) is received via serial port. If the tc.connect.mode is set to connect continuously, remote host, protocol, and port are defined in the tc.hc.1.net.host.protocol.port configuration parameter. If tc.connect.mode is set for ATD String, remote host, protocol, and port are obtained from an entry of the Terminal Client's Host Connection table (i.e. tc.hc.1, tc.hc2., or tc.hc3) that matches the dial string received. Terminal Client configuration fields are shown below:
- tc.enabled - enable the Terminal Client service
- tc.connect.mode - specify the Connect Mode. It can be Continuously or ATD String
- tc.reconnect.delay - specify the reconnect delay in seconds. It is the length in time the Terminal Client waits before attempting to re-establish a lost connection with the server
- tc.inactivity.timeout - the inactivity timeout in seconds. If set to 0, Terminal Client will not timeout
- tc.data.direction.mode - select Data Direction Mode. It can be Bidirectional, net-to-serial or serial-to-net
- tc.echo.connect.strings - if set to true, echoes connect message (e.g. CONNECT) back to serial port on successful start of socat of failure message (e.g. NO CARRIER) if socat fails.
- tc.connect.message - a text message (e.g. CONNECT) sent to the serial port when network connection is established to the remote host
- tc.failure.message - a text message (e.g. NO CARRIER) send to the serial port when Terminal Client disconnects from remote host or when connection fails
- tc.log.level - it specifies the log level used to report messages on the log file
- tc.serial.port - the serial port used to connect to an external device (e.g. 1-3.2 or /dev/ttyUSB0)
- tc.serial.baudrate - the baud rate used to communicate with the serial port
- tc.serial.data.parity.stop.bits - the data, parity, and stop bits (e.g. 8-N-1)
- tc.serial.flow.control - the flow control for serial connection. It can be None, RTS/CTS, or XON/XOFF
- tc.serial.raw - enable raw mode, thus passing input and output almost unprocessed.
- tc.serial.extra.options - any extra socat options specified by the user
- tc.hc.1.net.host.protocol.port - Specify remote host, transport protocol, and port (e.g. localhost:tcp:1025)
- tc.hc.1.dial.string - Enter the ATD string that is used to make a connection if the Connect Mode option is set to ATD
- tc.hc.2.net.host.protocol.port - Specify remote host, transport protocol, and port (e.g. localhost:tcp:1025)
- tc.hc.2.dial.string - Enter the ATD string that is used to make a connection if the Connect Mode option is set to ATD
- tc.hc.3.net.host.protocol.port - Specify remote host, transport protocol, and port (e.g. localhost:tcp:1025)
- tc.hc.3.dial.string - Enter the ATD string that is used to make a connection if the Connect Mode option is set to ATD
Multiple instances of Terminal Client can be configured using Create a new factory component button under Services. To create a new instance of Terminal Client:
- Open the New Factory Component dialog window by clicking the Create a new factory component button.
- Set the Factory field by selecting the com.eurotech.framework.terminal.service.TerminalClient
- Set the Name field by entering a name of this new instance of Terminal Client.
- Click the Apply button to create a new factory component.
Serial port virtualization with ESF Terminal Client and Server
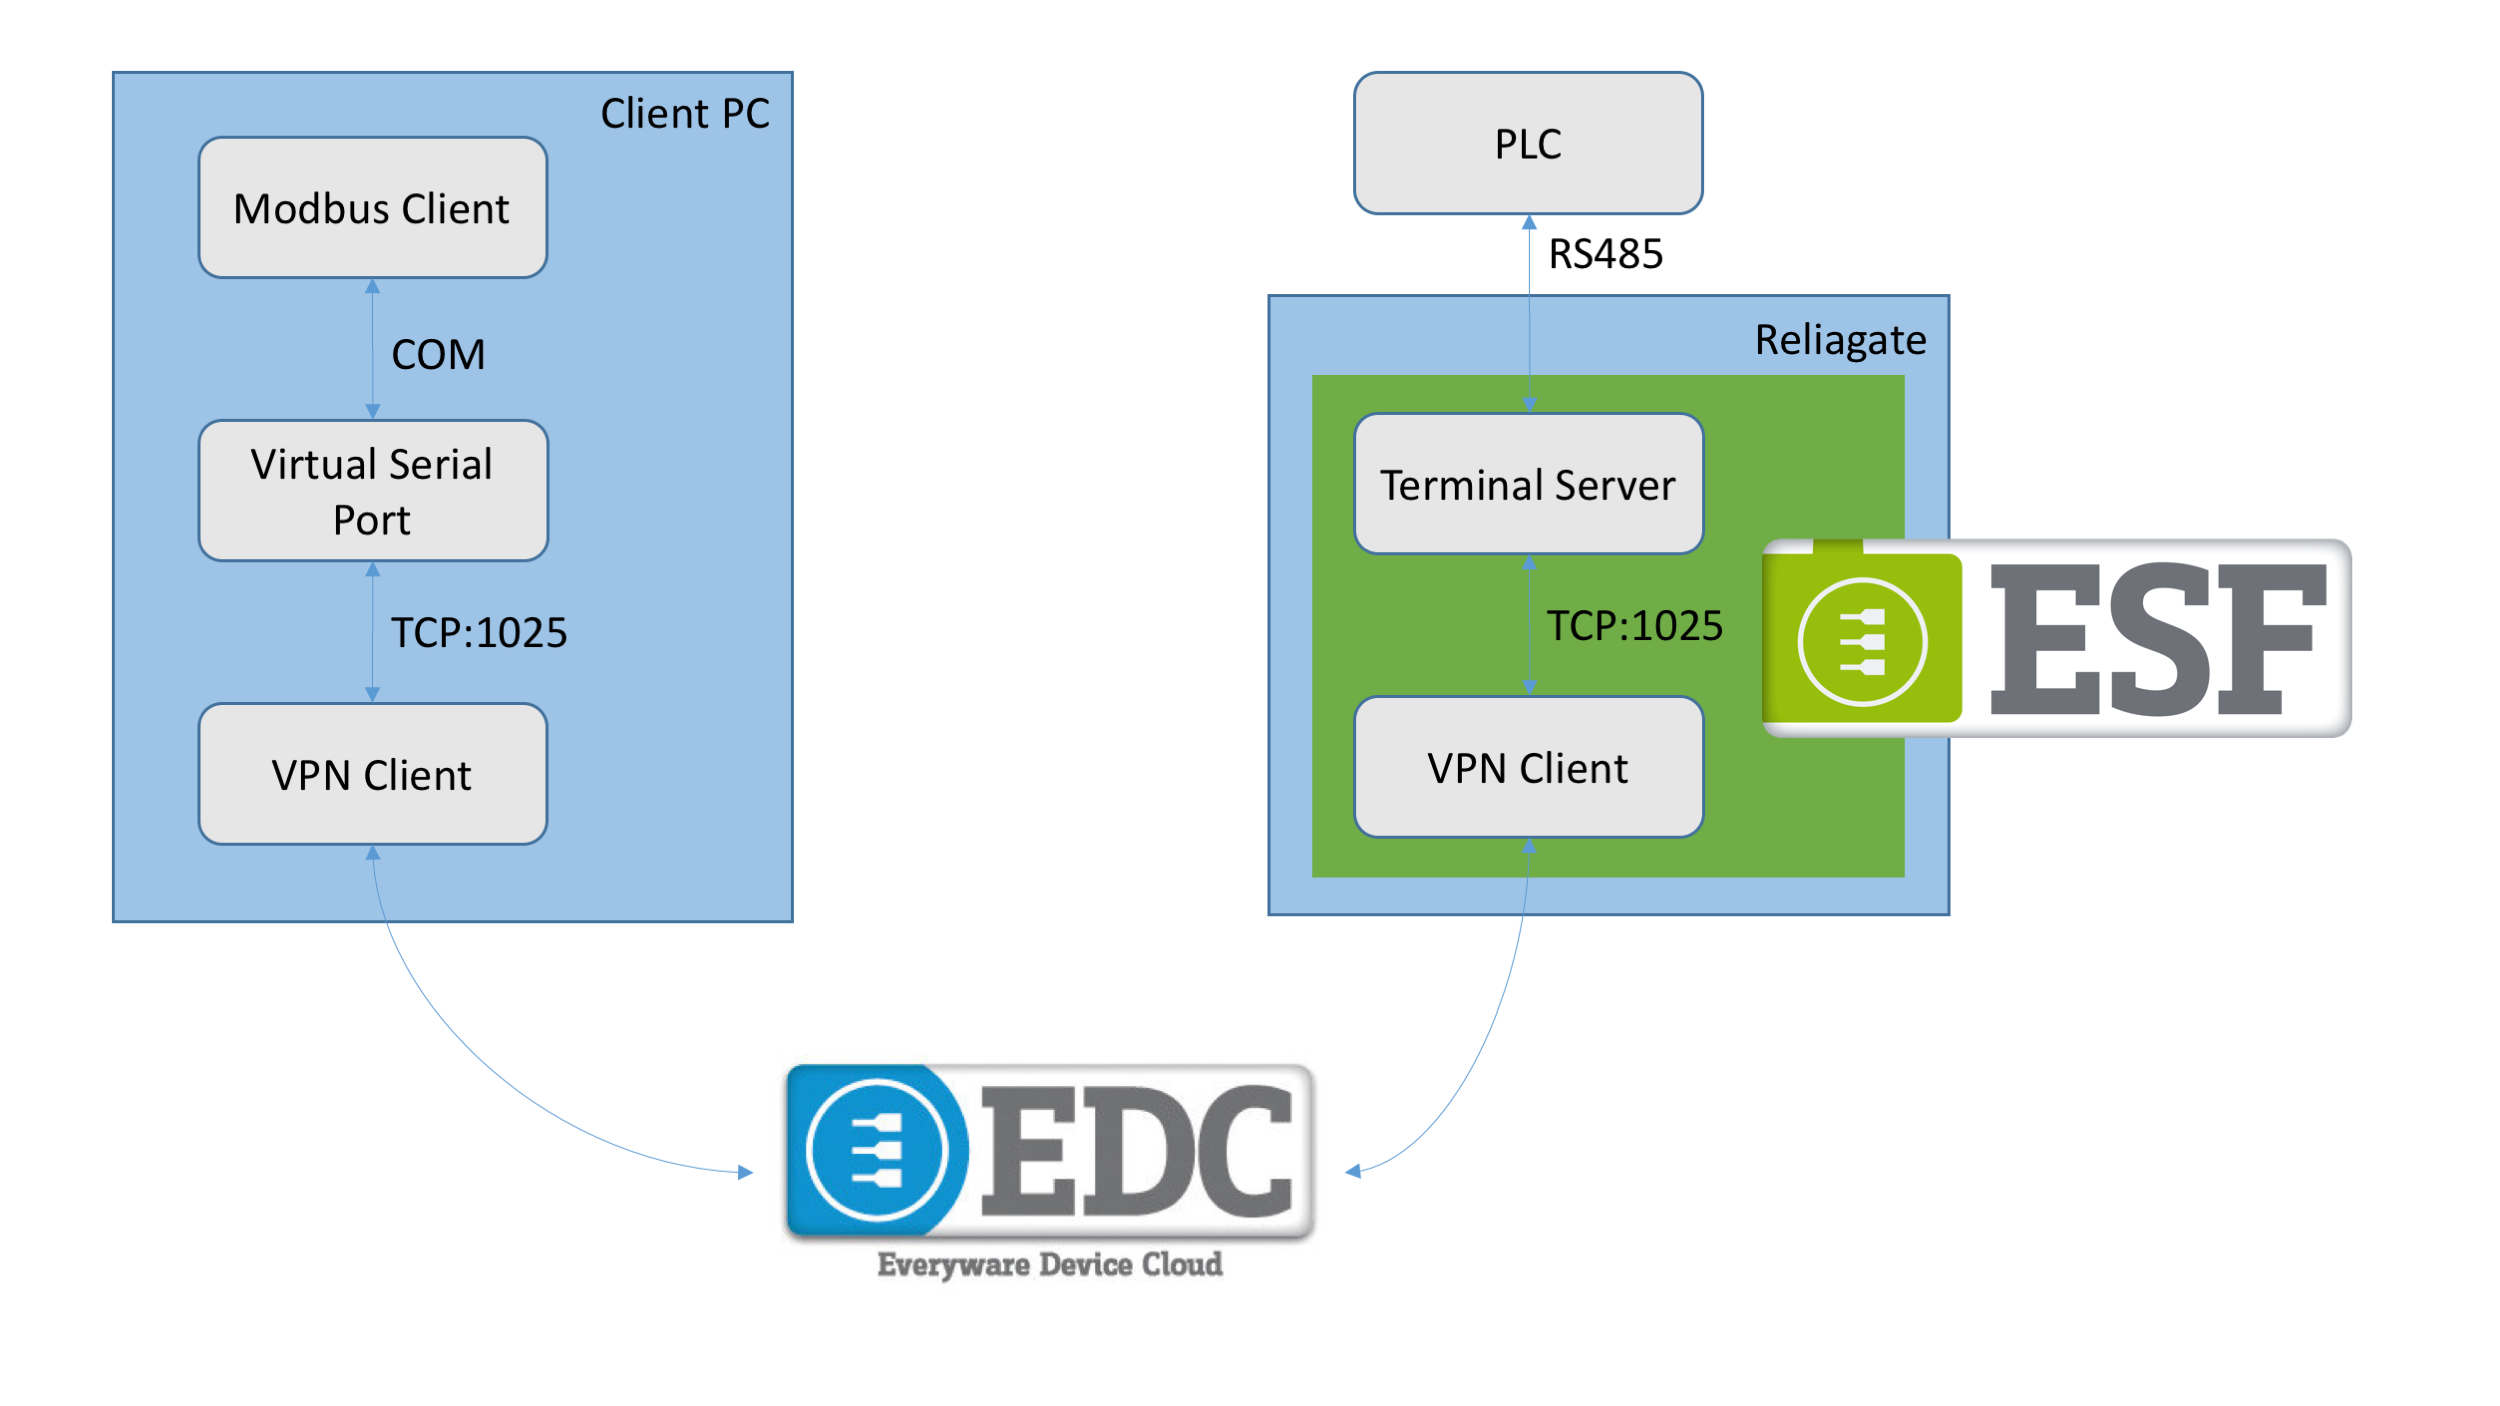
The objective of this section is to provide a simple but detailed guide on how to virtualize a serial port (RS485) using ESF Terminal Server service. The target is to read data from a PLC connected to a gateway from a remote client PC. The following figure shows the general configuration for this application.

How to configure the gateway
In the following a ReliaGATE is used to connect a PLC through a RS485 port. The gateway is equipped with ESF connected to Everyware Cloud. See here to configure the gateway to connect to Everyware Cloud.
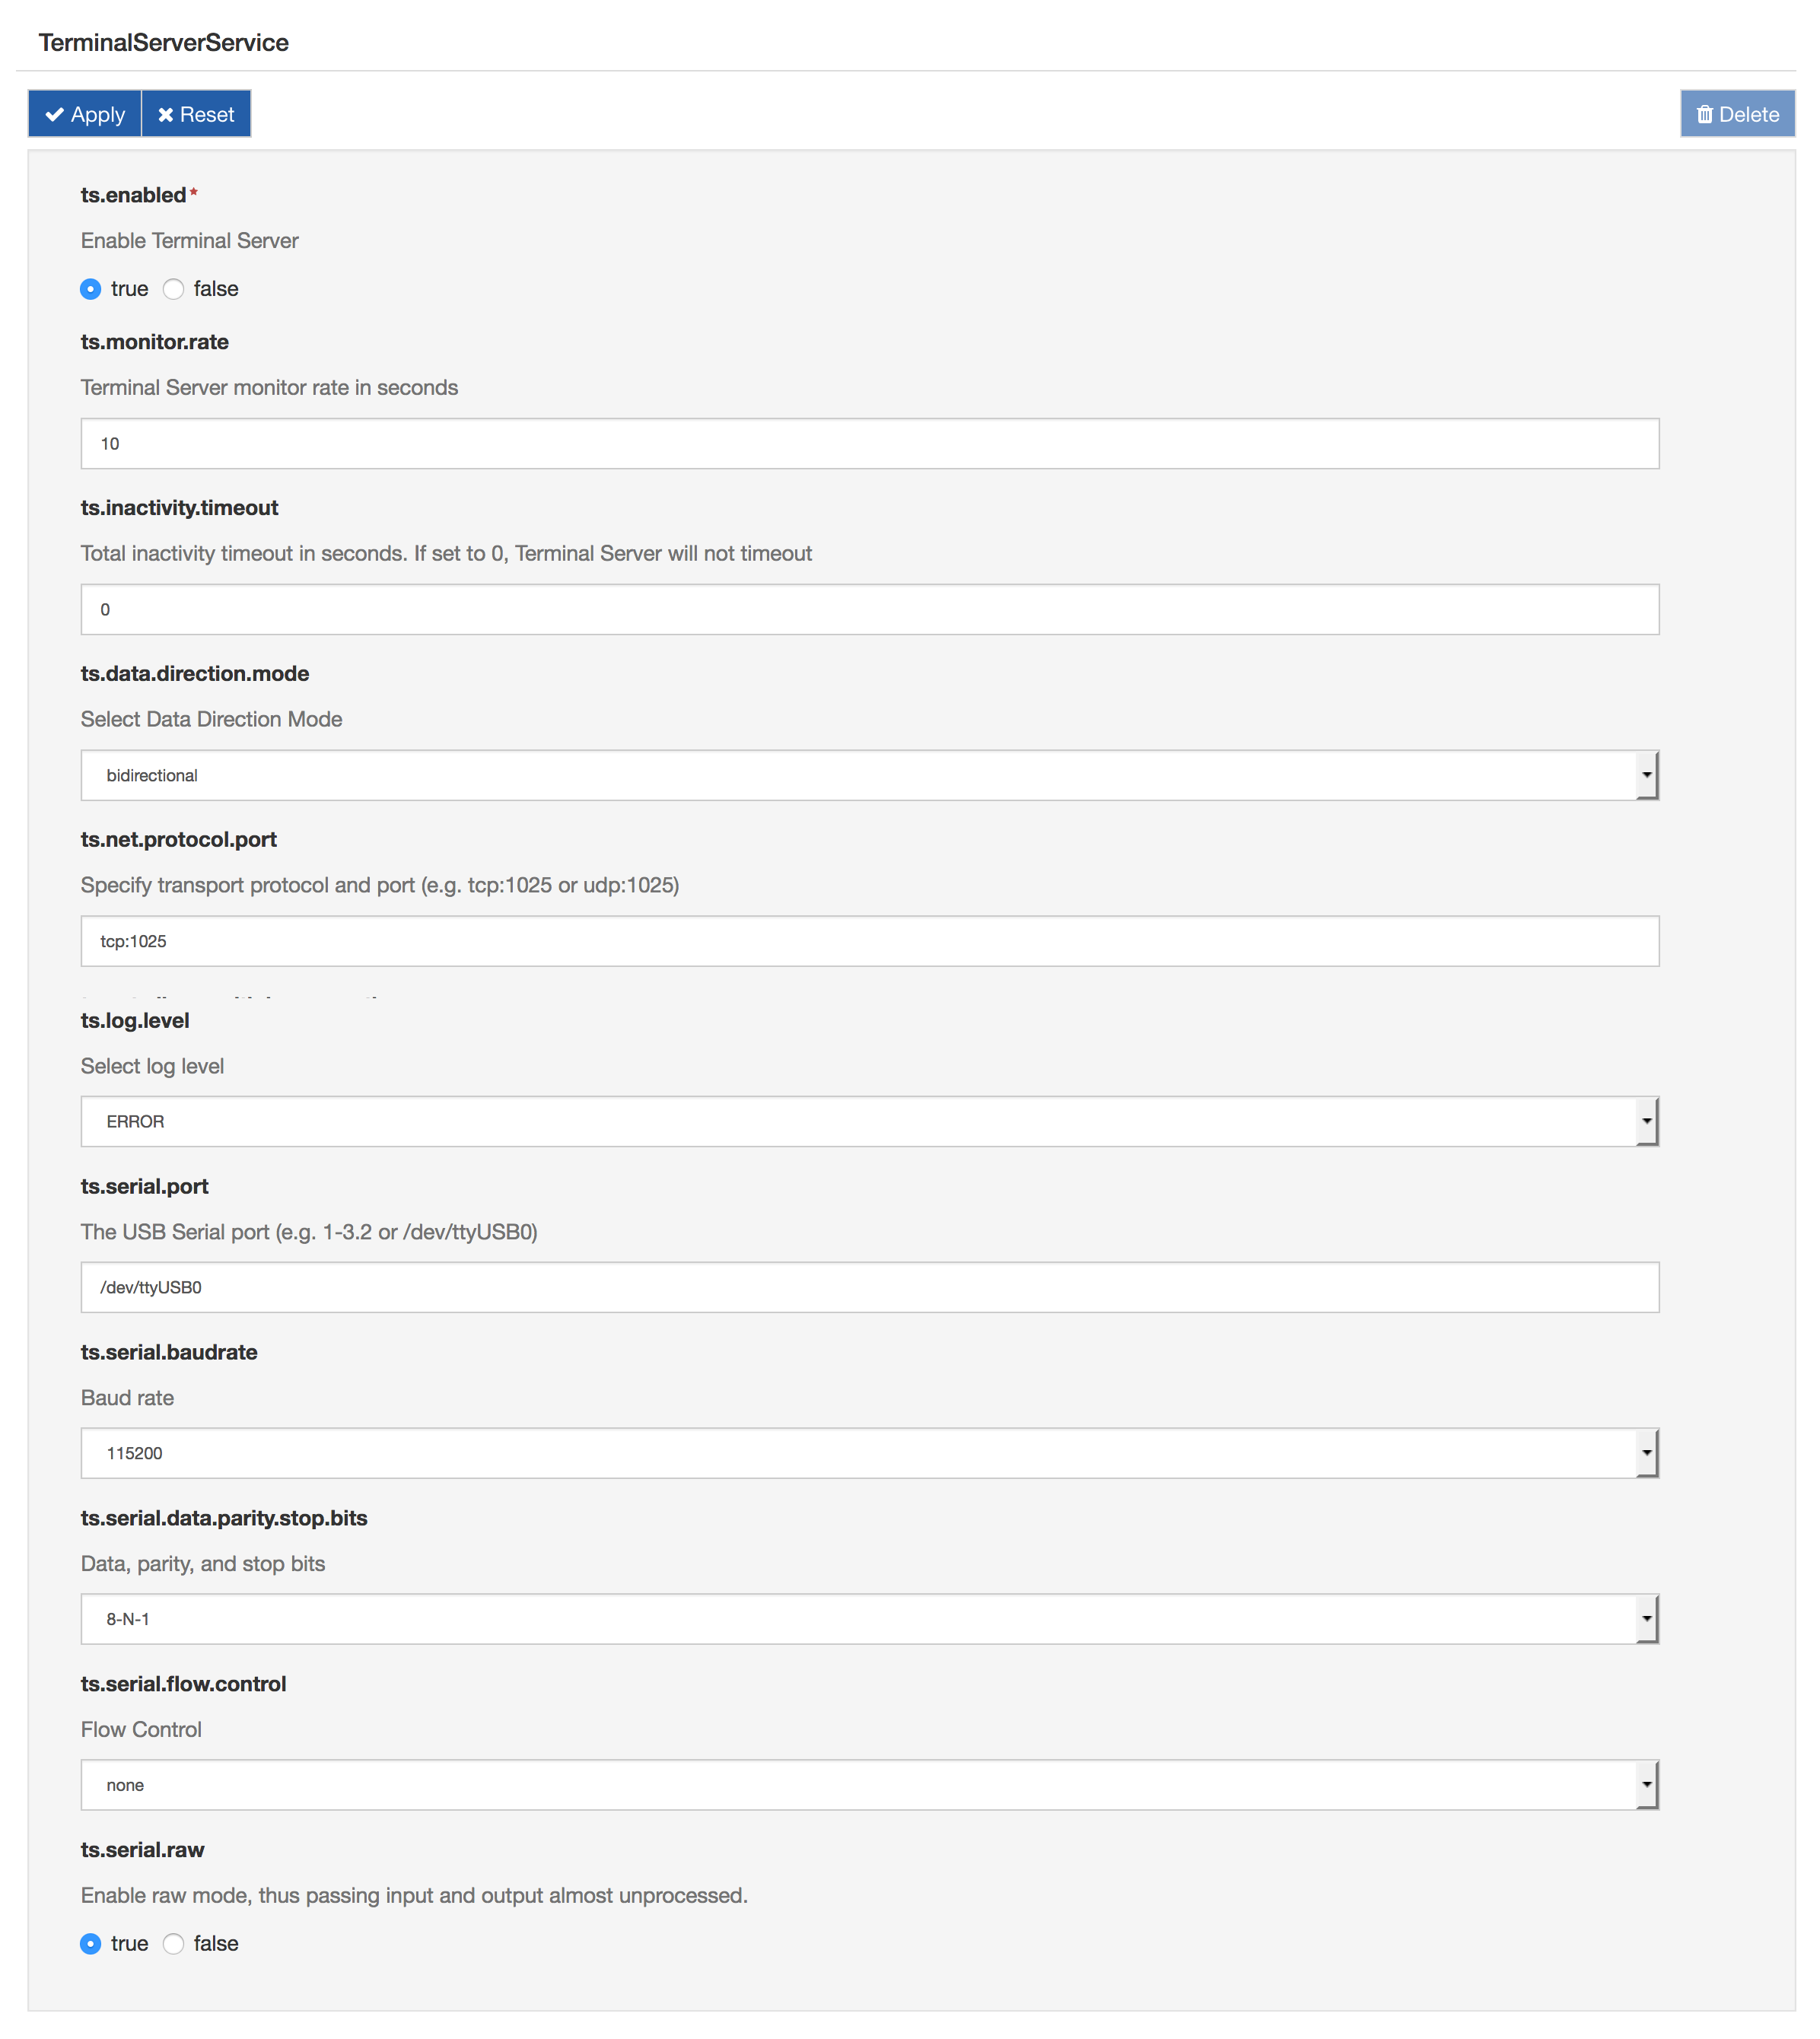
- Configure the Terminal Server service as shown in to the following figure. The ts.net.protocol.port sets the protocol and port that is used to forward the serial data. The ts.serial.port, ts.serial.baudrate, ts.serial.data.parity.stop.bits and ts.serial.flow.control properties are used to configure the serial connection to the PLC. Finally, ts.log.level controls the log level on the log file (/var/log/socatTS1.log).

- From the firewall tab, open the port configured at point 1 (i.e. 1025). See here to configure the firewall.
- Connect the PLC to the RS485 port on the device.
- From the EC console, open a VPN connection with the device and get the IP address assigned by the VPN server (e.g. 10.234.0.6) ad explained in the Remote Access section.
How to configure the client PC
- Install a VPN client in to the client PC. If a Windows OS is used, OpenVPN can be used for this example. The VPN client can be downloaded from
https://openvpn.net/index.php/download/58-open-source/downloads.html - Download from the VPN tab on EC console the proper VPN configuration file (.ovpn) and copy it on the client PC.
- Run the VPN client with the EC configuration file downloaded at point 2. If a Windows OS is used, launch a console (cmd) as administrator and go the folder where it is stored the VPN configuration file. Then type:
openvpn <name>.ovpn where <name> is the name of the VPN configuration file. - Type the username and password of the EC account when it is requested by the VPN client.
- Install a Virtual Serial Port application. If Windows OS is used, it can be found here.
- Run the Virtual Serial Port application as administrator and configure it setting the IP address of the gateway (the one assigned by the VPN server – i.e. 10.234.0.6) and the same port configured in the terminal server bundle (i.e. 1025).
- Now the PLC is virtually connected with the client PC and the internal registers can be read and written using a Modbus Client (i.e. ModScan for Windows OS).
Updated 4 months ago
