Legacy V2 X.509 Provisioning and Connection
Overview
This section explains how to provision a gateway and how to connect to the Azure IoT Services using X.509 certificates.
The Provisioning section describes how to provision a gateway into the Azure Portal.
The Create a X.509 cloud connection section describes how to create a new cloud connection in ESF and how to configure and use the TPM in the gateway to connect and authenticate into the selected Azure IoT Service.
Provisioning
X.509 Provisioning can be accomplished in two ways:
- Using Device Provisioning Service to provision device for Azure IoT Hub.
- Using Azure IoT Central Applications to provision device.
Using Device Provisioning Service to provision device for Azure IoT Hub
Prerequisites
Before adding a new X.509 enrollment to Device Provisioning Service, you must create a PEM formatted key and self-signed certificate for your device. Follow the directions here or create your own private key and self-signed certificate.
Save the "Common Name" for device enrollment.
The "Common Name" and Device ID must be in all lowercase letters for device enrollment in Azure IoT
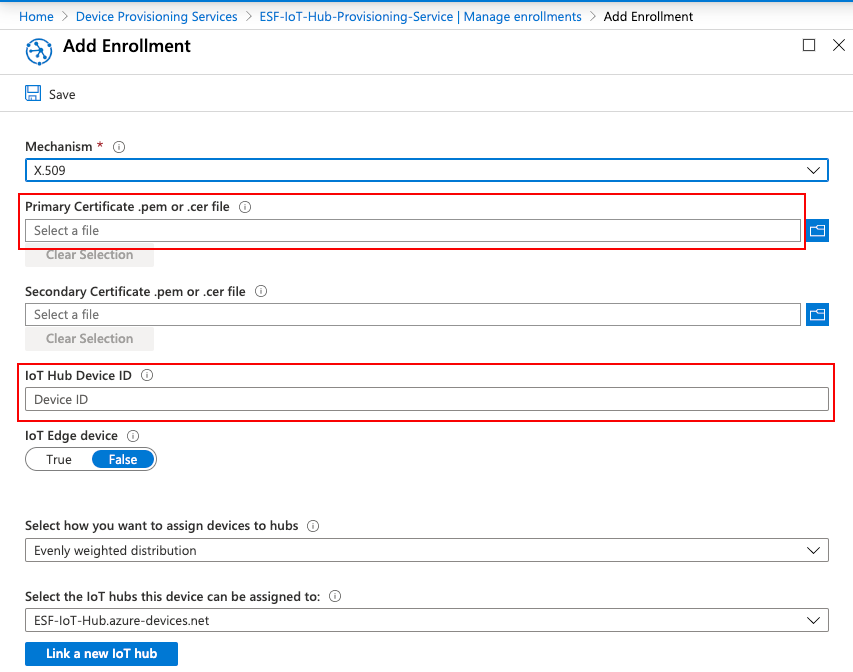
Add a new enrollment to Device Provisioning Service by selecting + Add individual enrollment from the Manage enrollments page.
Choose "X.509" as the Mechanism.
Add your self-signed device certificate in the Primary Certificate field.
Add the name of your certificate's "Common Name" as the IoT Hub Device ID field.

Click Save and you should now see a new entry in the Individual enrollments column.
Using Azure IoT Central Applications to provision device
Create a Device
You must Create your device in your Azure IoT Central Application before provisioning using X.509 credentials.
Create X.509 CA Certificate for IoT Central
From command line, generate a root private key and X.509 certificate using the following command:
openssl req -x509 -newkey rsa:2048 -keyout root-private-key.pem -nodes -out root-cert.pem
You must enter at least one name in one of the configuration fields. Your entries are negligible here.
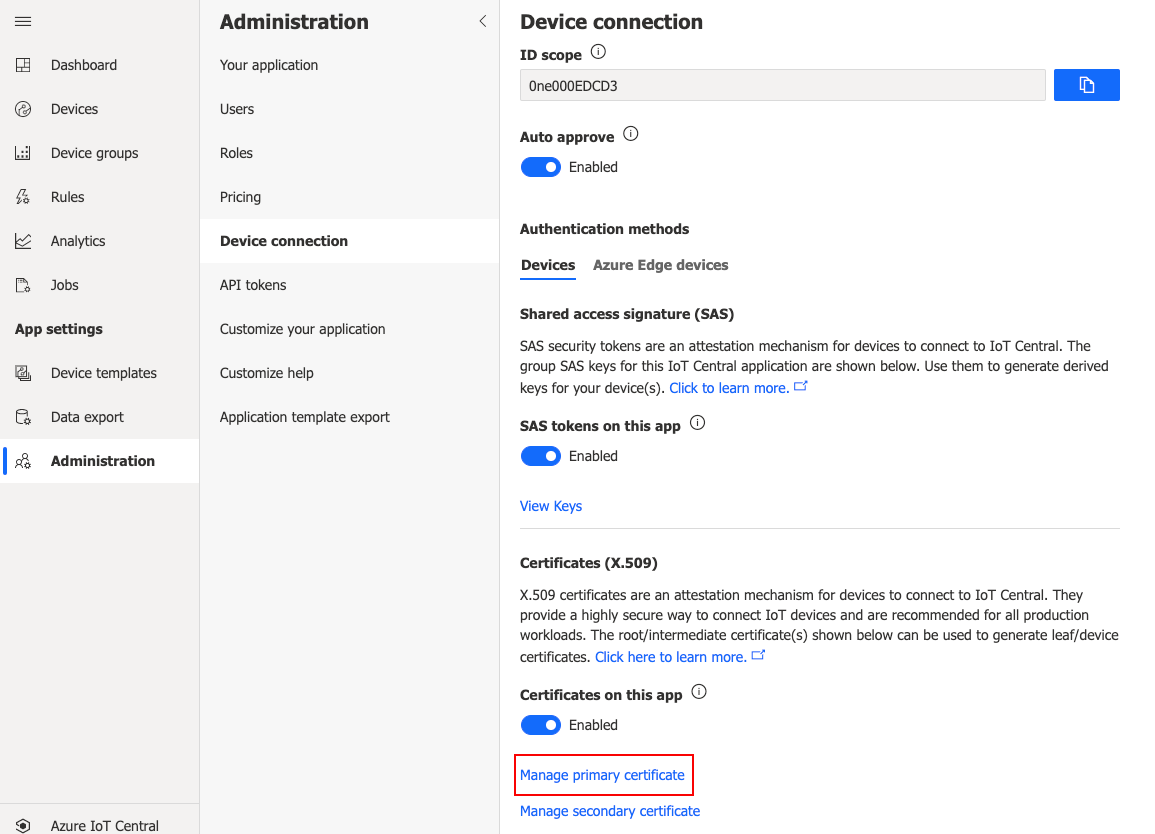
Navigate to your application in IoT Central Applications, go to Administration under the App settings panel, and select Device connection.
Select "Manage primary certificate" under Certificates (X.509).

Load your root-cert.pem file under Primary.
- NOTE: You should see "Not verified" under Primary in red.
Click the Refresh icon under Verification Code to generate a new verification code. Save this code. Leave this window open.
Return to your command prompt and create a verification key using the following command:
openssl genrsa -out verification.key 2048Now, create your verification certificate using your verification key using this command:
openssl req -new -key verification.key -out verification.csr
You must use your saved "Verification Code" from IoT Central as the "Common Name" field while creating your verification.csr.
Create a proof of possession certificate and sign your verification.csr with the root private key you previously created with this command:
openssl x509 -req -in verification.csr -CA root-cert.pem -CAkey root-private-key.pem -CAcreateserial -out verificationCert.pem -days 365 -sha256This created verificationCert.pem is your proof of possession for your Public Key Certificate and made it valid for 1 year (365 days).
Return back to IoT Central and click Verify, choose the verificationCert.pem and you should now see a green "Verified" under the dialogue's Primary field. Close the dialogue.
Create Private Key and CA-Signed CSR on Device
Create a device private key and CSR using this command:
openssl req -out device.csr -new -newkey rsa:2048 -nodes -keyout device-private-key.pem
You must use the Device ID of your IoT Central device as the CSR's "Common Name" field.
Next, sign the CSR using your X.509 root certificate and root private key enforcing SHA-256 with this command:
openssl x509 -req -days 365 -in device.csr -CA root-cert.pem -CAkey root-private-key.pem -CAcreateserial -out device.crt -sha256If verified with your CA Certificate, you should see an output similar to below:
Signature ok
subject=/CN=eurotechtestdevice
Getting CA Private Key
We will use this device.crt and device-private-key.pem upon connecting to the Azure IoT Broker detailed in Creating a Custom Connection.
Create a X.509 cloud connection
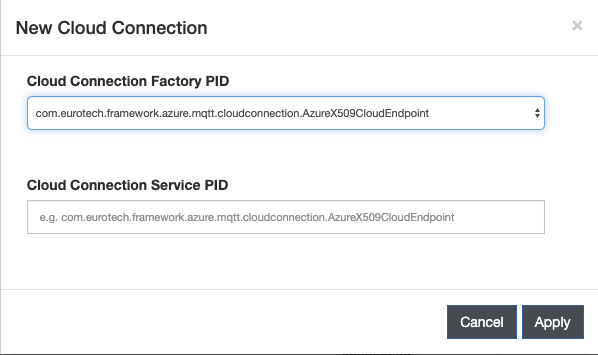
In the ESF Web interface, create a new Cloud Connection using Factory AzureX509CloudEndpoint

There are two methods of connection using Azure IoT Portal:
- Connect using Azure IoT Hub
- Connect using Azure IoT Central
Select the new connection and configure X509MqttDataTransport with the properties defined for your specific connection method:
Connect Using Azure IoT Hub
- Global Endpoint - Enter the Global Device endpoint of your Azure IoT Device Provisioning Service.
- Scope ID - Enter the ID Scope from the Overview page of the Azure IoT Device Provisioning Service.
- Device Certificate - Enter the device X.509 Public Key Certificate you just created in Provisioning.
- Device Private Key - Enter the device private key you created in Provisioning.
Connect Using Azure IoT Central
- Global Endpoint - Enter the Global Device endpoint of your Azure IoT Device Provisioning Service.
- Scope ID - Enter the ID Scope from your Azure IoT Central Application Endpoint.
- Device Certificate - Enter the device X.509 Public Key Certificate you just created in Provisioning.
- Device Private Key - Enter the device private key you created in Provisioning.
Updated 3 months ago
