LoRa Driver
This driver interfaces to the LoRa® packet forwarder by Semtech running on localhost and performs some of the functions that in a LoRaWAN® are operated by the Network Server and the Application Server.
End-nodes are represented by channels that allow configuring the LoRa® physical layer and the security material used by the LoRaWAN® network and application layer.
The LoRa® driver allows to transmit and receive raw payloads. Encoding and decoding the payload is handed off to client code, the Wires framework or to the back-end of cloud computing platform.
Features
The LoRa® driver features include:
- Support for ABP and OTAA activation.
- Support for ADR management.
- Support for Downlink messages (only Classe A mode currently supported)
- The driver decrypts the LoRa® payload and returns it in the form of a byte array coded as an hex string.
## Installation
In the same way as the other Drivers supported by ESF, it is distributed as a deployment package on Eclipse Marketplace. It can be installed following the instructions provided here.
Instance creation
A new LoRa® driver instance can be created either by clicking the New Driver button in the dedicated Drivers and Assets Web UI section or by clicking on the + button under Services. In both cases, the com.eurotech.framework.driver.lora factory must be selected and a unique name must be provided for the new instance.
Channel configuration
Each sensor attached to the gateway is defined by a channel configuration. The LoRa® driver channel configuration is composed of the following parameters:
- name: the channel name.
- type: the channel type, (
READ,WRITE, orREAD_WRITE). - value type: the Java type of the channel value (must be STRING, the channel will always return an hex string representing a byte array).
- listen: when selected, a listener will be attached to this channel. Any event on the channel will be reported using a callback and the decoded value will be emitted. For Lora driver this must be enabled
- dev.eui: 64 bit end-device identifier.
- dev.address: 32 bit device address.
- app.key: application key.
- appS.key: application session key.
- nwkS.key: network session key.
For an OTAA device the application key (app.key) is mandatory, appS.key and nwkS.key will be automatically generated during the acticvation process.
For an ABP device, app.key is optional, appS.key and nwkS.key are mandatory.
Adaptative Data Rate management
Adaptive data-rate lets LoRa® Server control the data-rate and tx-power of the device, so that it uses less airtime and less power to transmit the same amount of data. This is not only beneficial for the energy consumption of the device, but also optimizes the spectrum.
The parameter that controls the data rate is the “’Spreading Factor” (for detailed explanation see https://www.semtech.com/uploads/documents/an1200.22.pdf)
(Important note : This ADR management is currently only valid for European Standard.)
We are considering 6 levels for the Data Rate :
Data Rate | Configuration | bits/s | Max payload |
|---|---|---|---|
DR0 | SF12/125kHz | 250 | 59 |
DR1 | SF11/125kHz | 440 | 59 |
DR2 | SF10/125kHz | 980 | 59 |
DR3 | SF9/125kHz | 1760 | 123 |
DR4 | SF8/125kHz | 3125 | 230 |
DR5 | SF7/125kHz | 5470 | 230 |
Currently, the LoRa® driver implements a simplified management of ADR. The configuration of the ADR is included in the channel definition :

If ADR is enabled for a sensor, the SF value and Tx Power will be programmed by a command sent from the gateway to the sensor only if the current Spreading Factor is higher than the one configured for the channel AND the SNR is greater than 0.
By default a LoRa® sensor starts with a SF = SF12/125KHz and a Tx Power = 14 dBm. On the first packet received, the gateway will determine if the Spread factor and Tx power can be modified and will send a command to apply it.
After this step, the sensor will automatically increase SF if the signal is bad until it reaches a correct value.
In LoRaWAN® ADR management, the gateway can only decrease the SF and the sensor can only increase the SF.
Using LoRa® Asset in a Wires Graph
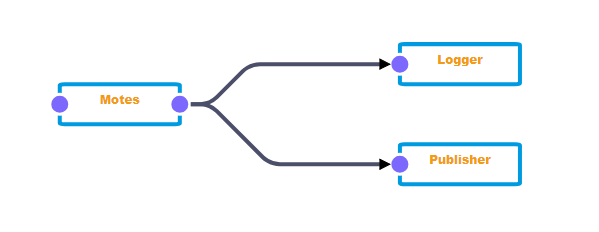
Using the Wires functionality of ESF will take care of publishing the data corresponding to the channels defined previously in the Cloud Platform of your choice.

The String exported by each channel is a json string including the metadata of the packet and the payload decrypted represented by an hex string:
{"rssi":"-74","freq":"868.1","datr":"SF12BW125","lsnr":"9.5","codr":"4/5","rfch":"1","chan":"0","time":"","fcnt":1,"fport":1,"data":"8E1800000EC8"}
Adding a filter
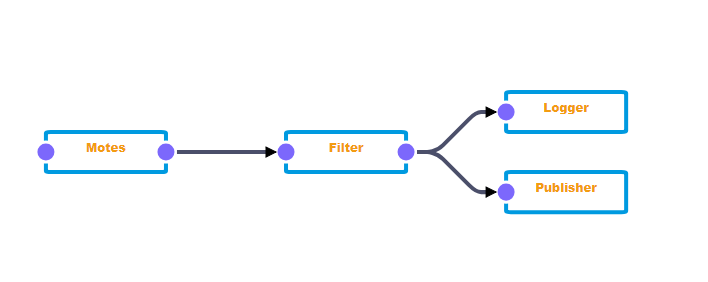
It is generally a good idea to use a javascript filter to publish only useful data after decoding the payload. You need first to install the filter component from Eclipse MarketPlace.

We use a JSON parser to extract each field and publish only the values that interest us. In the example below, we publish the rssi and the temperature decoded from the payload:
var record = input.records[0]
for (var prop in record) {
  if(prop==="mySensor"){
	   var str = record[prop].getValue();
	   logger.info(str);
	   obj = JSON.parse(str);
	   logger.info("rssi = {}",obj.rssi);
	   var sdat = obj.data;
	   logger.info("data = {}",sdat);

     // convert the payload to a byte array
	   var a = []
	   for (var i = 0; i < sdat.length; i += 2) {
	      a.push(parseInt(sdat.substr(i, 2),16));
	   }
	   logger.info("temperature={}",a[1]);

     // create the record that will be published
	   var outRecord = newWireRecord()
	   outRecord.assetName = newStringValue(record.assetName.getValue());
	   outRecord.mote = newStringValue(prop);
	   outRecord.rssi = newStringValue(obj.rssi);
	   outRecord.temperature = newIntegerValue(a[1]);

     // publish
	   output.add(outRecord);
  }
}
Downlink management
In LoRaWAN® standard a downlink message is sent from the application to the sensor. It will be used, for example, to send a new configuration to the sensor (eg data publish frequency, or sensitivity etc …).
In Class A mode (the only mode currently supported by the driver), downlink messages can only be sent during the receive window opened after an uplink message (from sensor to application) has been sent by the sensor.
The LoRa® driver will store the message to send to the sensor and will send it at the next uplink reception.
How to transmit a downlink message to the LoRa® driver:
In the most common case, the message will be sent by the external application that manages the LoRa® sensors, using the Cloud connection.
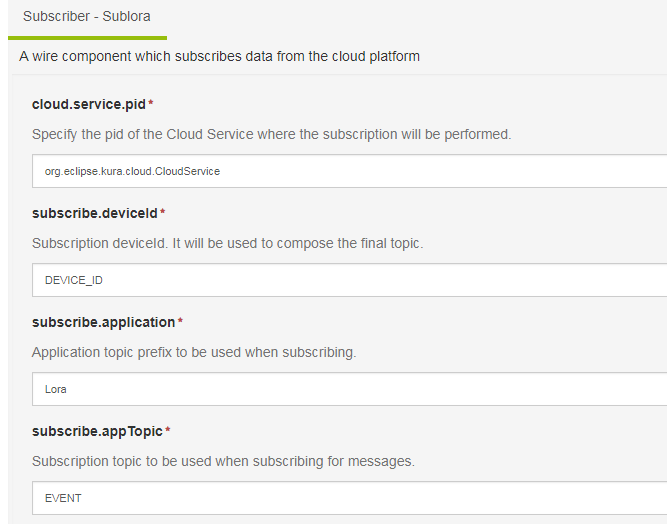
We will add to the Wires graph a Cloud subscriber that will receive these messages and pass it through a Javascript Filter to the asset containing the LoRa® channels:

Sublora = Subscriber configured to receive messages on a given topic:

In this case the messages are sent on topic: [accountname]/DEVICE_ID/Lora/EVENT and must contain a metric in the following format: [name of the channel]:[payload to send to the sensor]
Eg : {"metrics:{"Adeunis":"4555524F54454348"}} to send the message “4555524F54454348” to the sensor Adeunis.
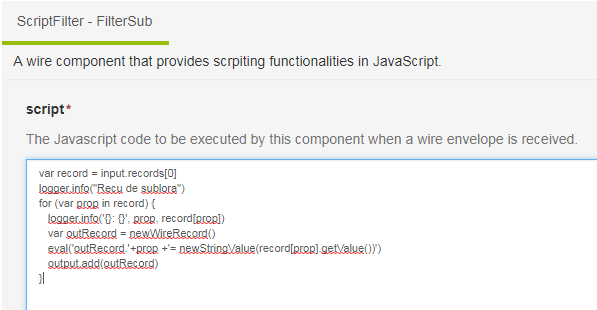
The message received is then transferred to a JavaScript Filter that will extract the payload to be transmitted to the LoRa® sensor:

This script uses the eval function to build a metric containing the name of the channel (prop) and the payload (record[prop].getValue()).
This payload must be a string representing an array of bytes coded in hexadecimal. For example, here: “4555524F54454348” represents the string “EUROTECH”.
The channel concerned in the asset (Mote) receives the message and stores it until it receives an uplink message from the concerned channel.
The configuration of the channel must be as follows:

• Type must be READ_WRITE.
• Value.type must be STRING
• And listen must be checked (in any case for LoRa® driver listen must be checked).
Important note:
The subscriber will receive messages in the format configured for the payload.encoding in the Cloud Service.
It can be Kura Protobuf or Simple json.
Be careful to send messages in the right format.
Updated 3 months ago
