SaS Provisioning and Connection
Overview
This section explains how to provision a gateway and how to connect to the Azure IoT Services using SaS. This connection method can only be used with IoT Hub DPS Individual Enrollment, IoT Hub DPS Enrollment Group, IoT Central Individual Enrollment, or IoT Central Enrollment Group.
ESF Cloud Connector for Azure IoT, Version 2.0.0 And Above OnlyThese instructions apply to the ESF Cloud Connector for Azure IoT, Version 2.0.0 and above. See Legacy v2 Azure IoT Connection if you are using any version under 2.0.0.
Provisioning
SaS Provisioning can be accomplished in four ways:
- Start at Provision Device Using IoT Hub DPS Individual Enrollment for IoT Hub DPS Individual Enrollment
- Start at Provision Device Using IoT Hub DPS Enrollment Group for IoT Hub DPS Enrollment Group
- Start at Provision Device Using IoT Central Individual Enrollment for IoT Central Individual Enrollment
- Start at Provision Device Using IoT Central Enrollment Group for IoT Central Enrollment Group
Provision Device Using IoT Hub DPS Individual Enrollment
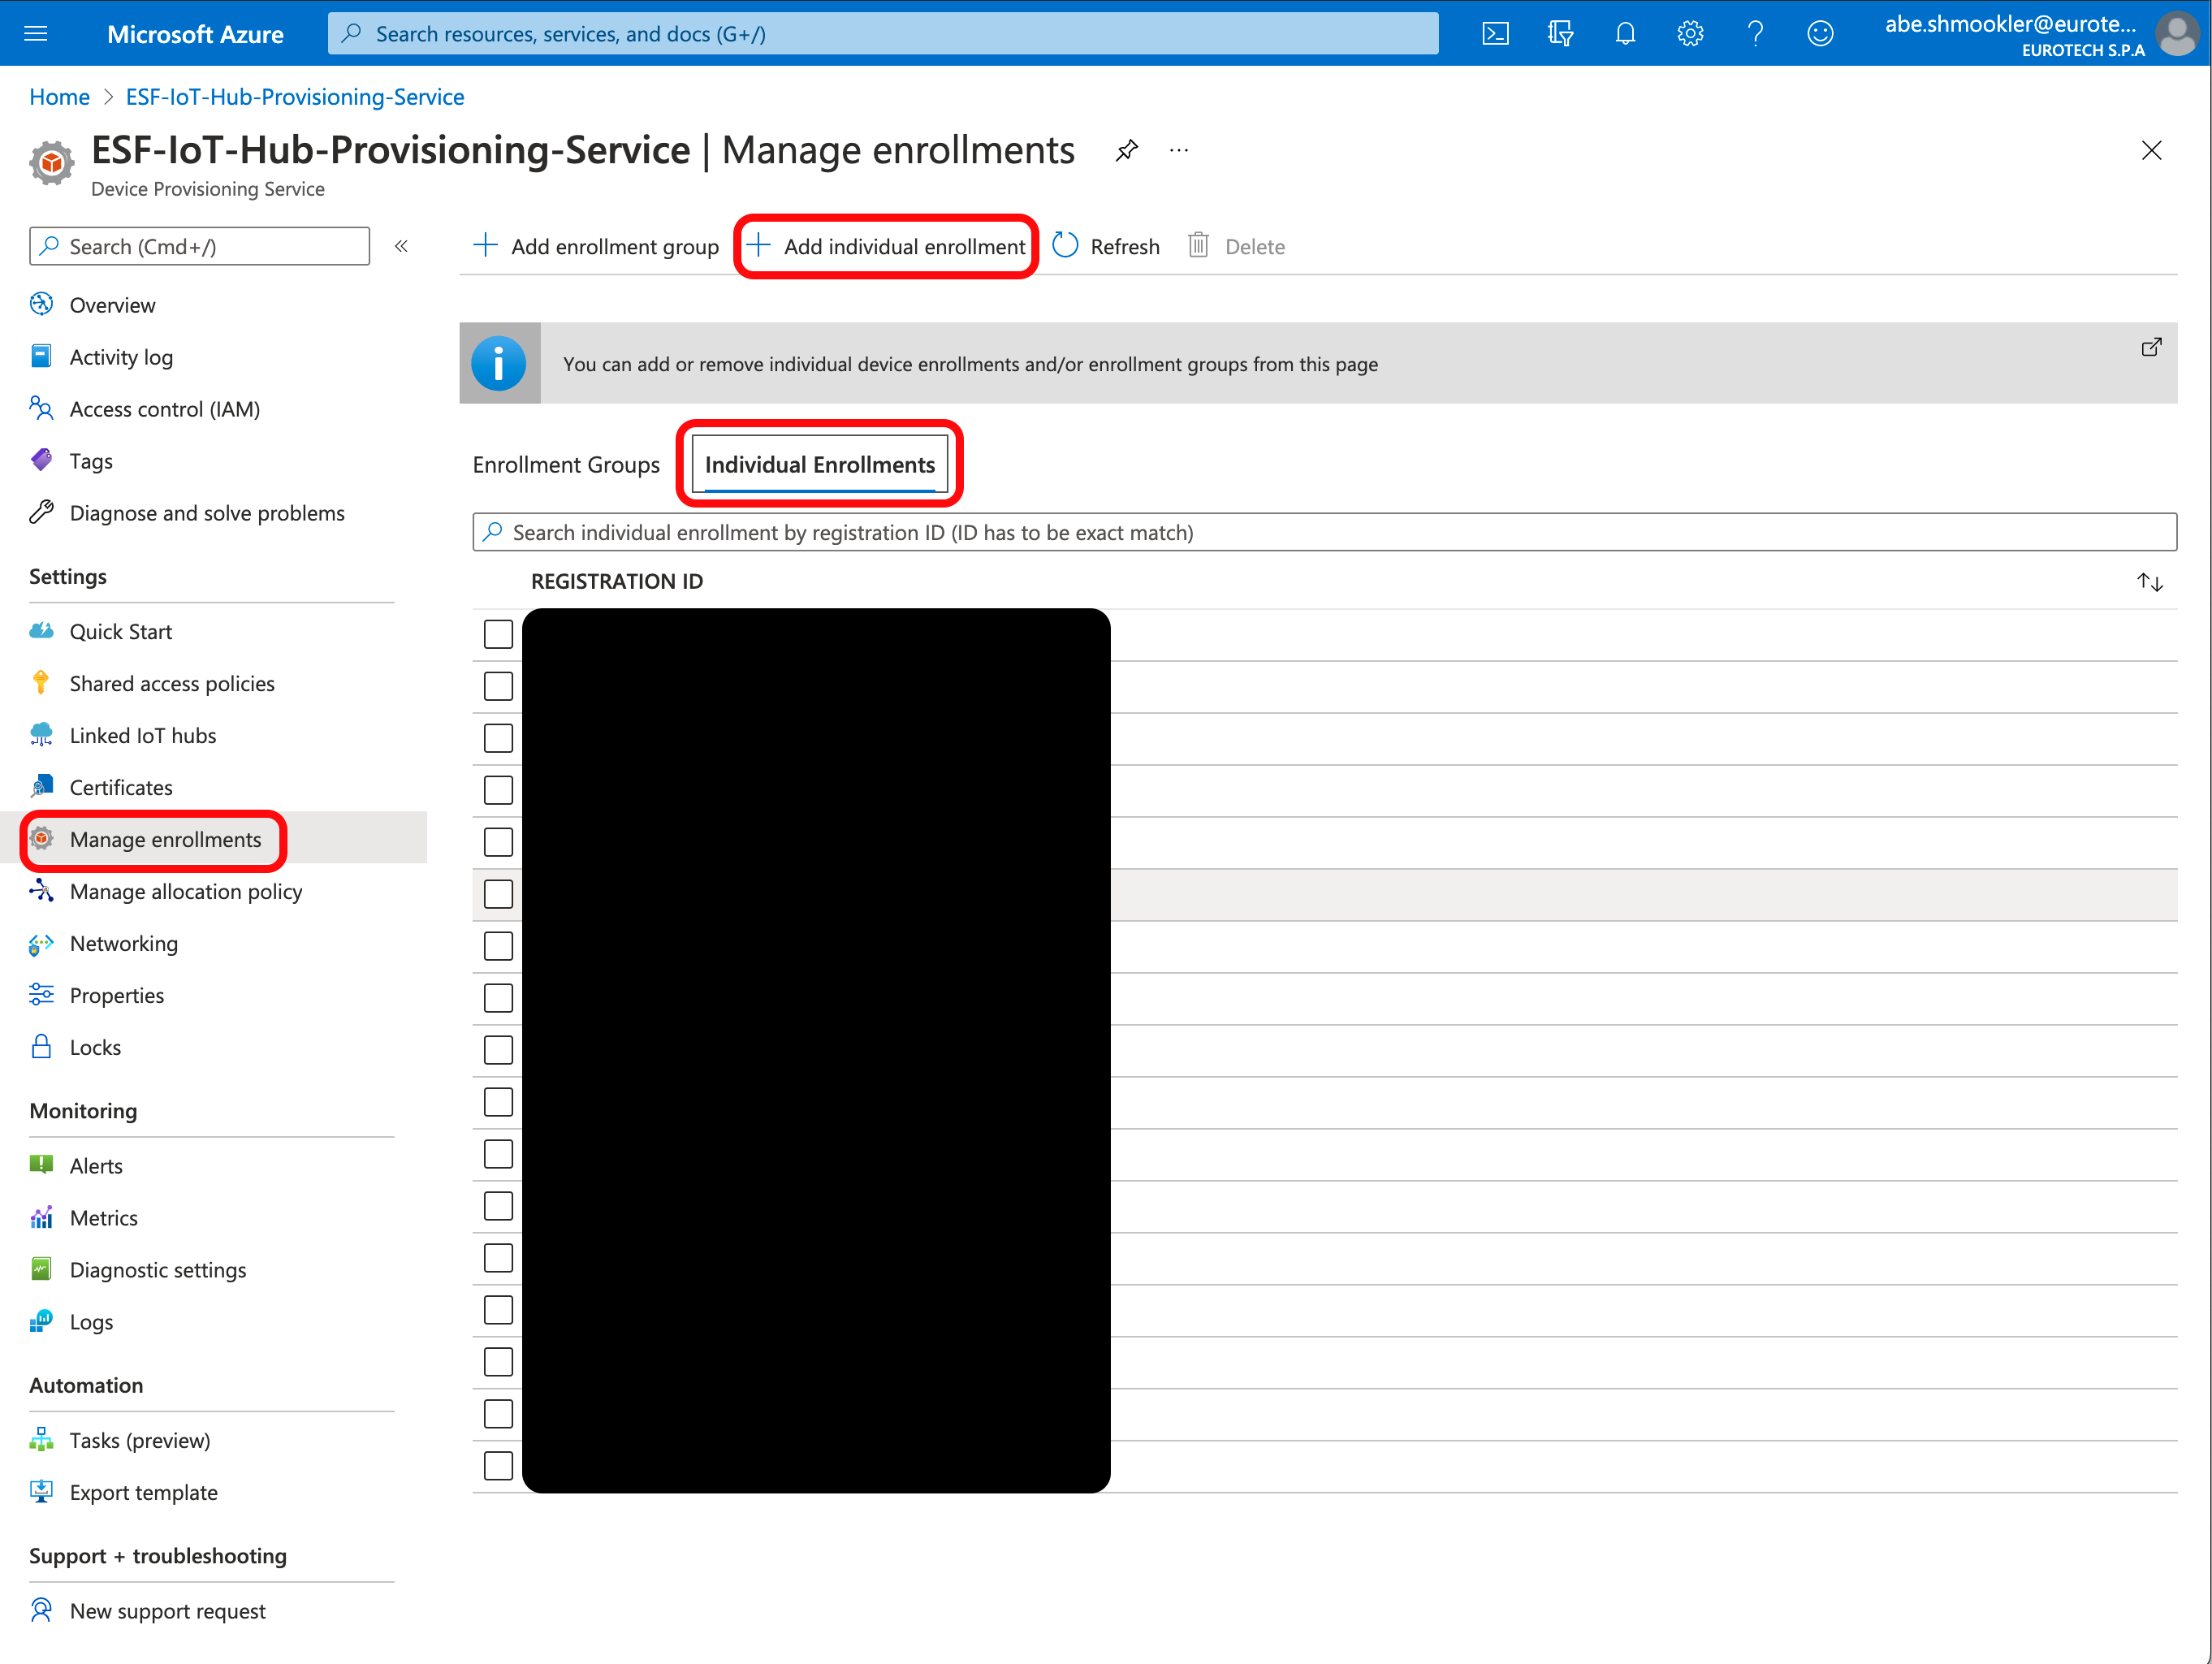
Go to the Manage Enrollments page of your DPS in your Azure Portal and click + Add individual enrollment.
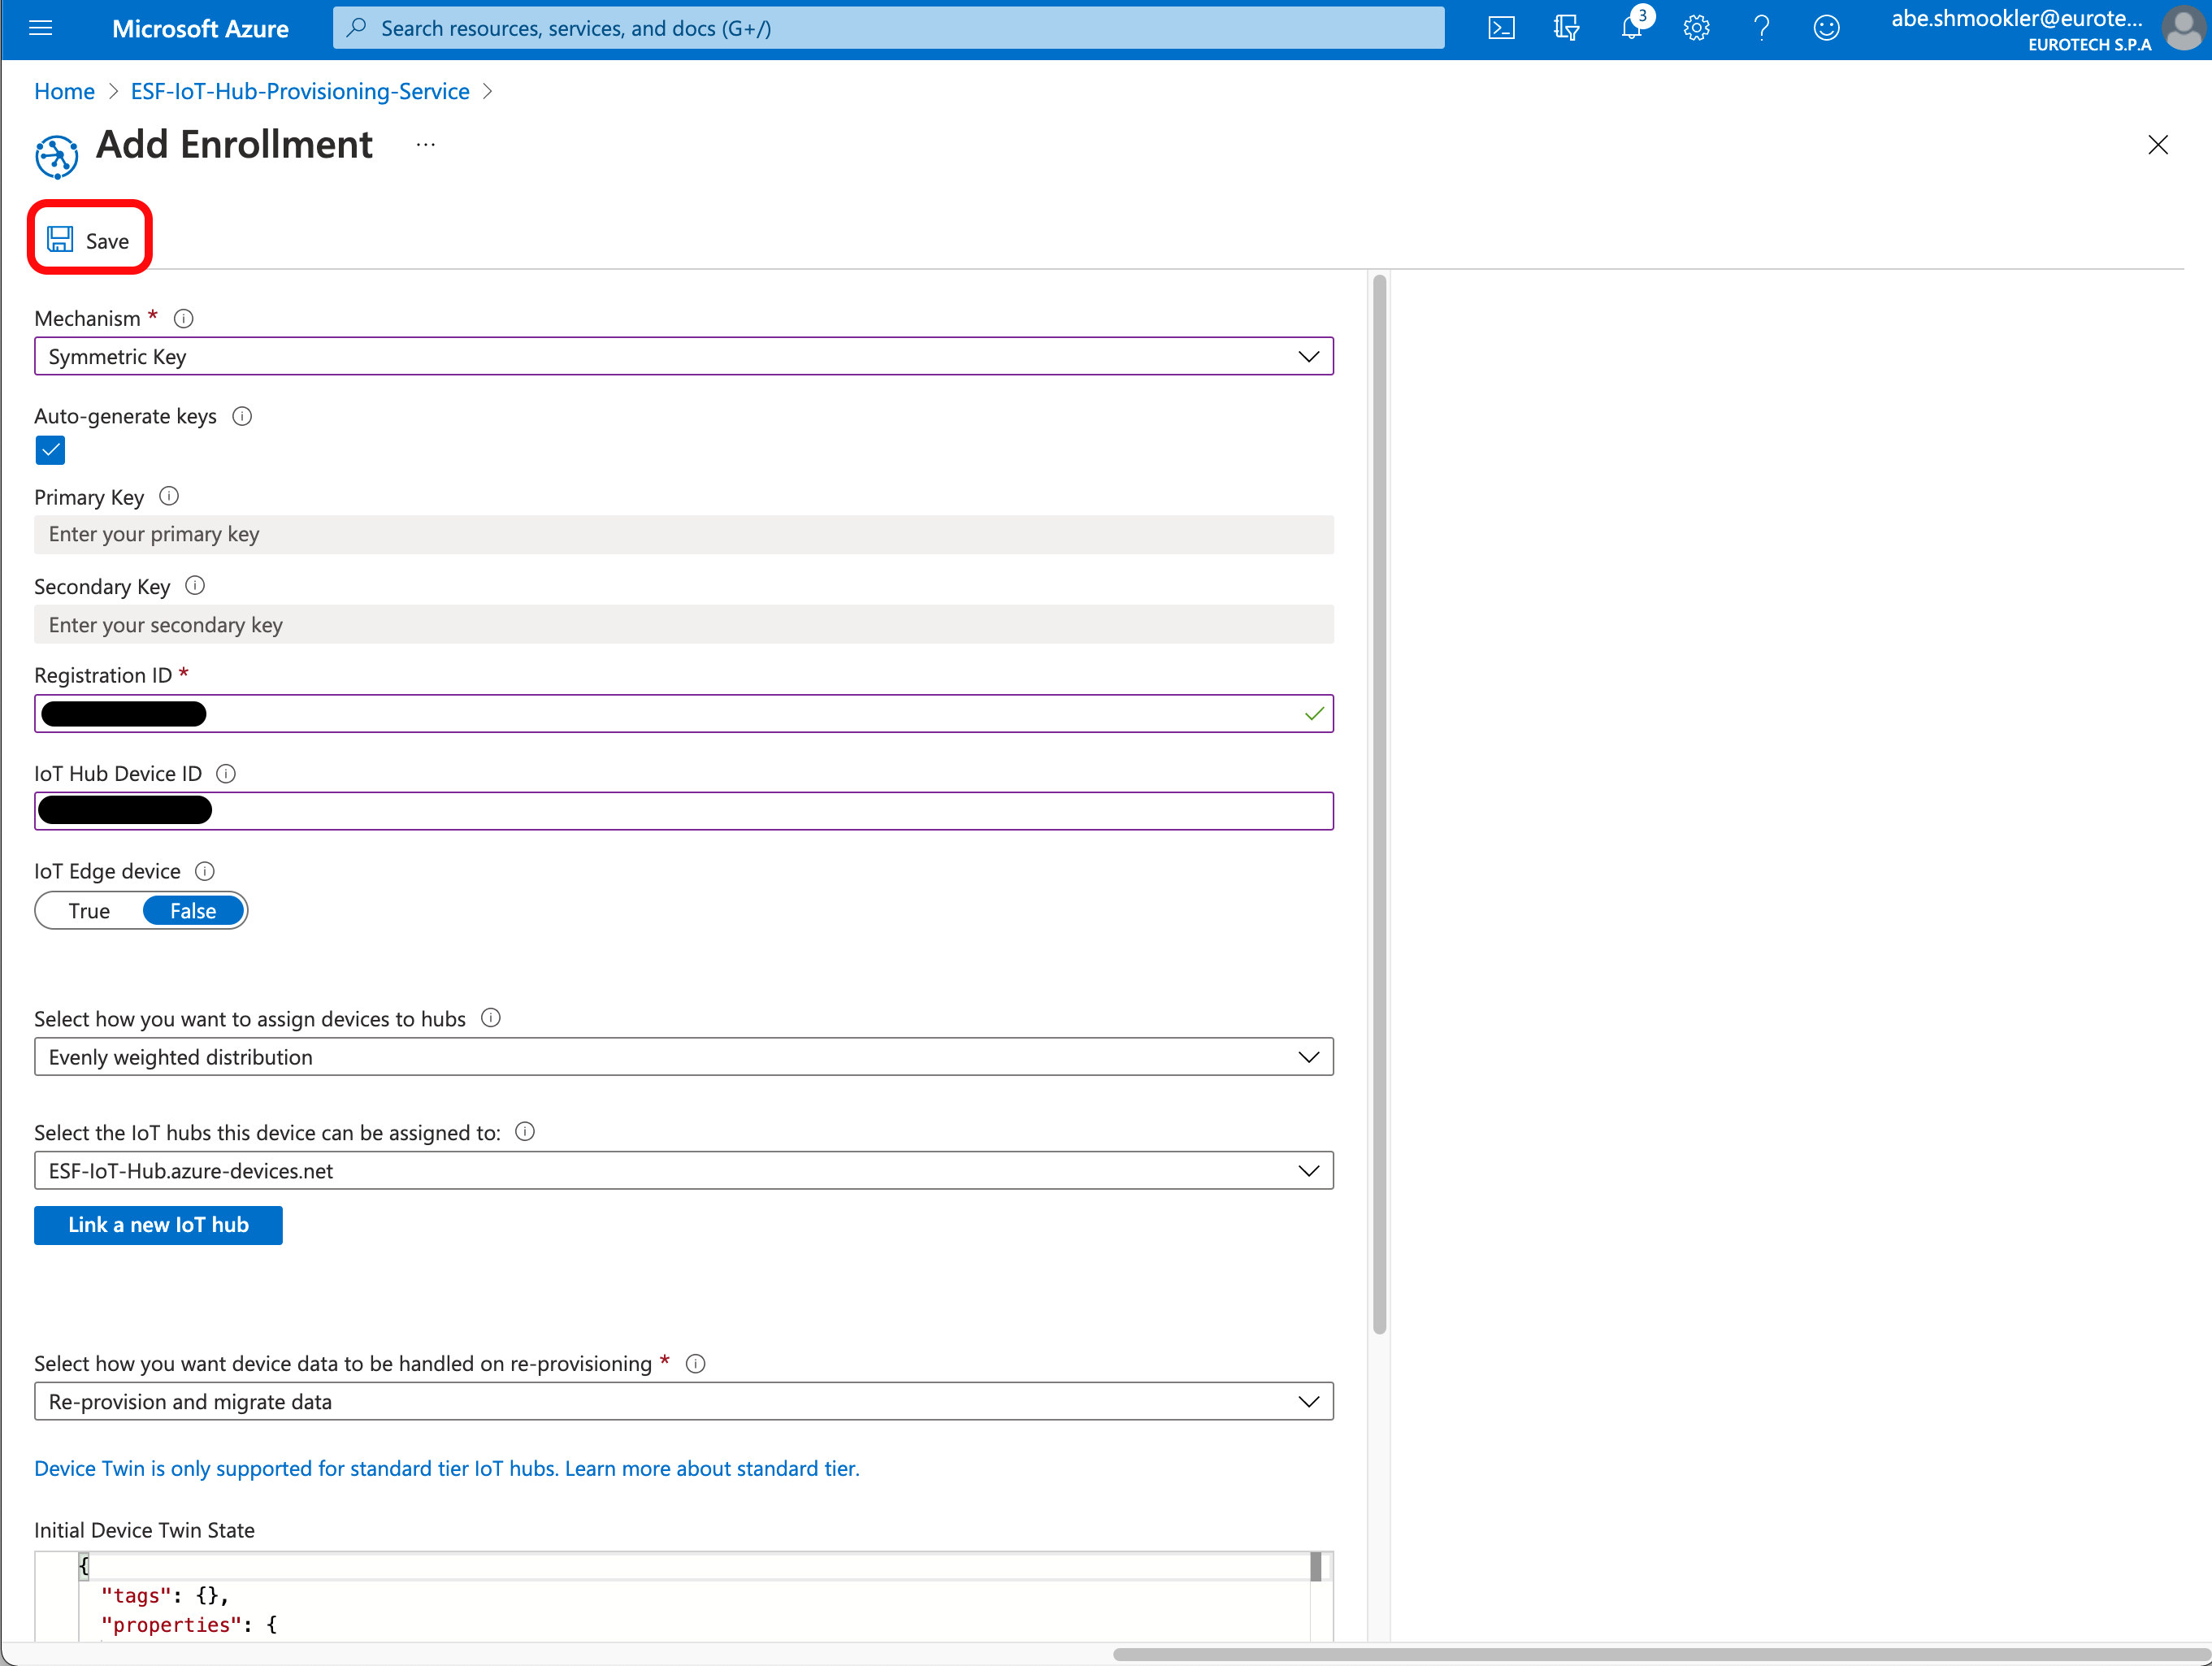
On the Add Enrollment page, enter the following information:
- Mechanism: Symmetric Key
- Check Auto-Generate Keys (recommended) or enter your own Primary and Secondary keys (advanced)
- Registration ID and IoT Hub Device ID: Both fields should be the same value. This can be any unique identifier. A good method to ensure this is unique is to use the gateway's MAC address and serial number (in the format [MACAddress]-[SerialNumber])
- All other fields: Leave at the default values
Click Save.
The Azure Portal will return you to the Manage Enrollments page. Navigate to the Manage Enrollments page if you are not automatically returned to it.
Continue at Create a SaS cloud connection.
Provision Device Using IoT Hub DPS Enrollment Group
Azure CLI RequiredThe Azure CLI is required for IoT Hub DPS Enrollment Group provisioning. Ensure it is installed and available before proceeding. Instructions for installing the Azure CLI are available here.
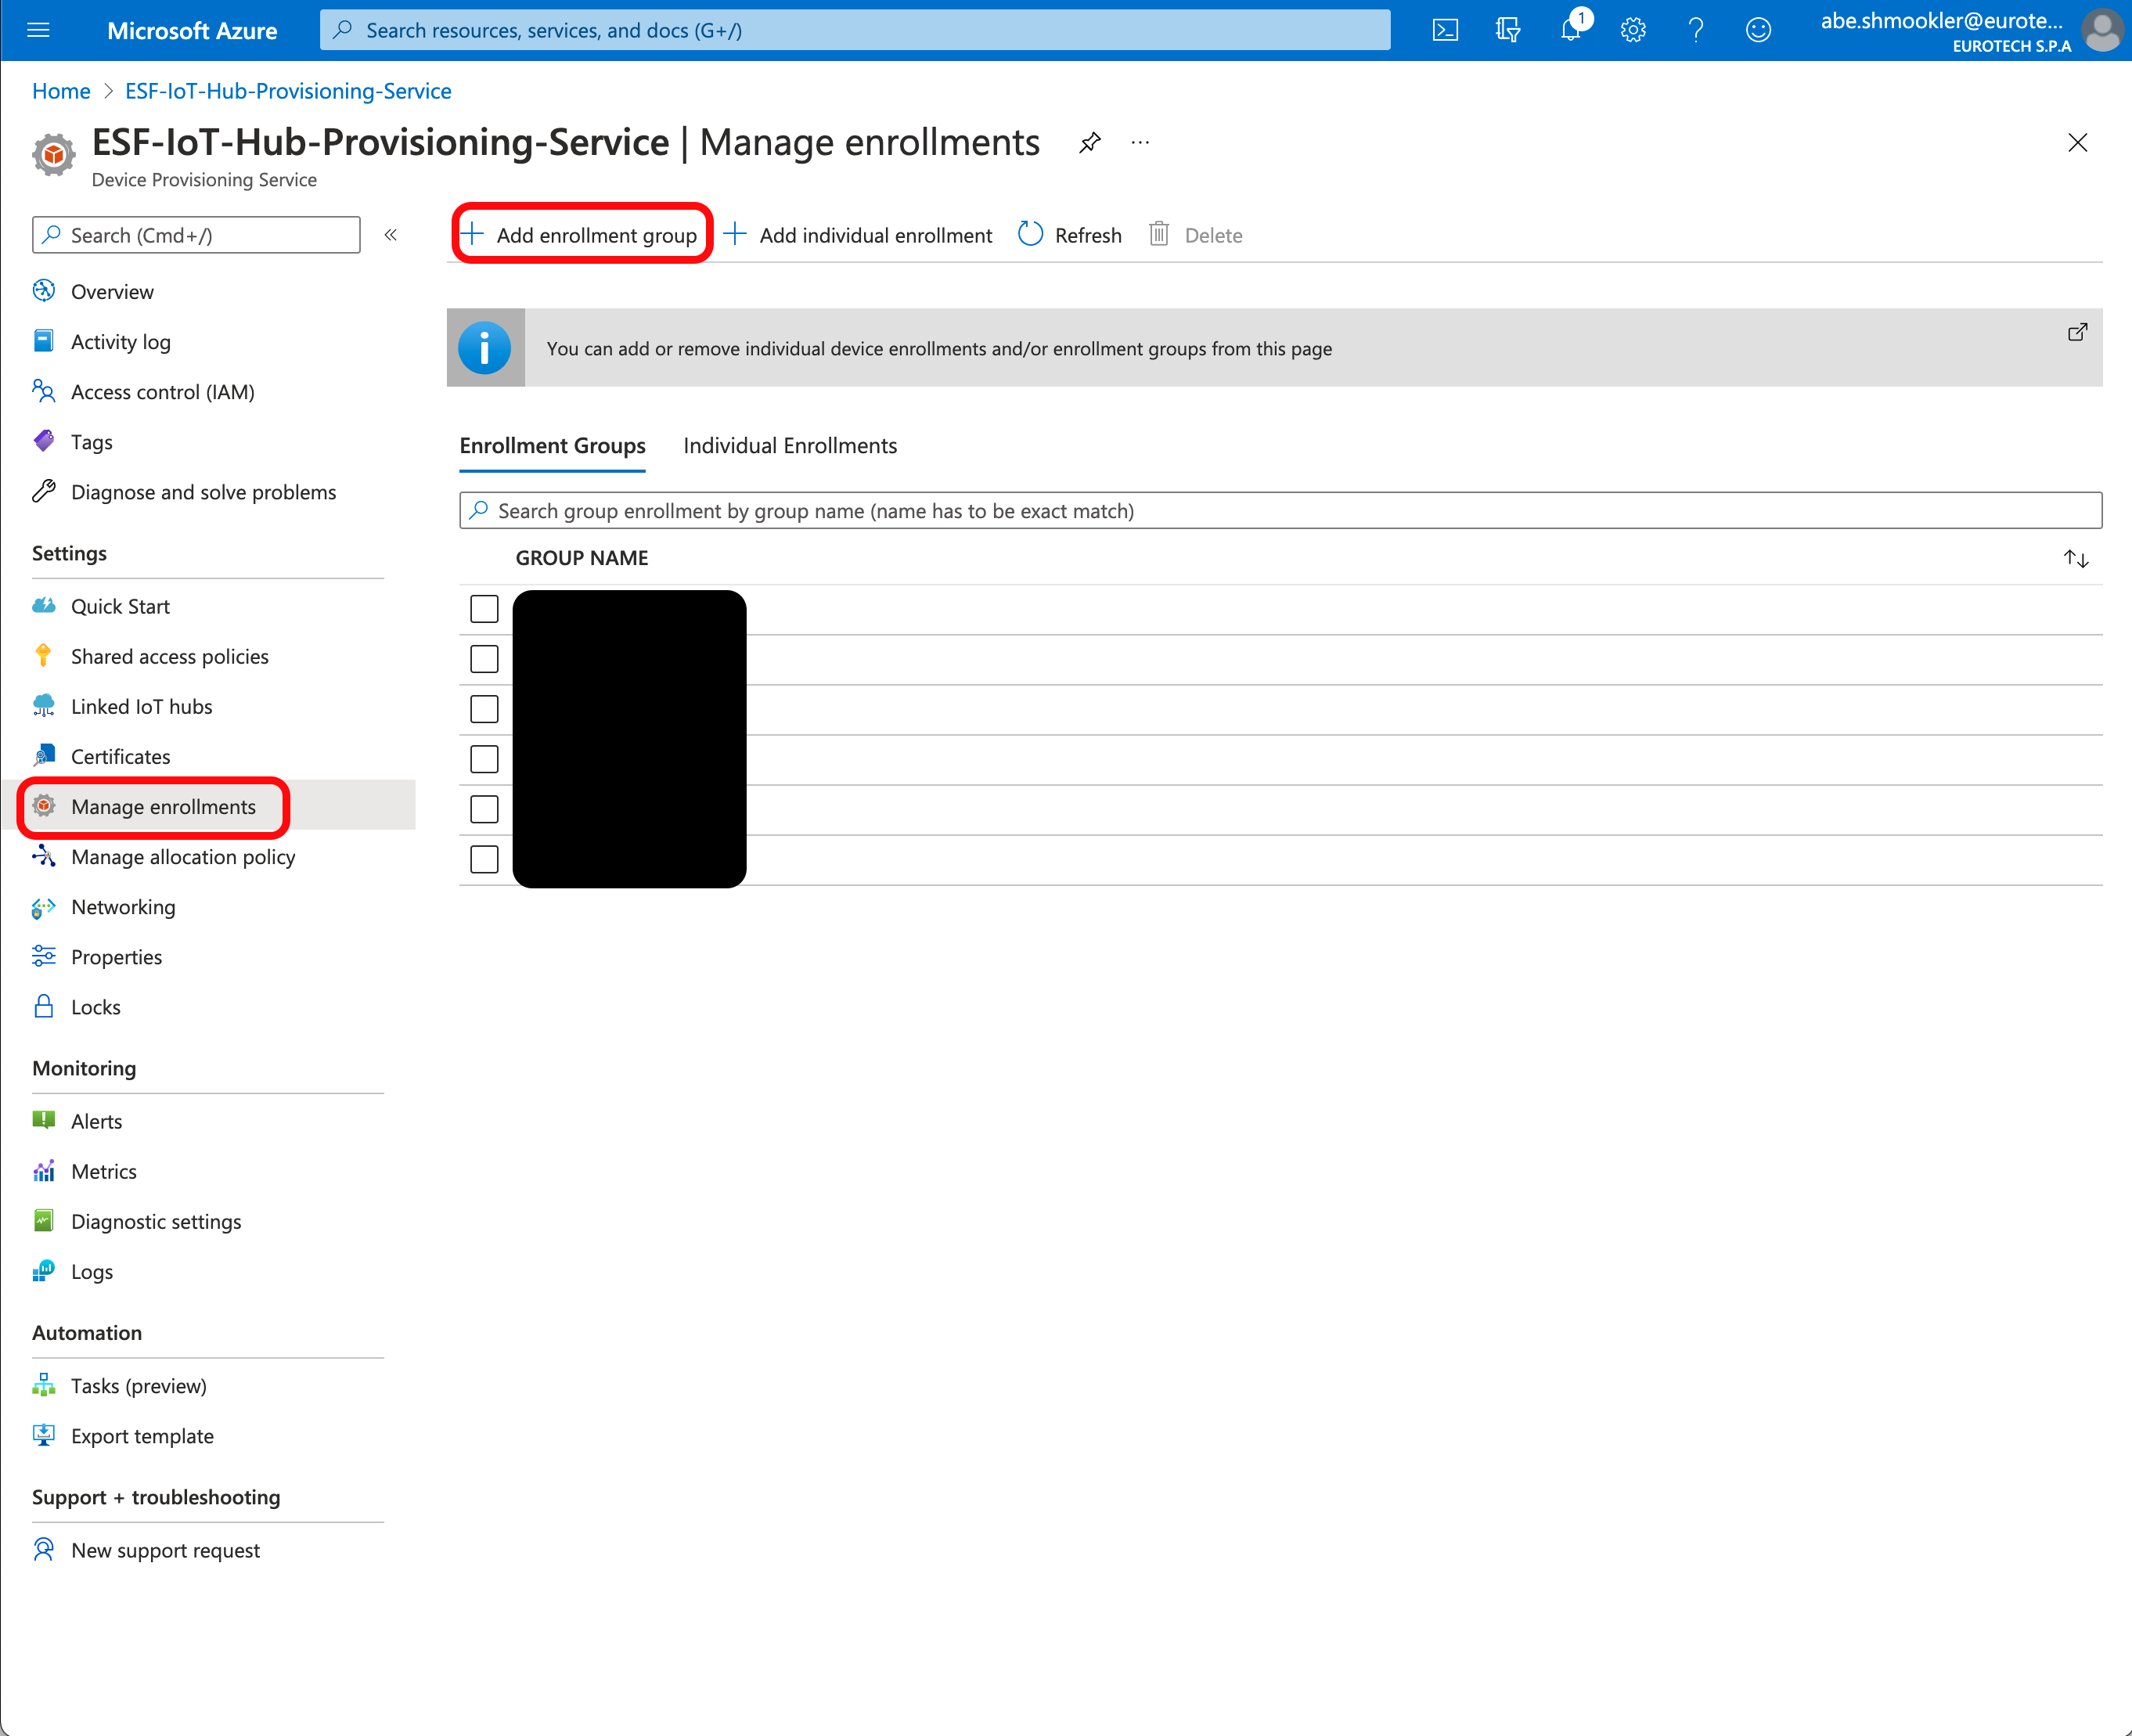
Go to your DPS in your Azure Portal. Go to the Manage Enrollments page. If you already have an enrollment group set up for SaS that you want to use, skip to Add Device to Enrollment Group.
Create Enrollment Group
Click + Add Enrollment Group.
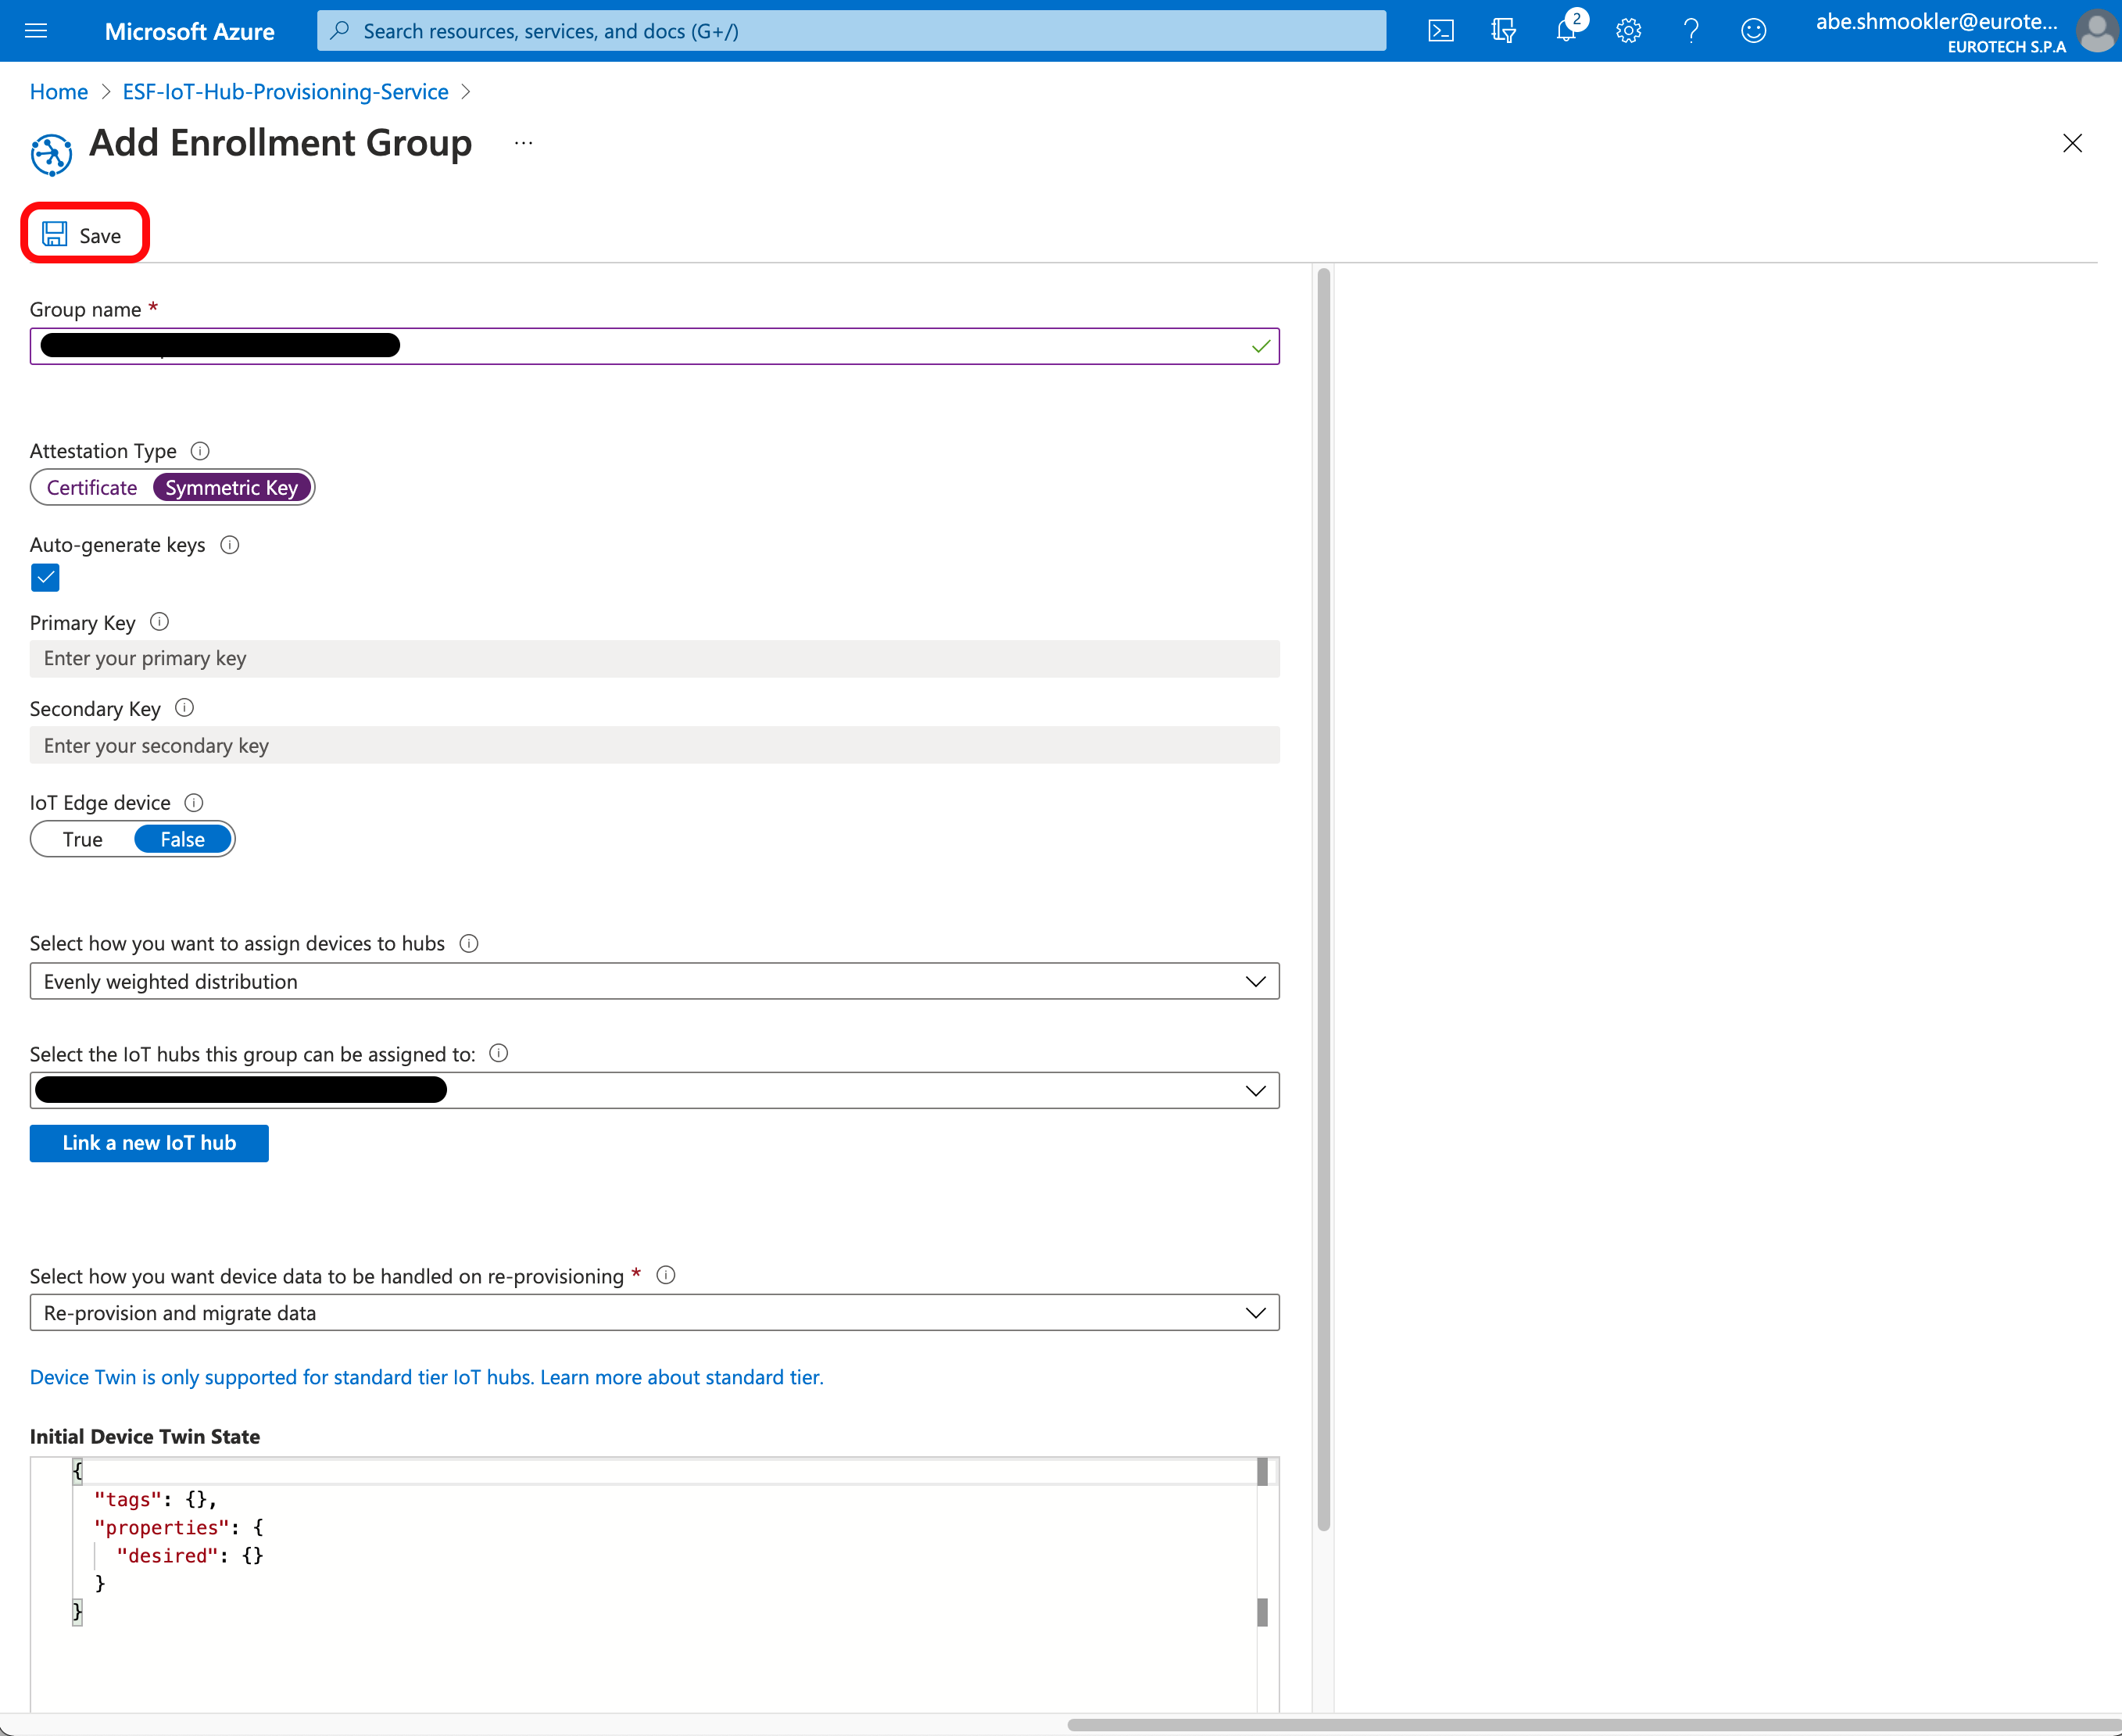
On the Add Enrollment Group page, enter the following information:
- Group Name: Any unique designator.
- Attestation Type: Symmetric Key
- Check Auto-Generate Keys (recommended) or enter your own Primary and Secondary keys (advanced)
- All other fields: Leave at the default values
Click Save.
The Azure Portal will return you to the Manage Enrollments page. Navigate to the Manage Enrollments page if you are not automatically returned to it.
Add Device to Enrollment Group
Navigate to the DPS Manage Enrollments page. Click on the enrollment group the device should be registered in to go to the Enrollment Group Details page. Copy the Primary key.
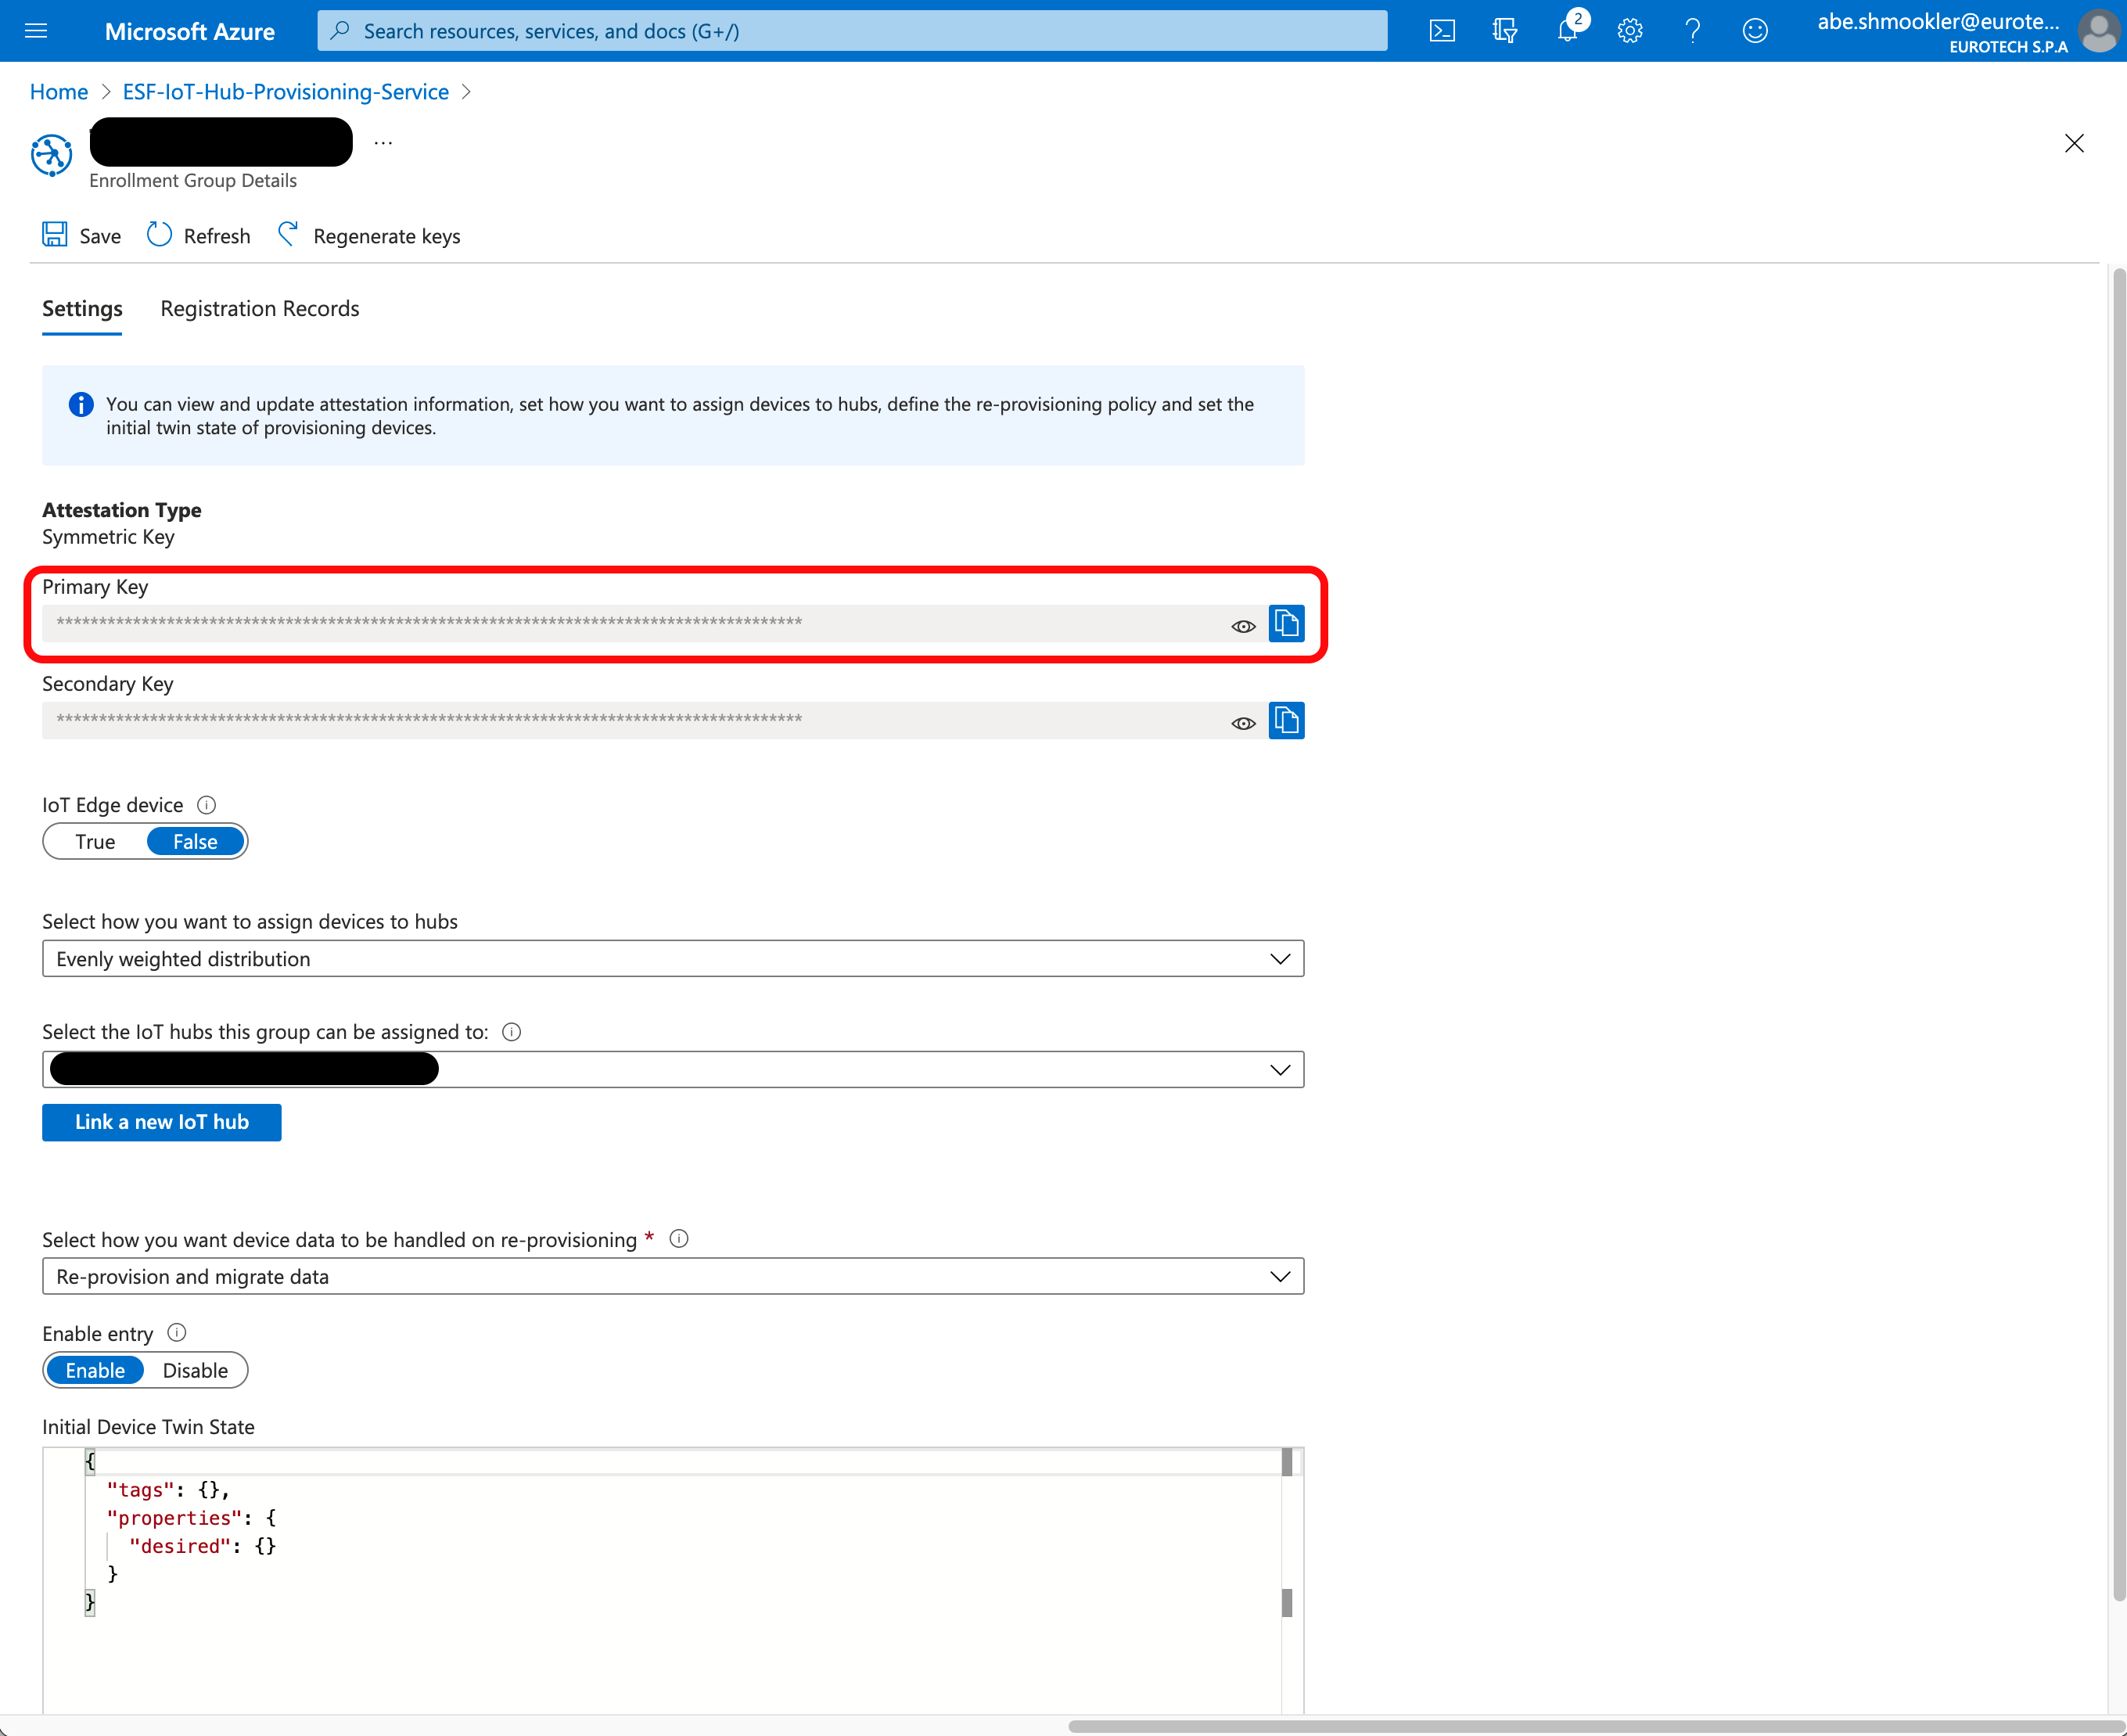
Run the following command in Azure CLI. Replace "<primary_key>" with the Primary Key you copied above. Replace "<device_id>" with any unique designator. A good method to ensure this is unique is to use the gateway's MAC address and serial number (in the format [MACAddress]-[SerialNumber])
az iot central device compute-device-key --pk <primary_key> --device-id <device_id>The Azure CLI will display a key. You will need this key and the Device ID you used in the next section.
Continue at Create a SaS cloud connection.
Provision Device Using IoT Central Individual Enrollment
Prerequisites
Create an Application
In order to provision your device with SaS credentials using IoT Central Applications, you must first create an application. Instructions on how to create your own IoT Central application can be found here.
Create a Device
You must Create your device in your Azure IoT Central Application before provisioning using SaS credentials.
Connect device
Click on your device from the Devices page and click Connect.

Make sure the Authentication Type is set to "Shared access signature (SAS)".
Leave this window open. It will be used in the next section.
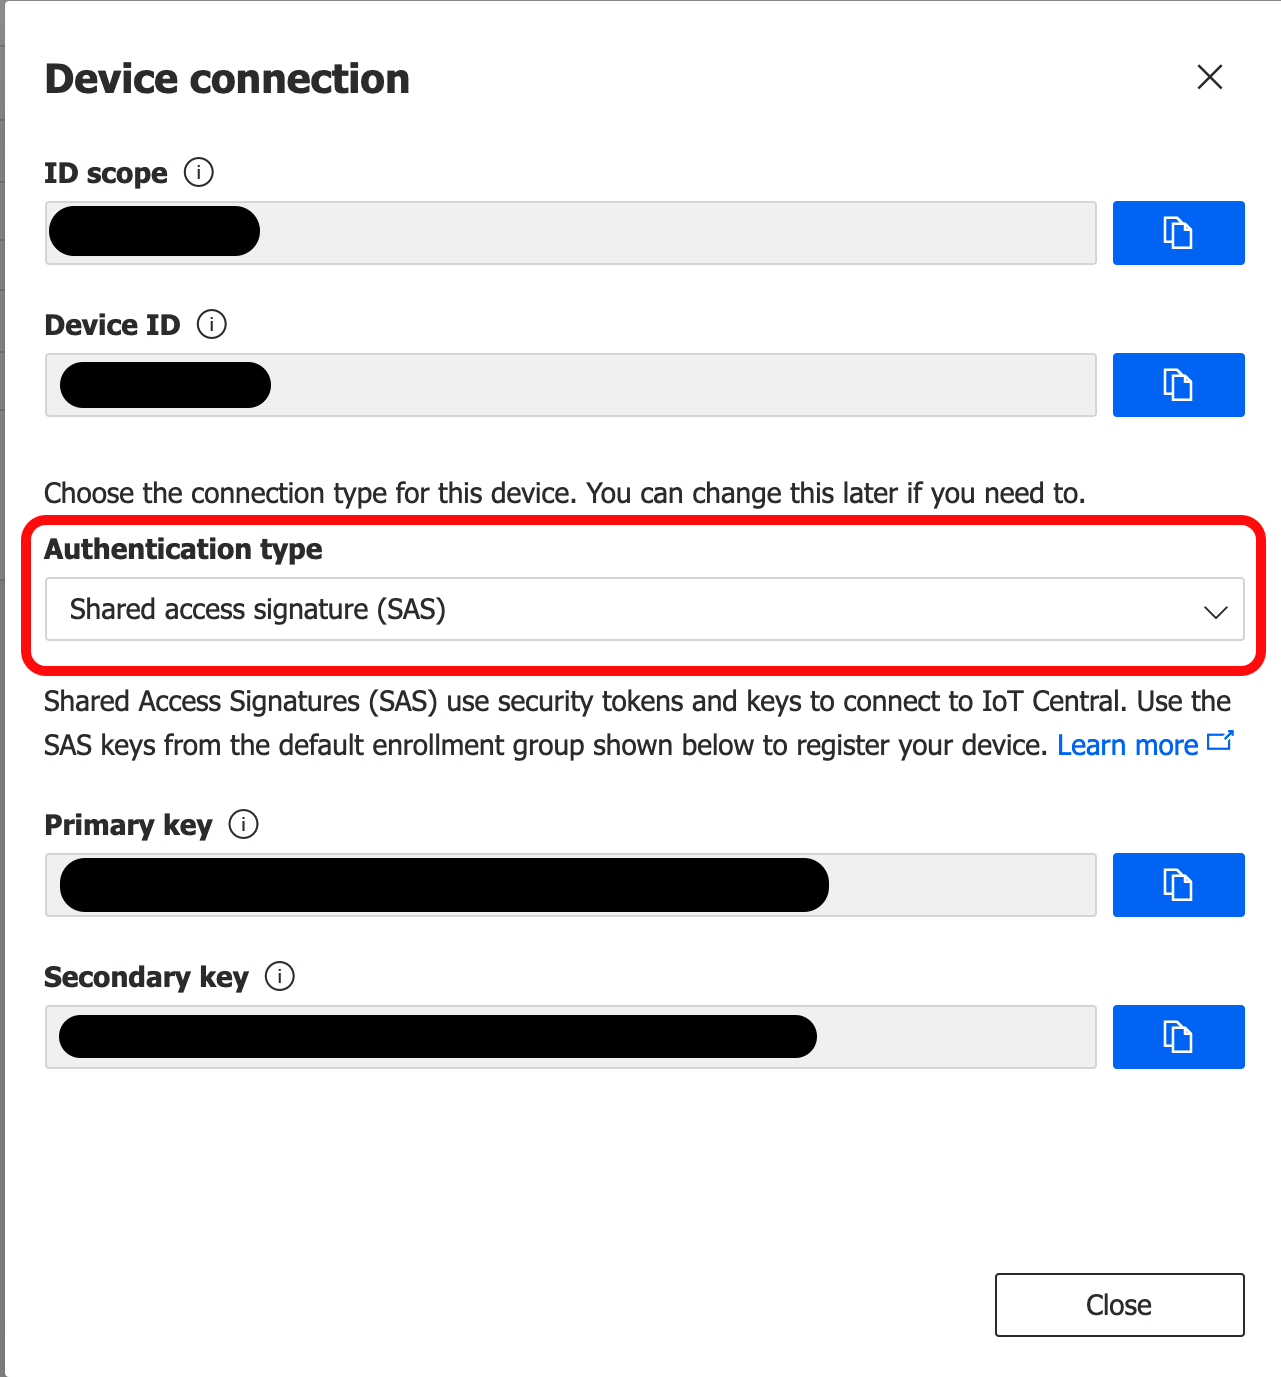
Continue at Create a SaS cloud connection.
Provision Device Using IoT Central Enrollment Group
Azure CLI RequiredThe Azure CLI is required for IoT Central Enrollment Group provisioning. Ensure it is installed and available before proceeding. Instructions for installing the Azure CLI are available here.
Prerequisites
Create an Application
In order to provision your device with SaS credentials using IoT Central Applications, you must first create an application. Instructions on how to create your own IoT Central application can be found here.
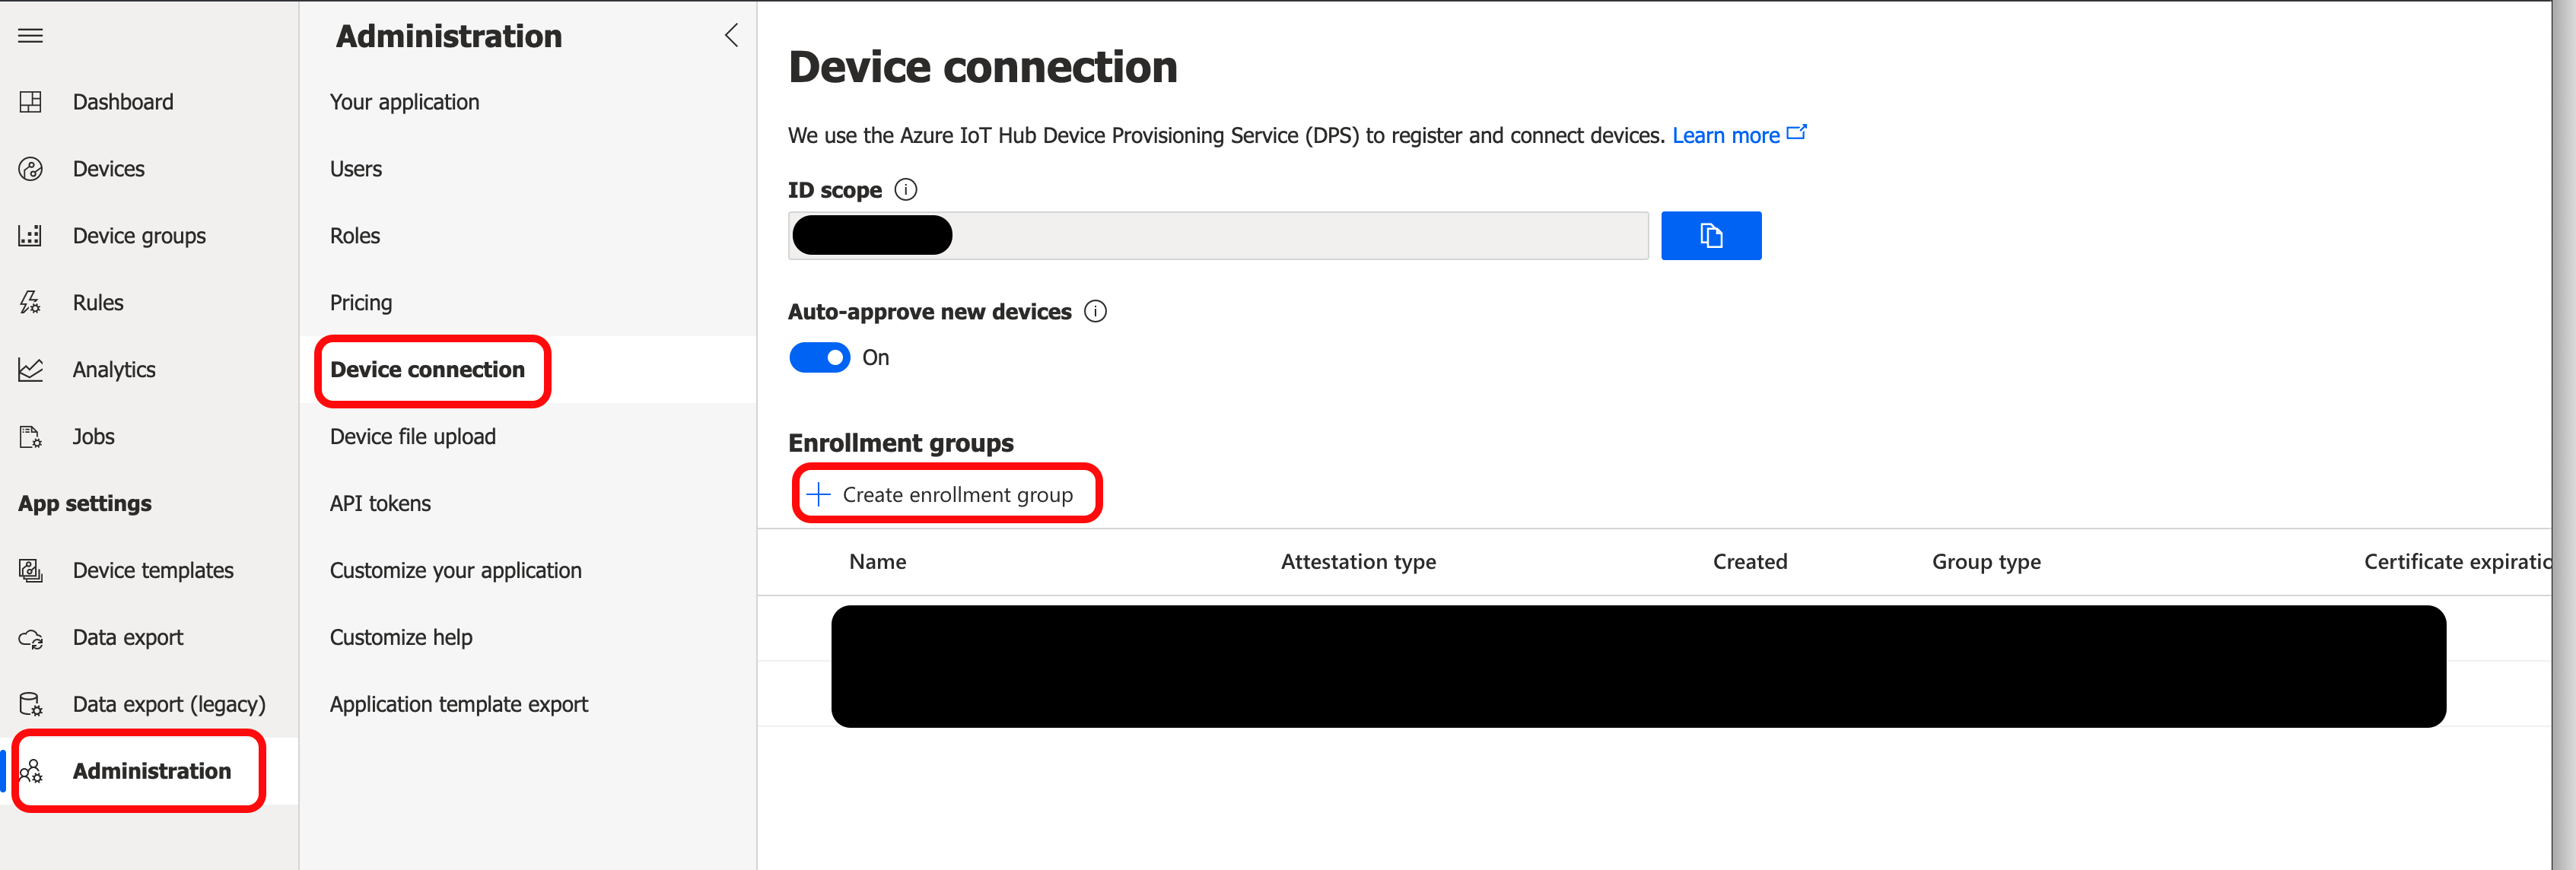
Navigate to the Device connection section of the Administration page in your IoT Central Application. Click + Create enrollment group.
The Name must be set to a unique enrollment group name. Set the Attestation type to "Shared access signature (SAS)." Leave all other fields at default values and click Save.
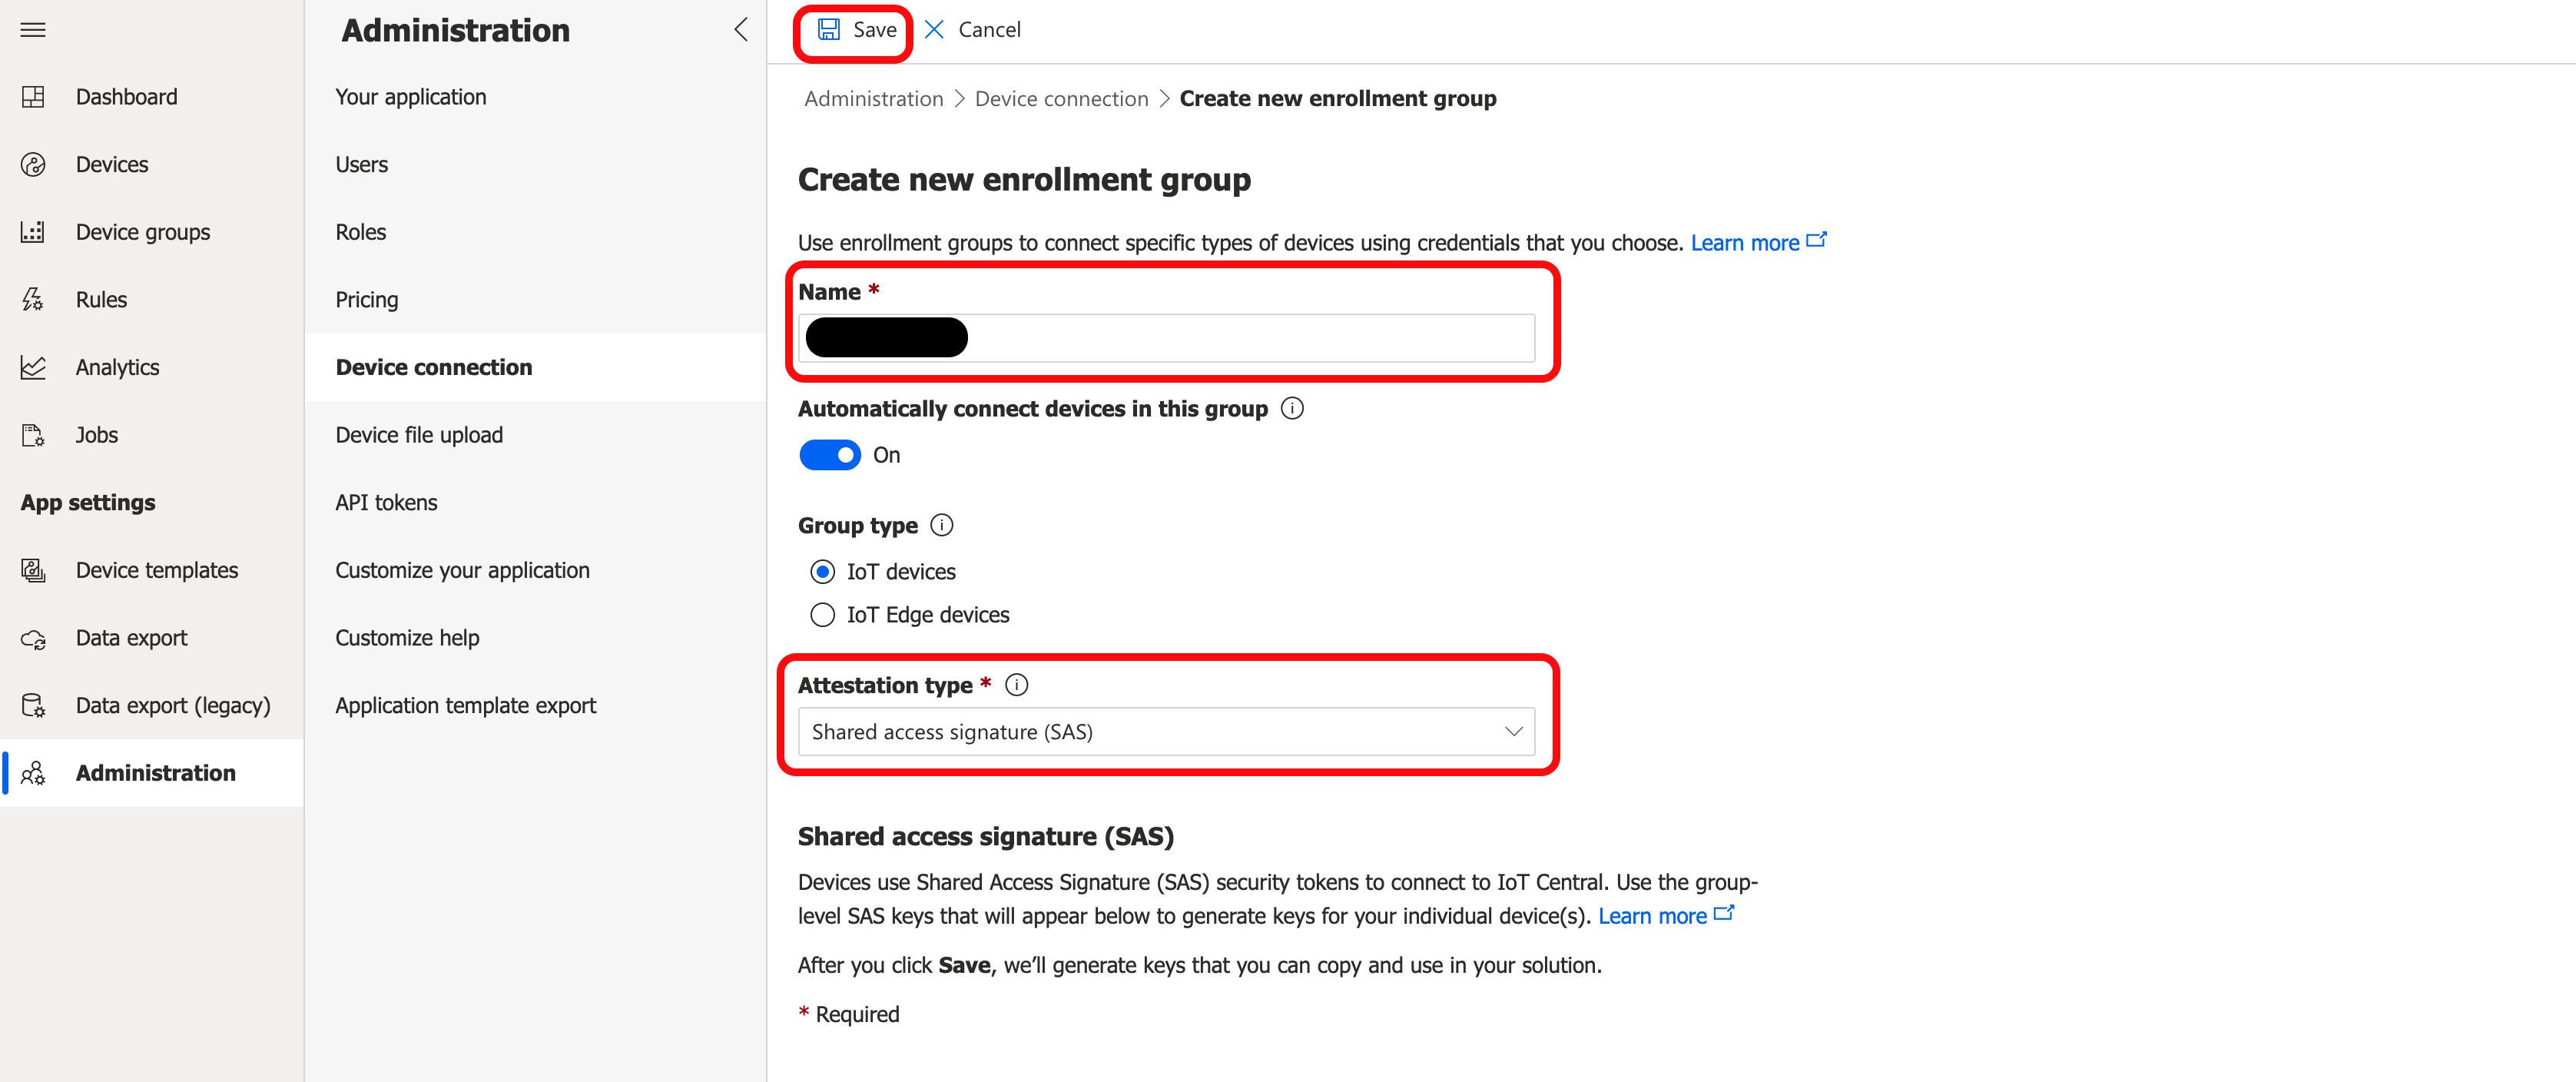
The Azure Portal will return you to the Enrollment Group details page. Copy the Primary key.
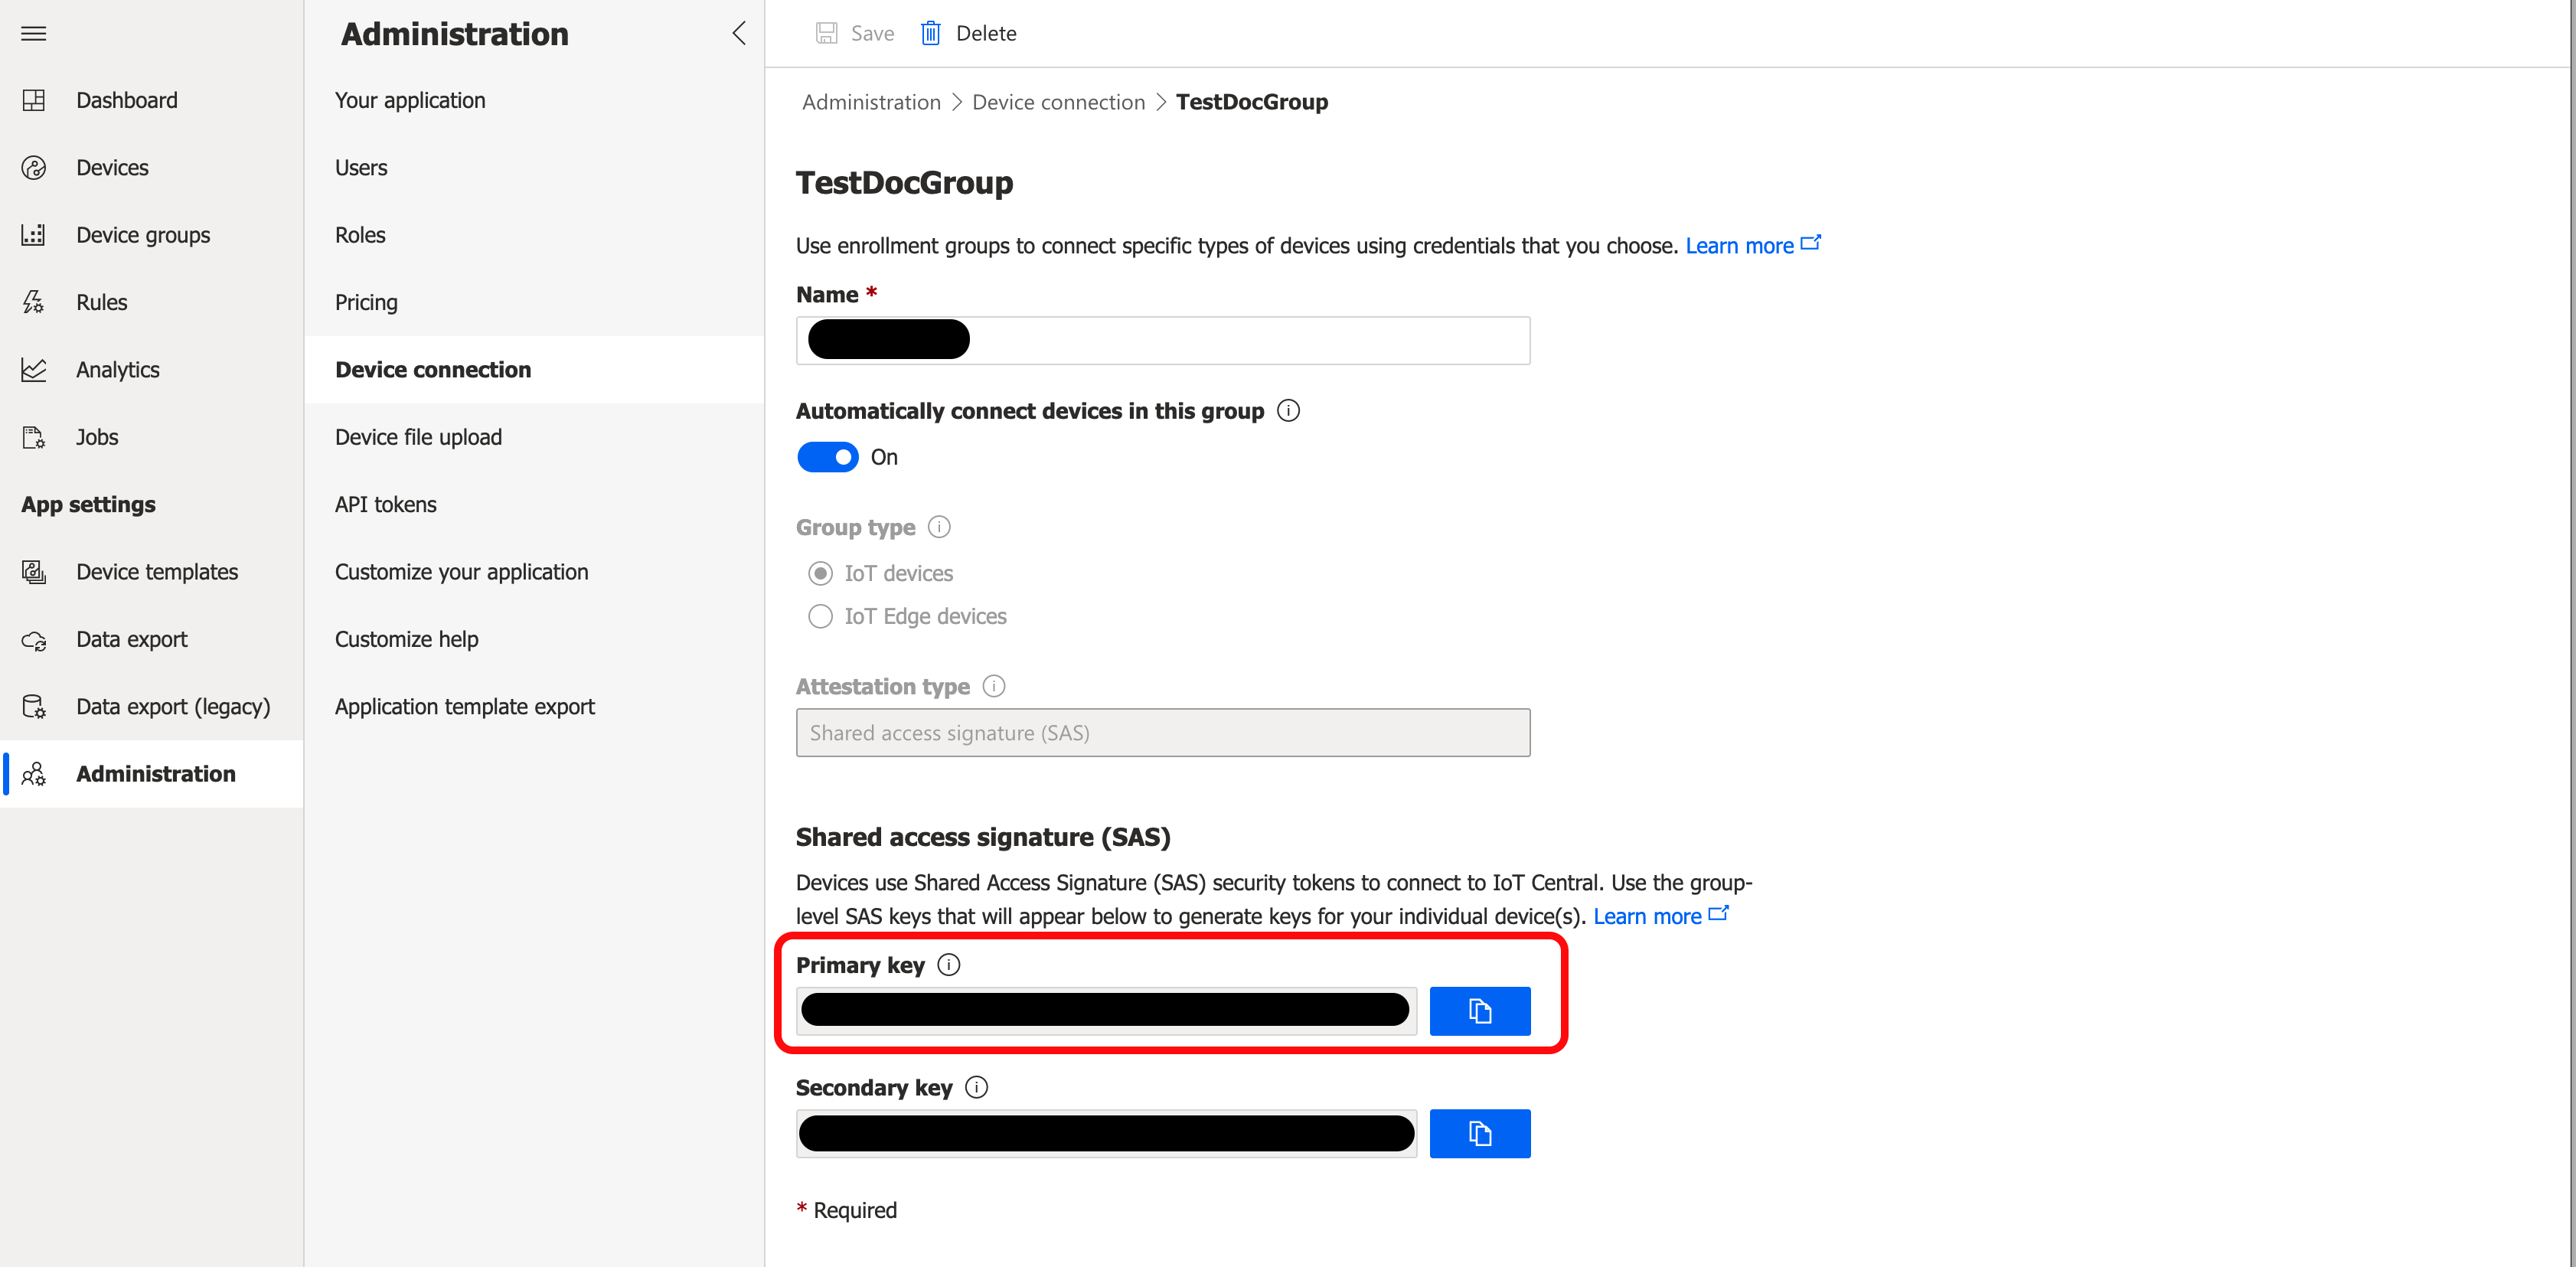
Run the following command in Azure CLI. Replace "<primary_key>" with the Primary Key you copied above. Replace "<device_id>" with any unique designator. A good method to ensure this is unique is to use the gateway's MAC address and serial number (in the format [MACAddress]-[SerialNumber]).
az iot central device compute-device-key --pk <primary_key> --device-id <device_id>The Azure CLI will display a key. You will need this key and the Device ID you used in the next section.
Continue at Create a SaS cloud connection.
Create a SaS cloud connection
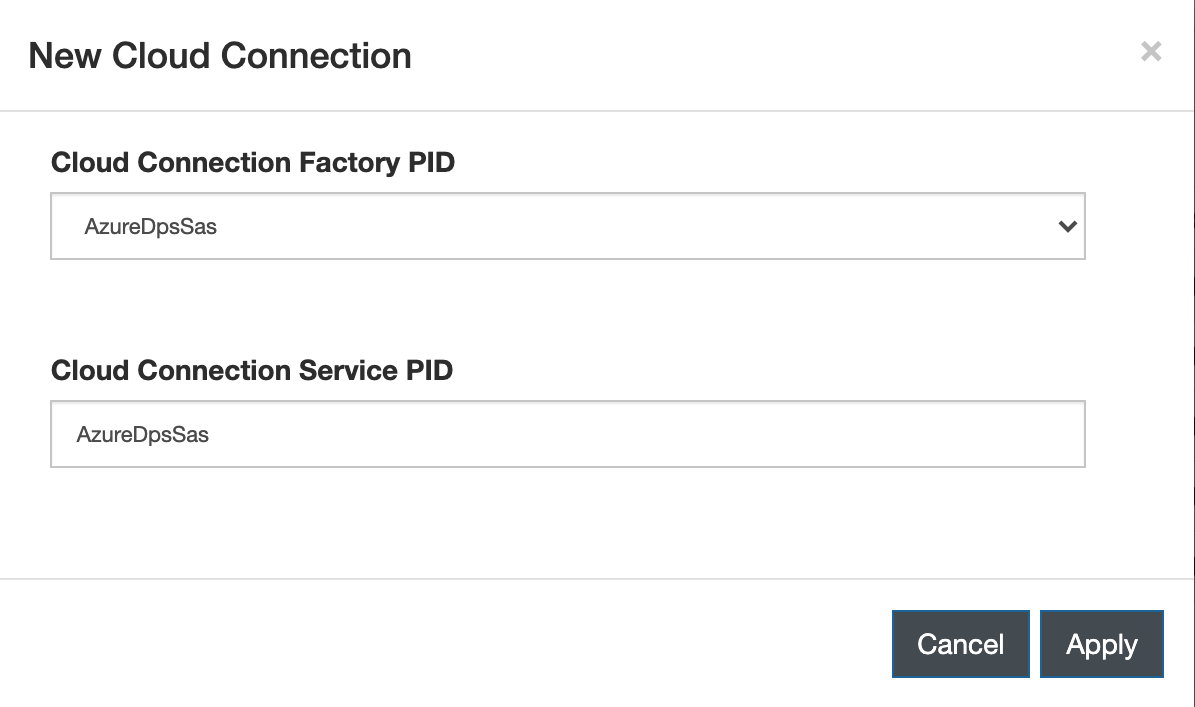
In the ESF Web interface, go to the Cloud Connection section and click New Connection.
On the New Cloud Connection dialog, enter the following information:
- Cloud Connection Factory PID: AzureDpsSas
- Cloud Connection Service PID: AzureDpsSas or other valid Cloud Connection Service PID
Click Apply.
Select the new connection and go to the SasMqttDataTransport tab.
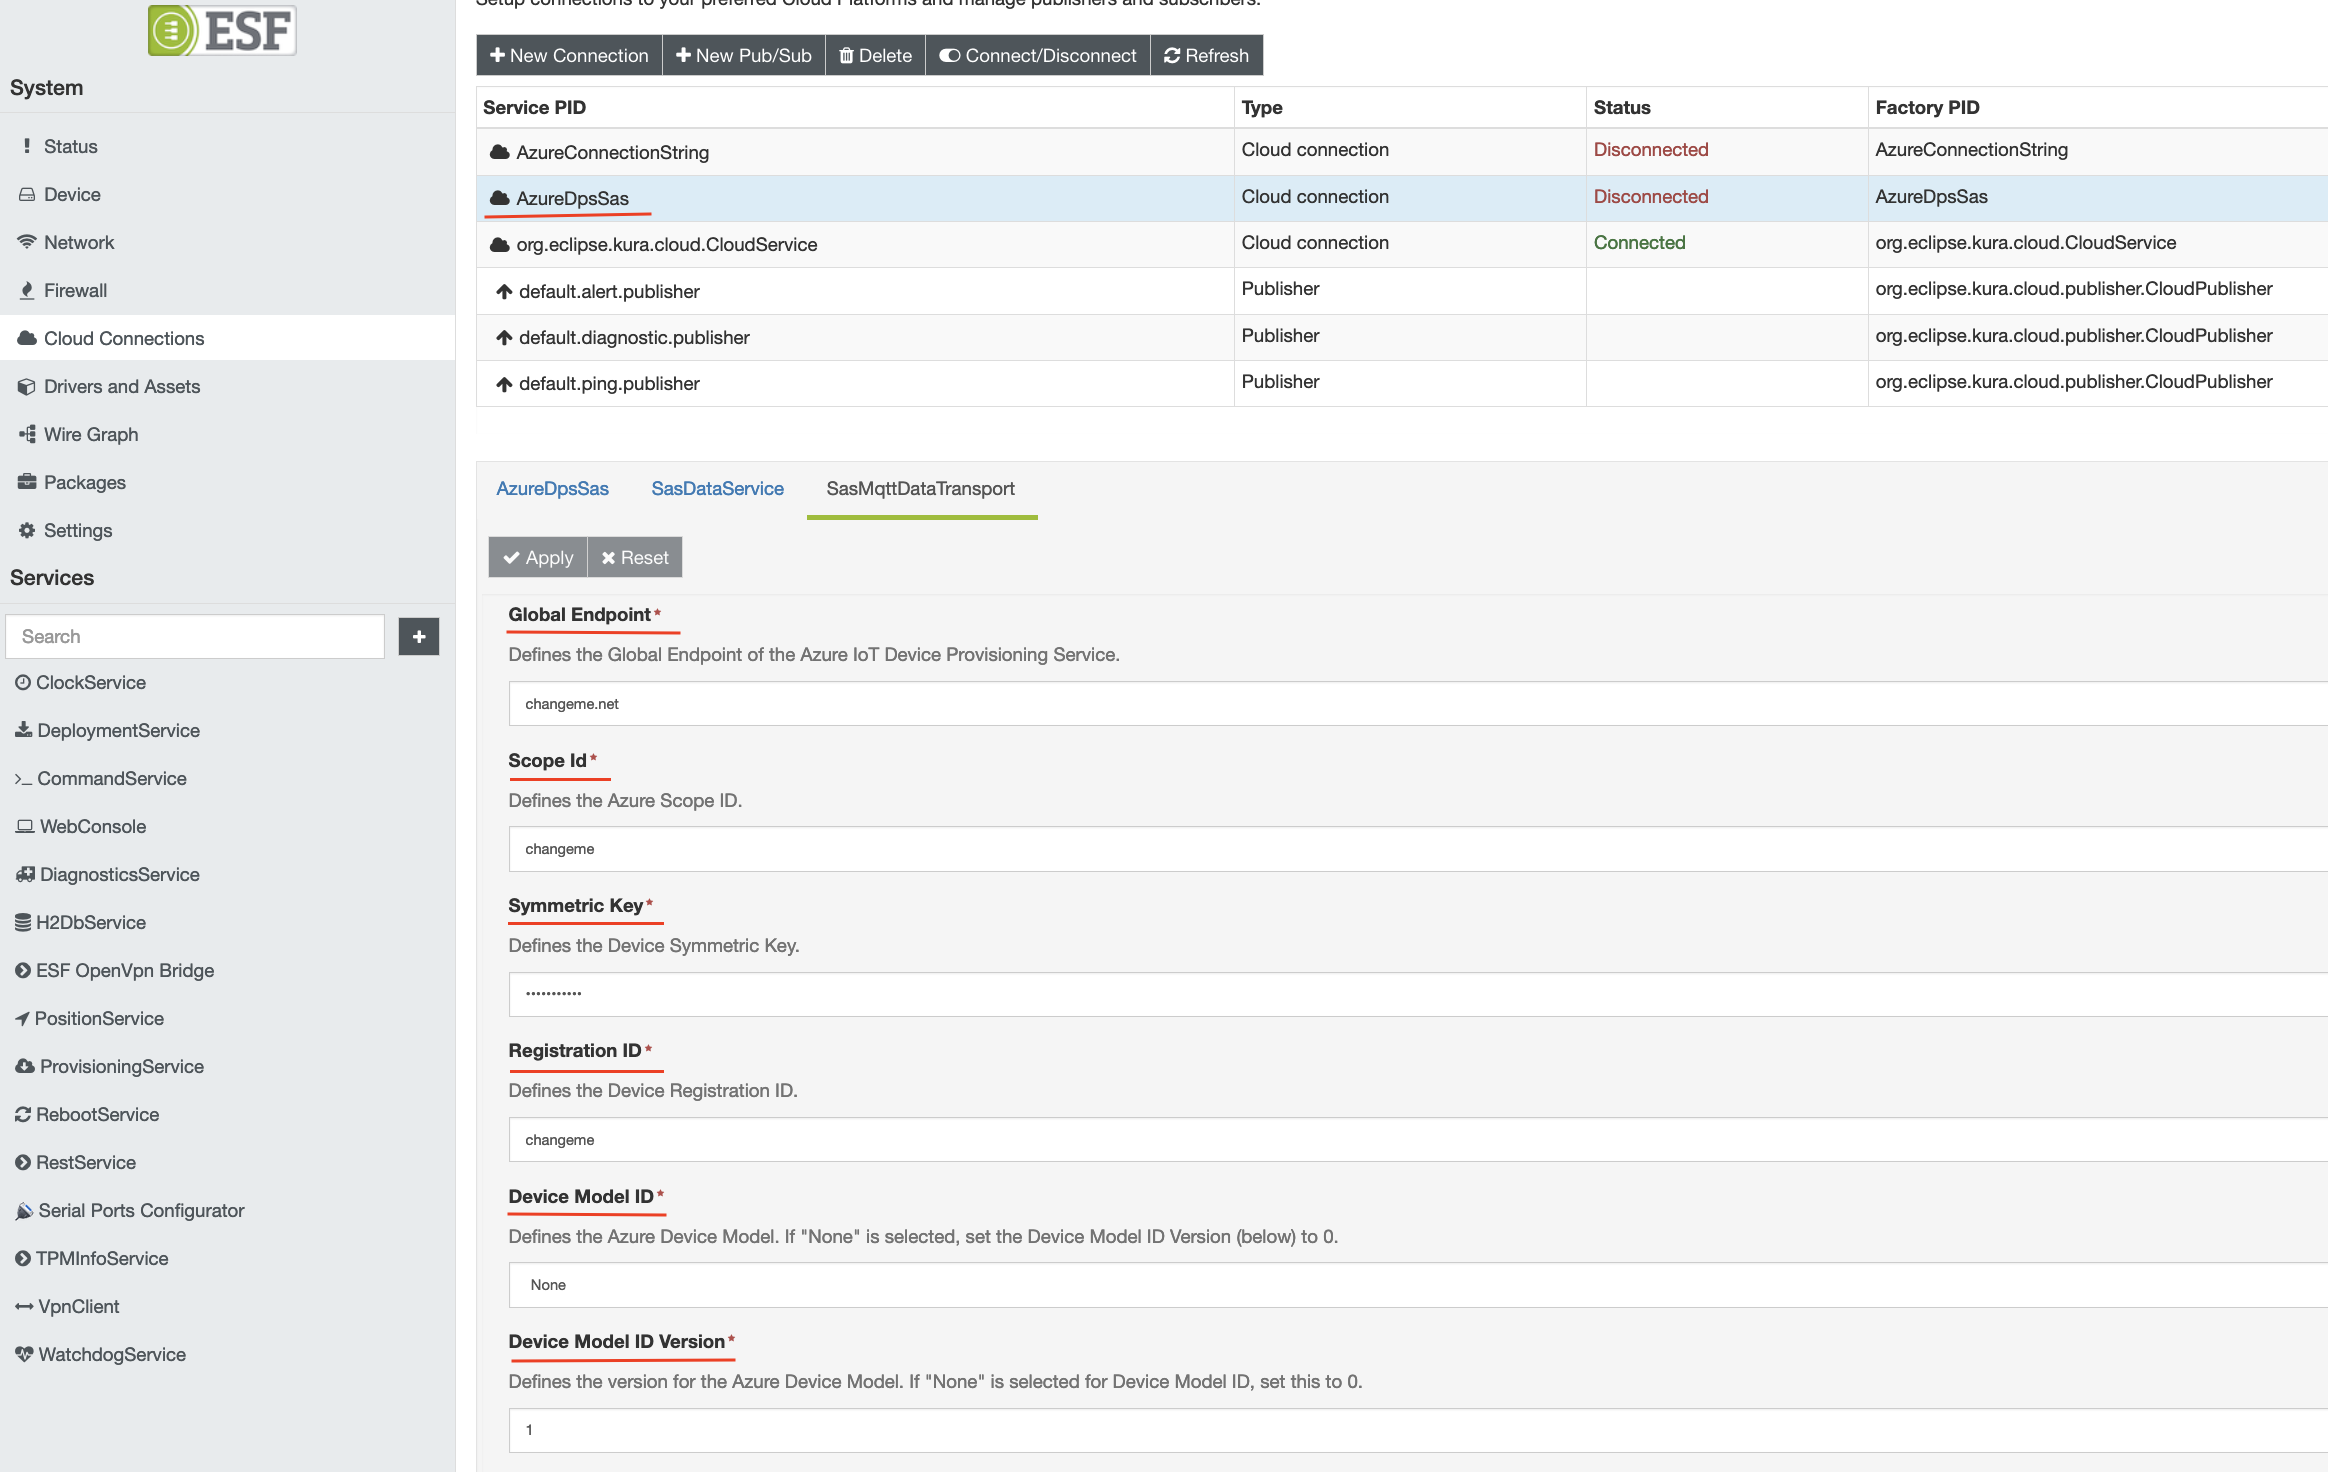
Select the appropriate Device Model ID from the list of options. If a device model does not need to be specified your application, leave the default 'None' field'. Set the 'Device Model ID Version' to the appropriate version of the Device Model ID.
Connecting to Azure IoT Portal can be accomplished in four ways:
- Start at Configure connection using IoT Hub DPS Individual Enrollment for IoT Hub DPS Individual Enrollment
- Start at Configure connection using IoT Hub DPS Enrollment Group for IoT Hub DPS Enrollment Group
- Start at Configure connection using IoT Central Individual Enrollment for IoT Central Individual Enrollment
- Start at Configure connection using IoT Central Enrollment Group for IoT Central Enrollment Group
Configure connection using IoT Hub DPS Individual Enrollment
Navigate to the Azure DPS Manage Enrollments page and select the Individual Enrollments tab. Find your device in the list and click it to go to the Enrollment Details page. Copy the Primary Key to the Symmetric Key in ESF. Copy the Registration ID from the top of the page to the Registration ID in ESF.
Finding the Registration ID on the Enrollment Details PageThe Registration ID is the larger text near the top of the page. It is not labelled as "Registration ID." This is the topmost red square in the image below.
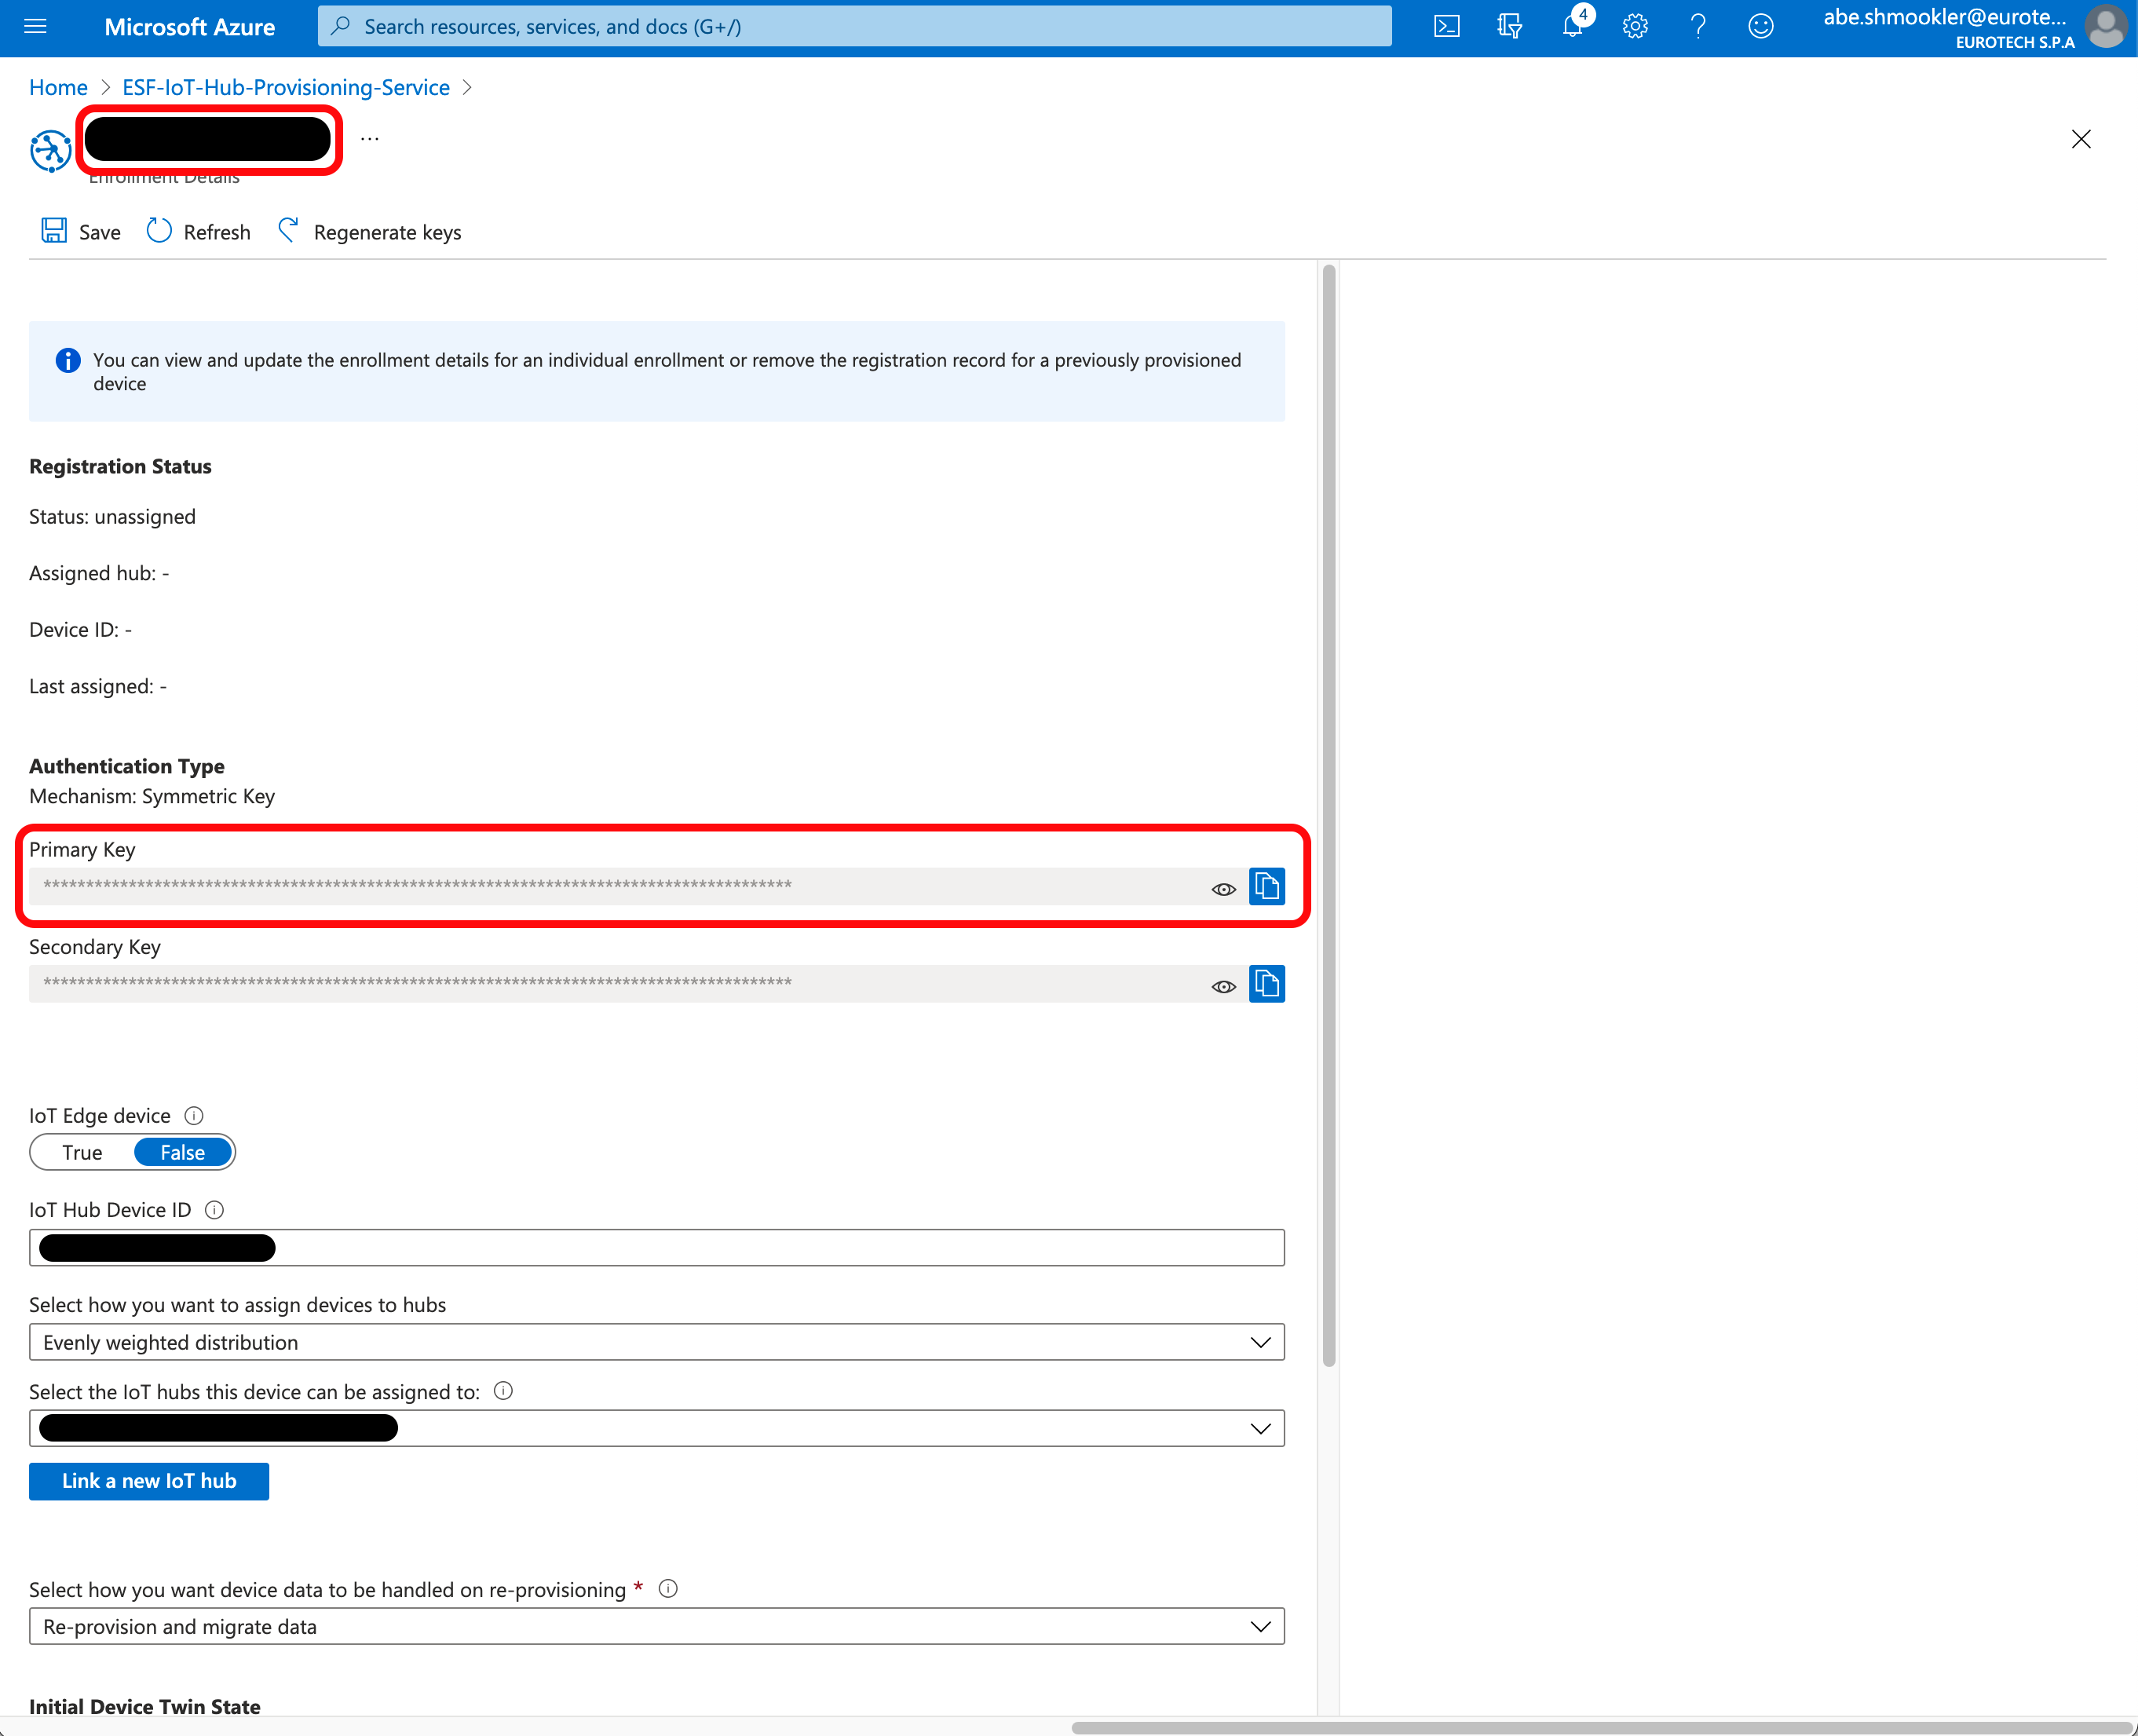
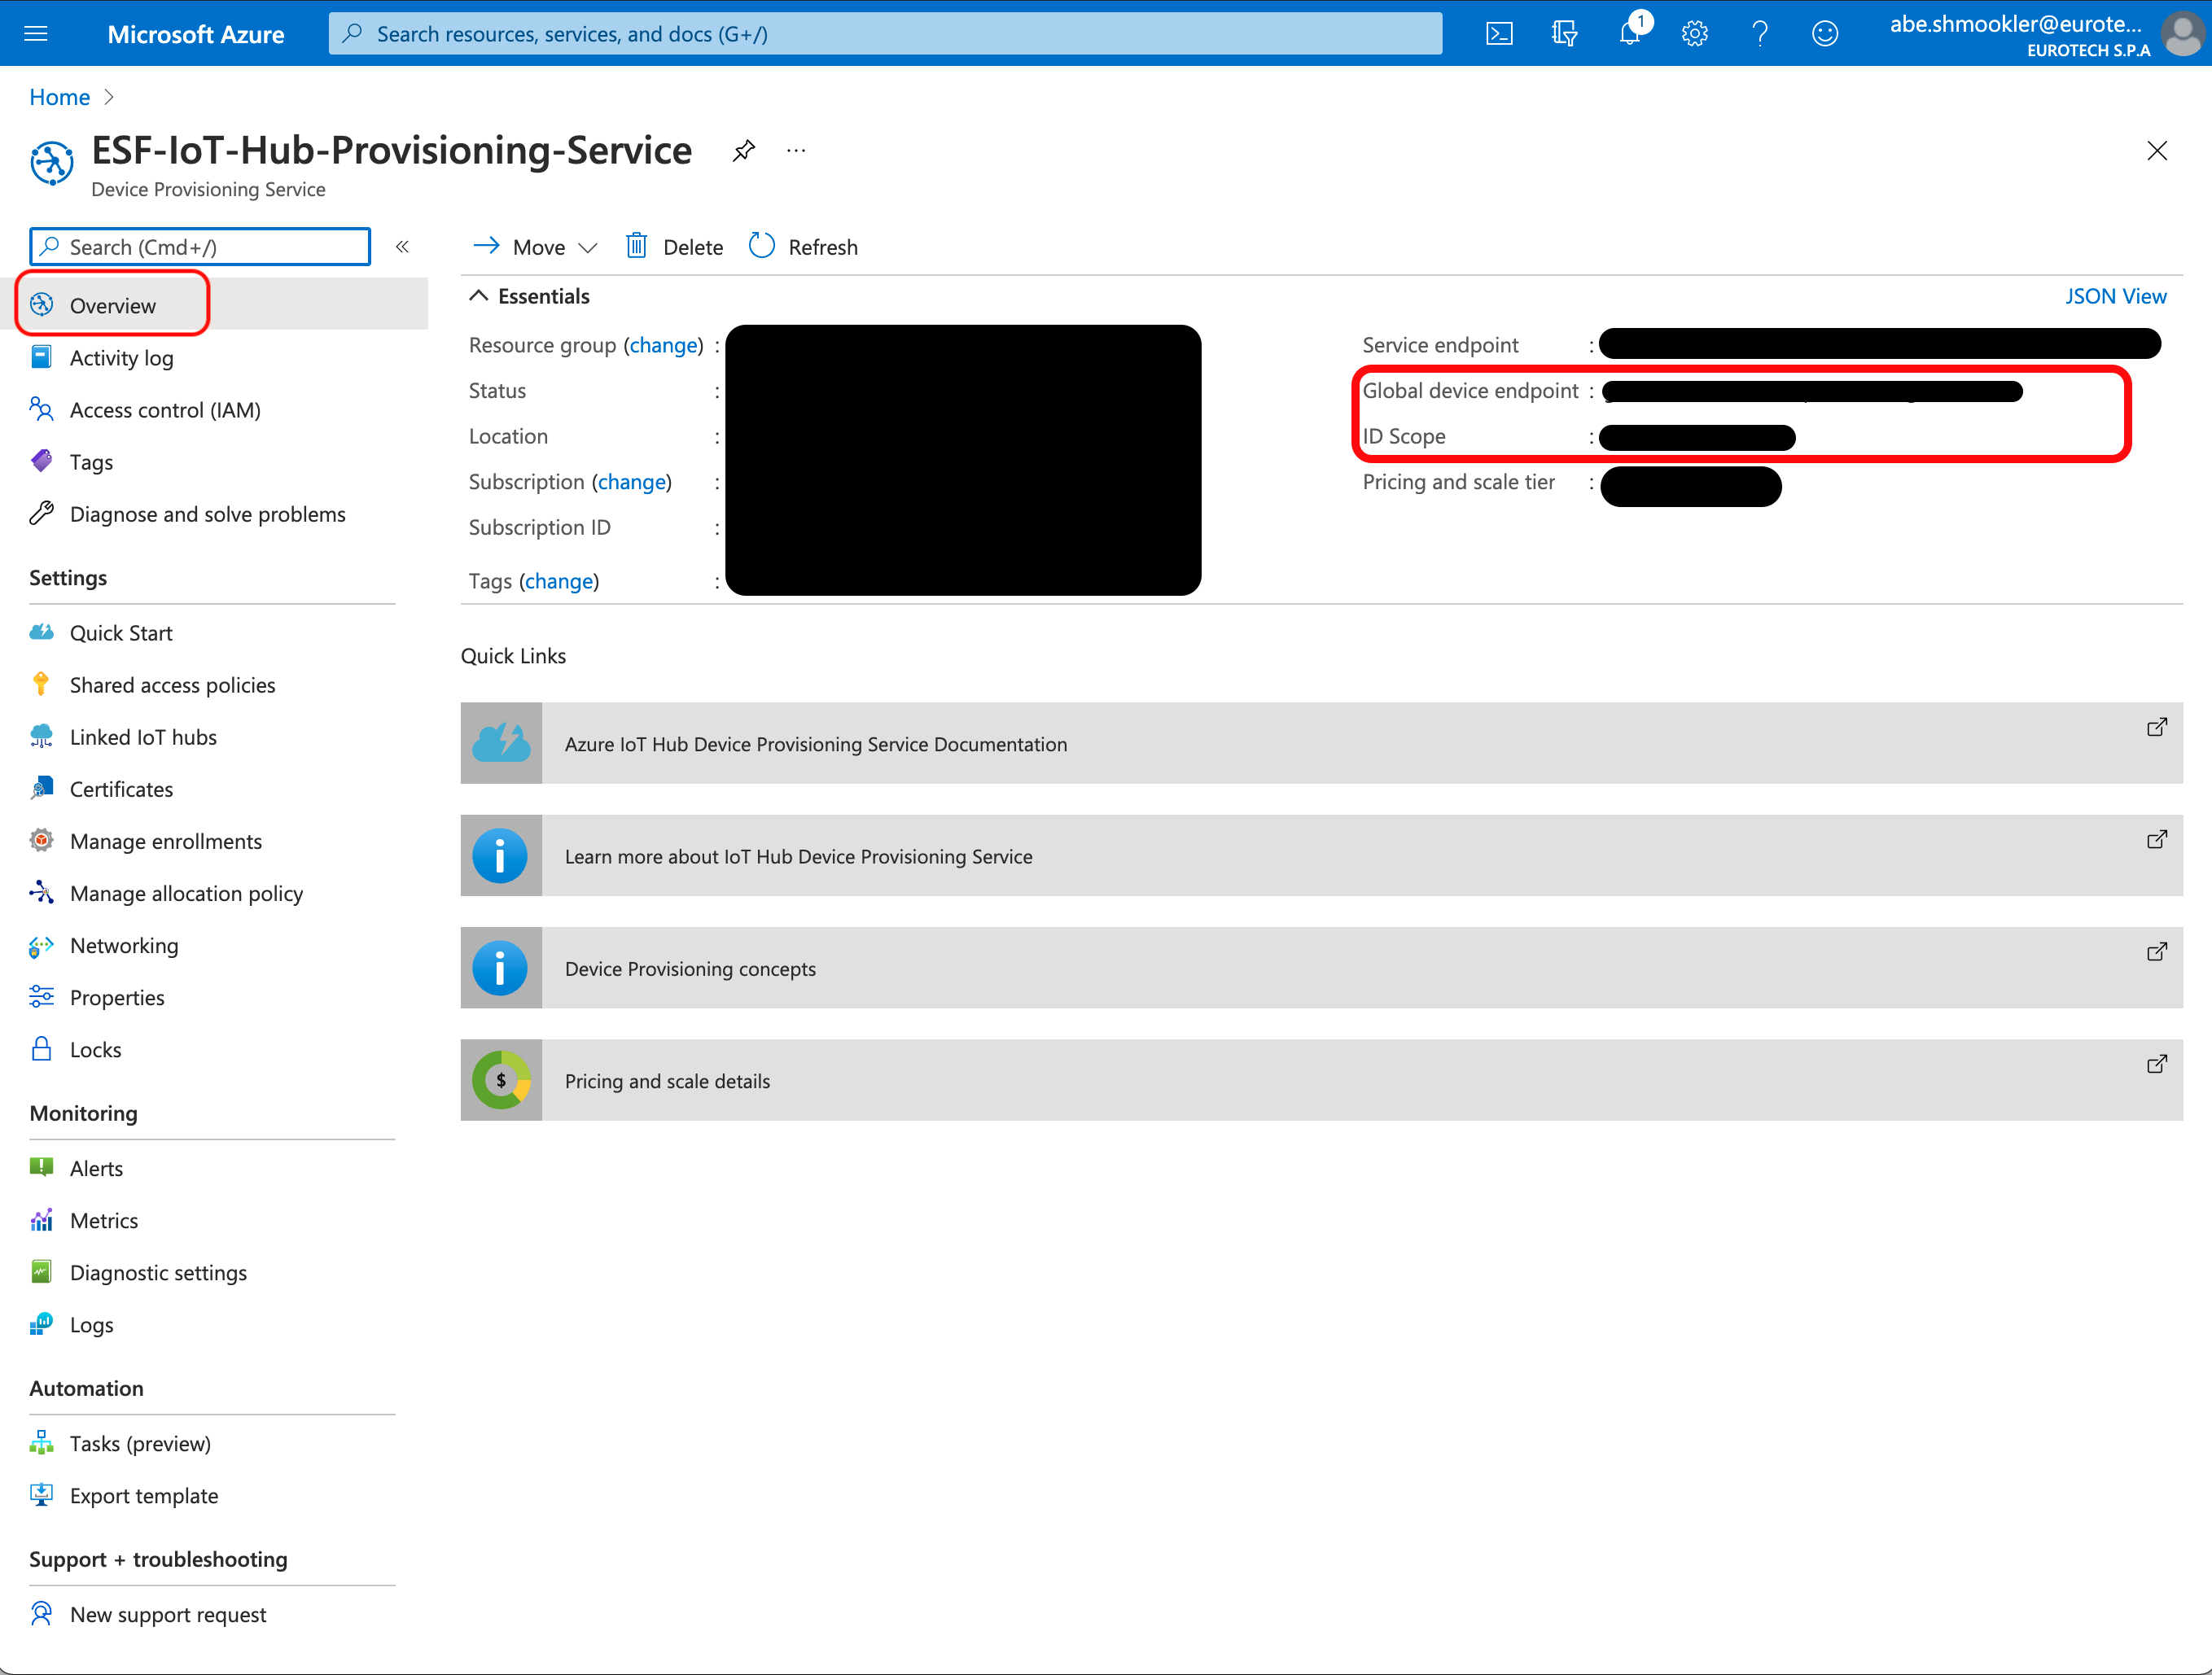
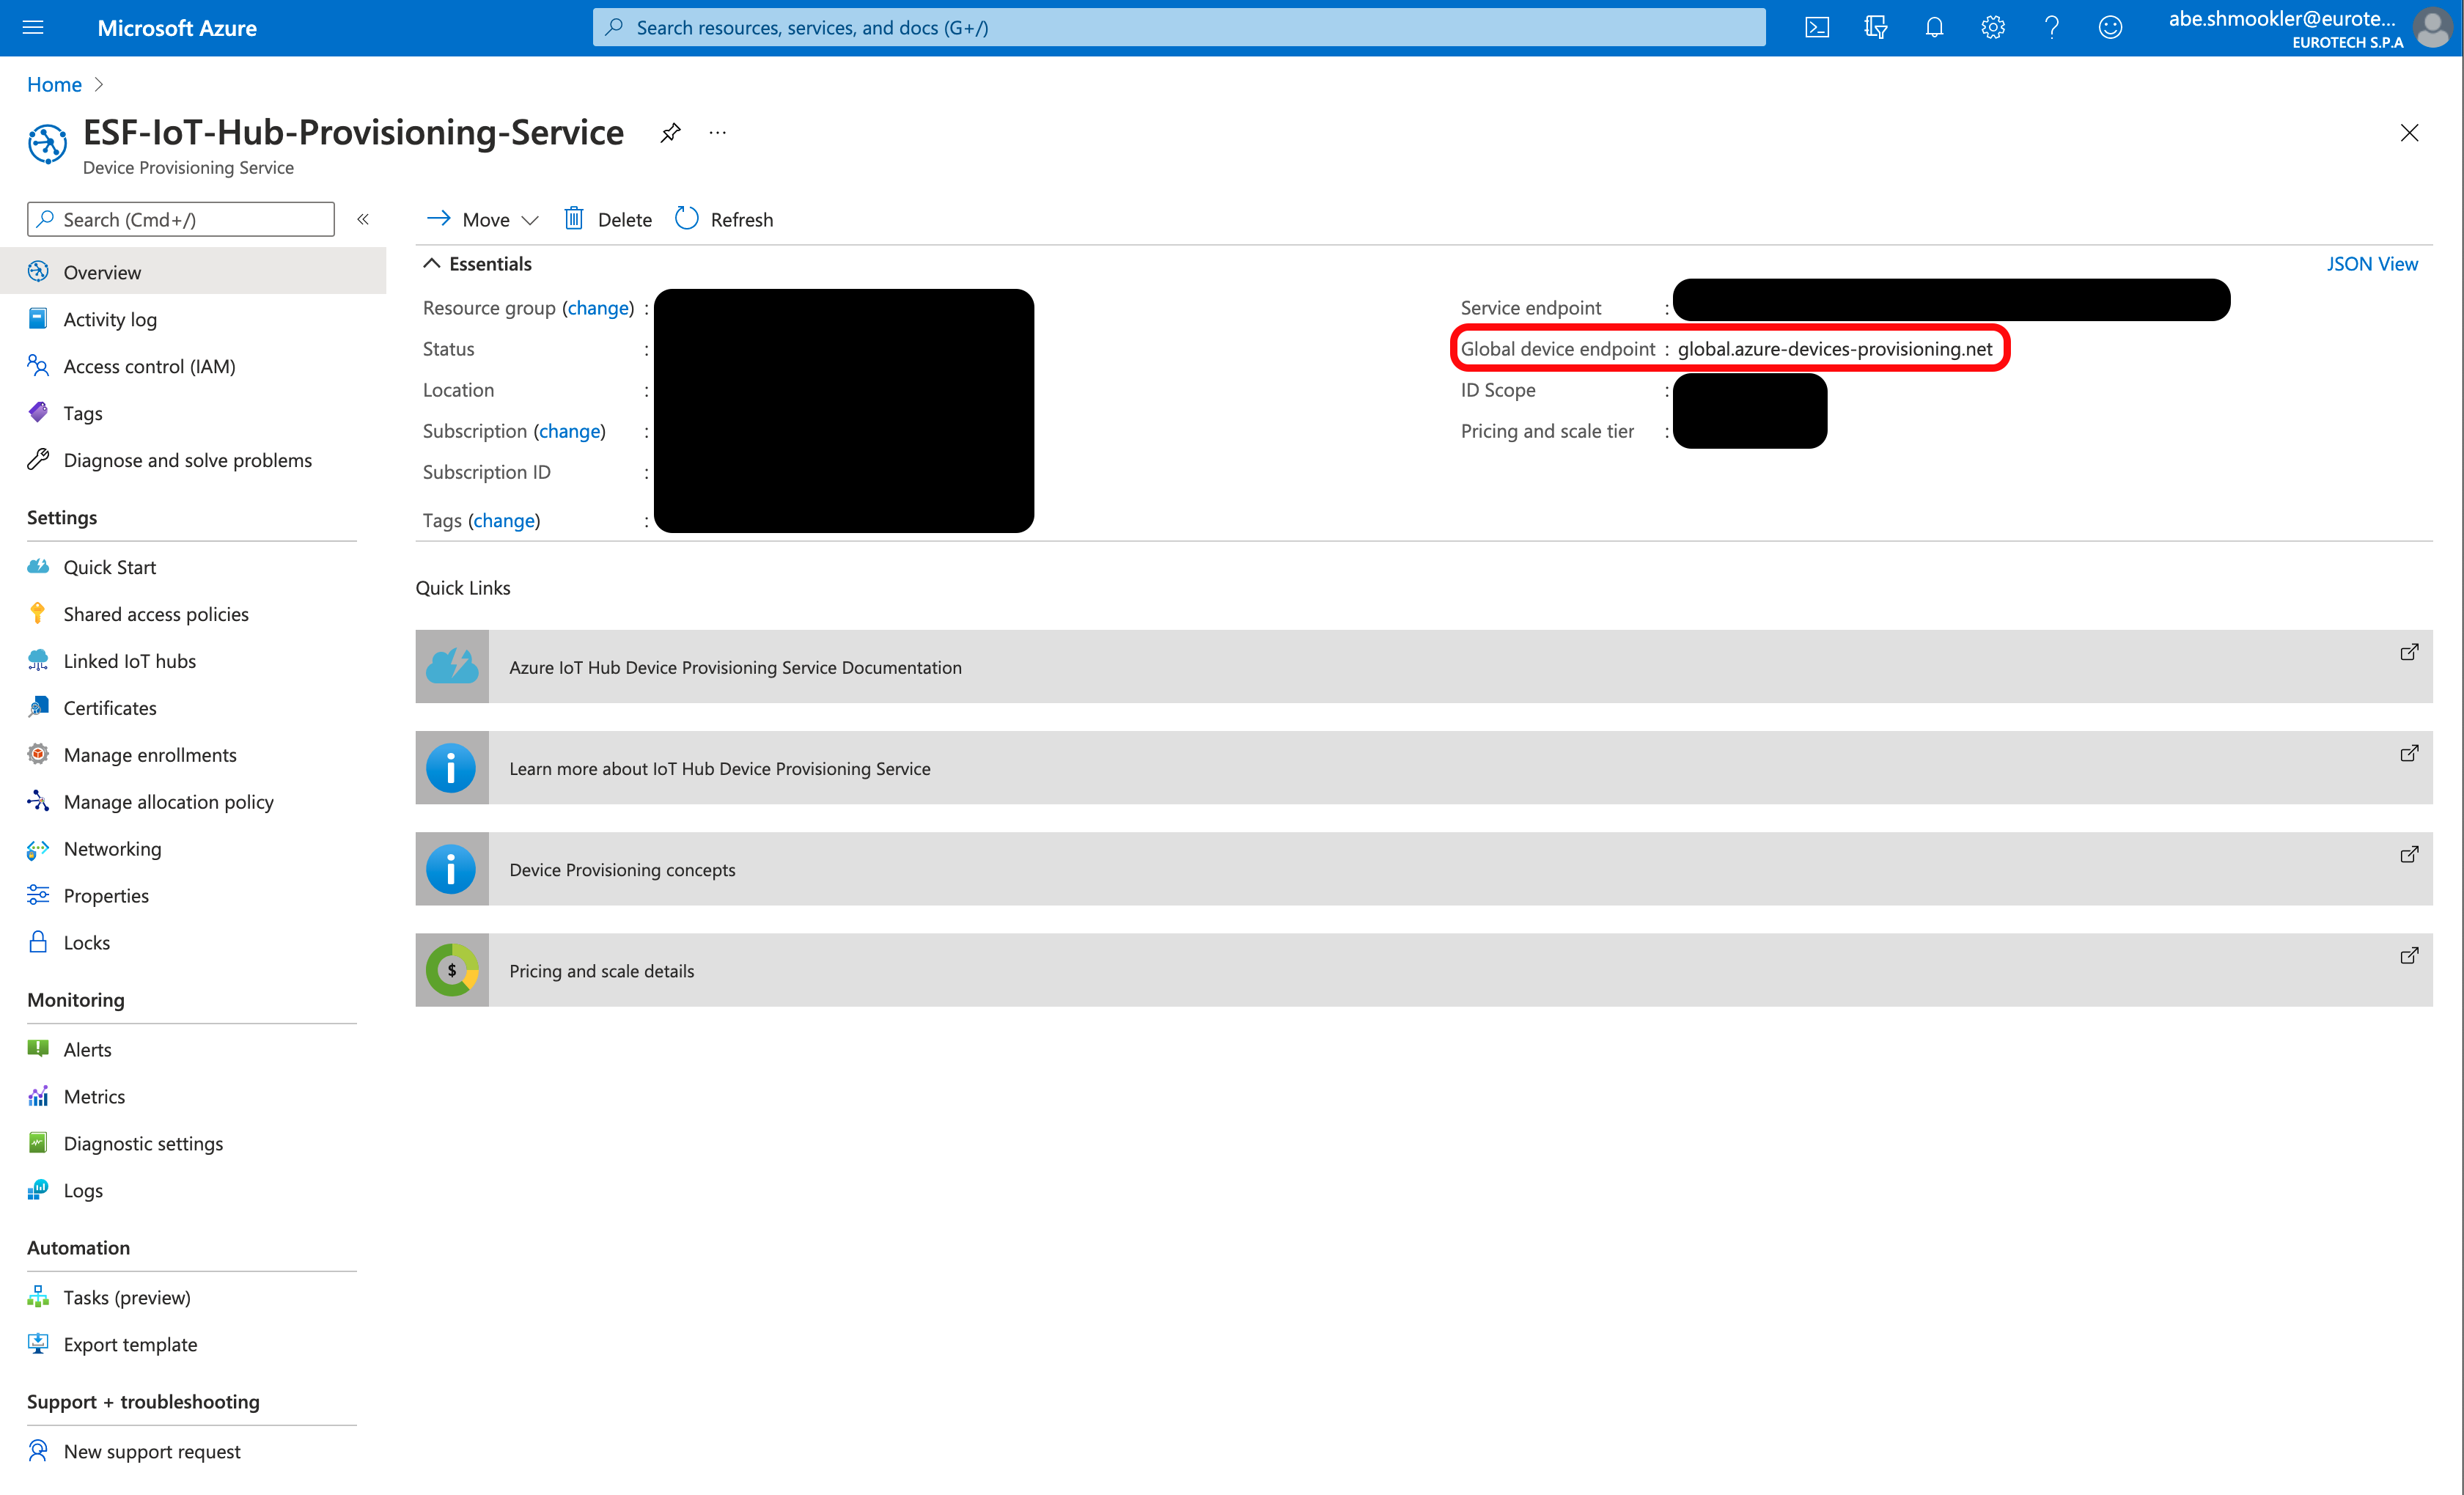
Navigate to the Overview page of the Azure DPS. Copy/paste the Global device endpoint and ID Scope into the Global Endpoint and Scope ID in ESF. Click Apply.
Click the Connect/Disconnect button. The Status should change to Connected. The connection process may take up to 30 seconds.
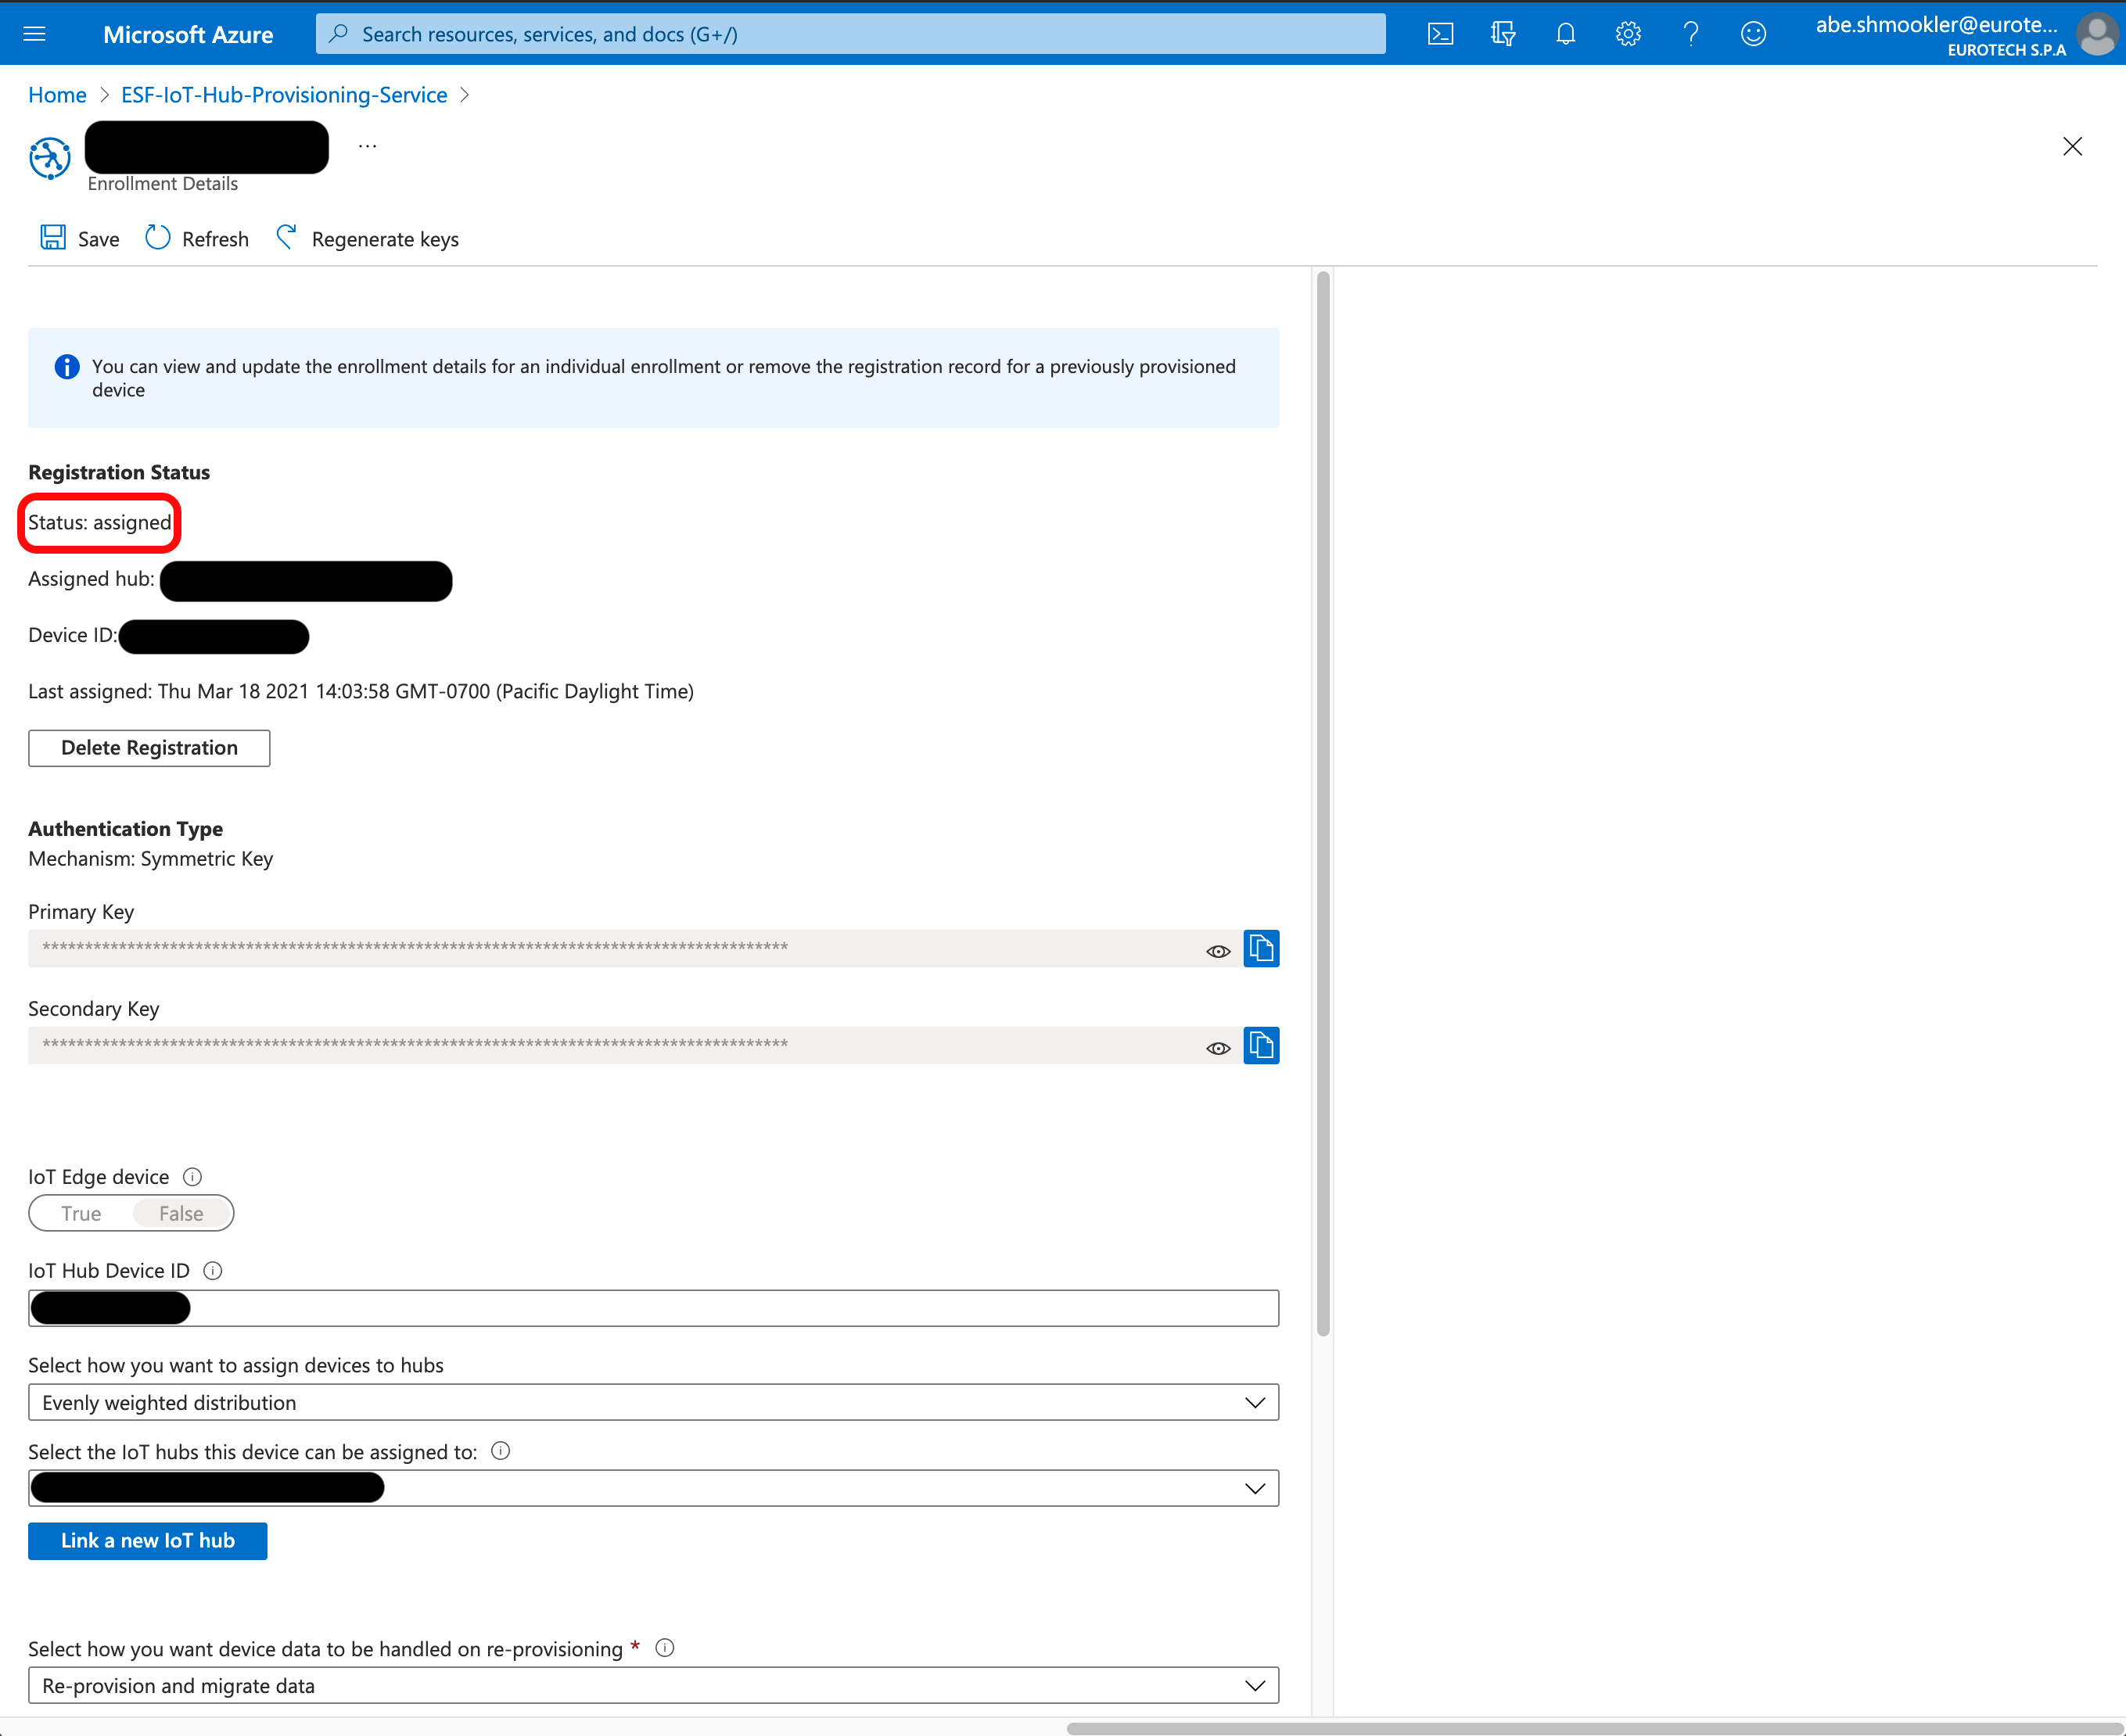
When the AzureDpsSas is connected, navigate to the device in DPS (via Manage Enrollments/Individual Enrollments). Select your device to go to the Enrollment Details page.
In the Registration Status section, confirm that the Status is "assigned." If the Status is still "unassigned" try refreshing the page in your browser (not the Azure Portal "refresh" button).
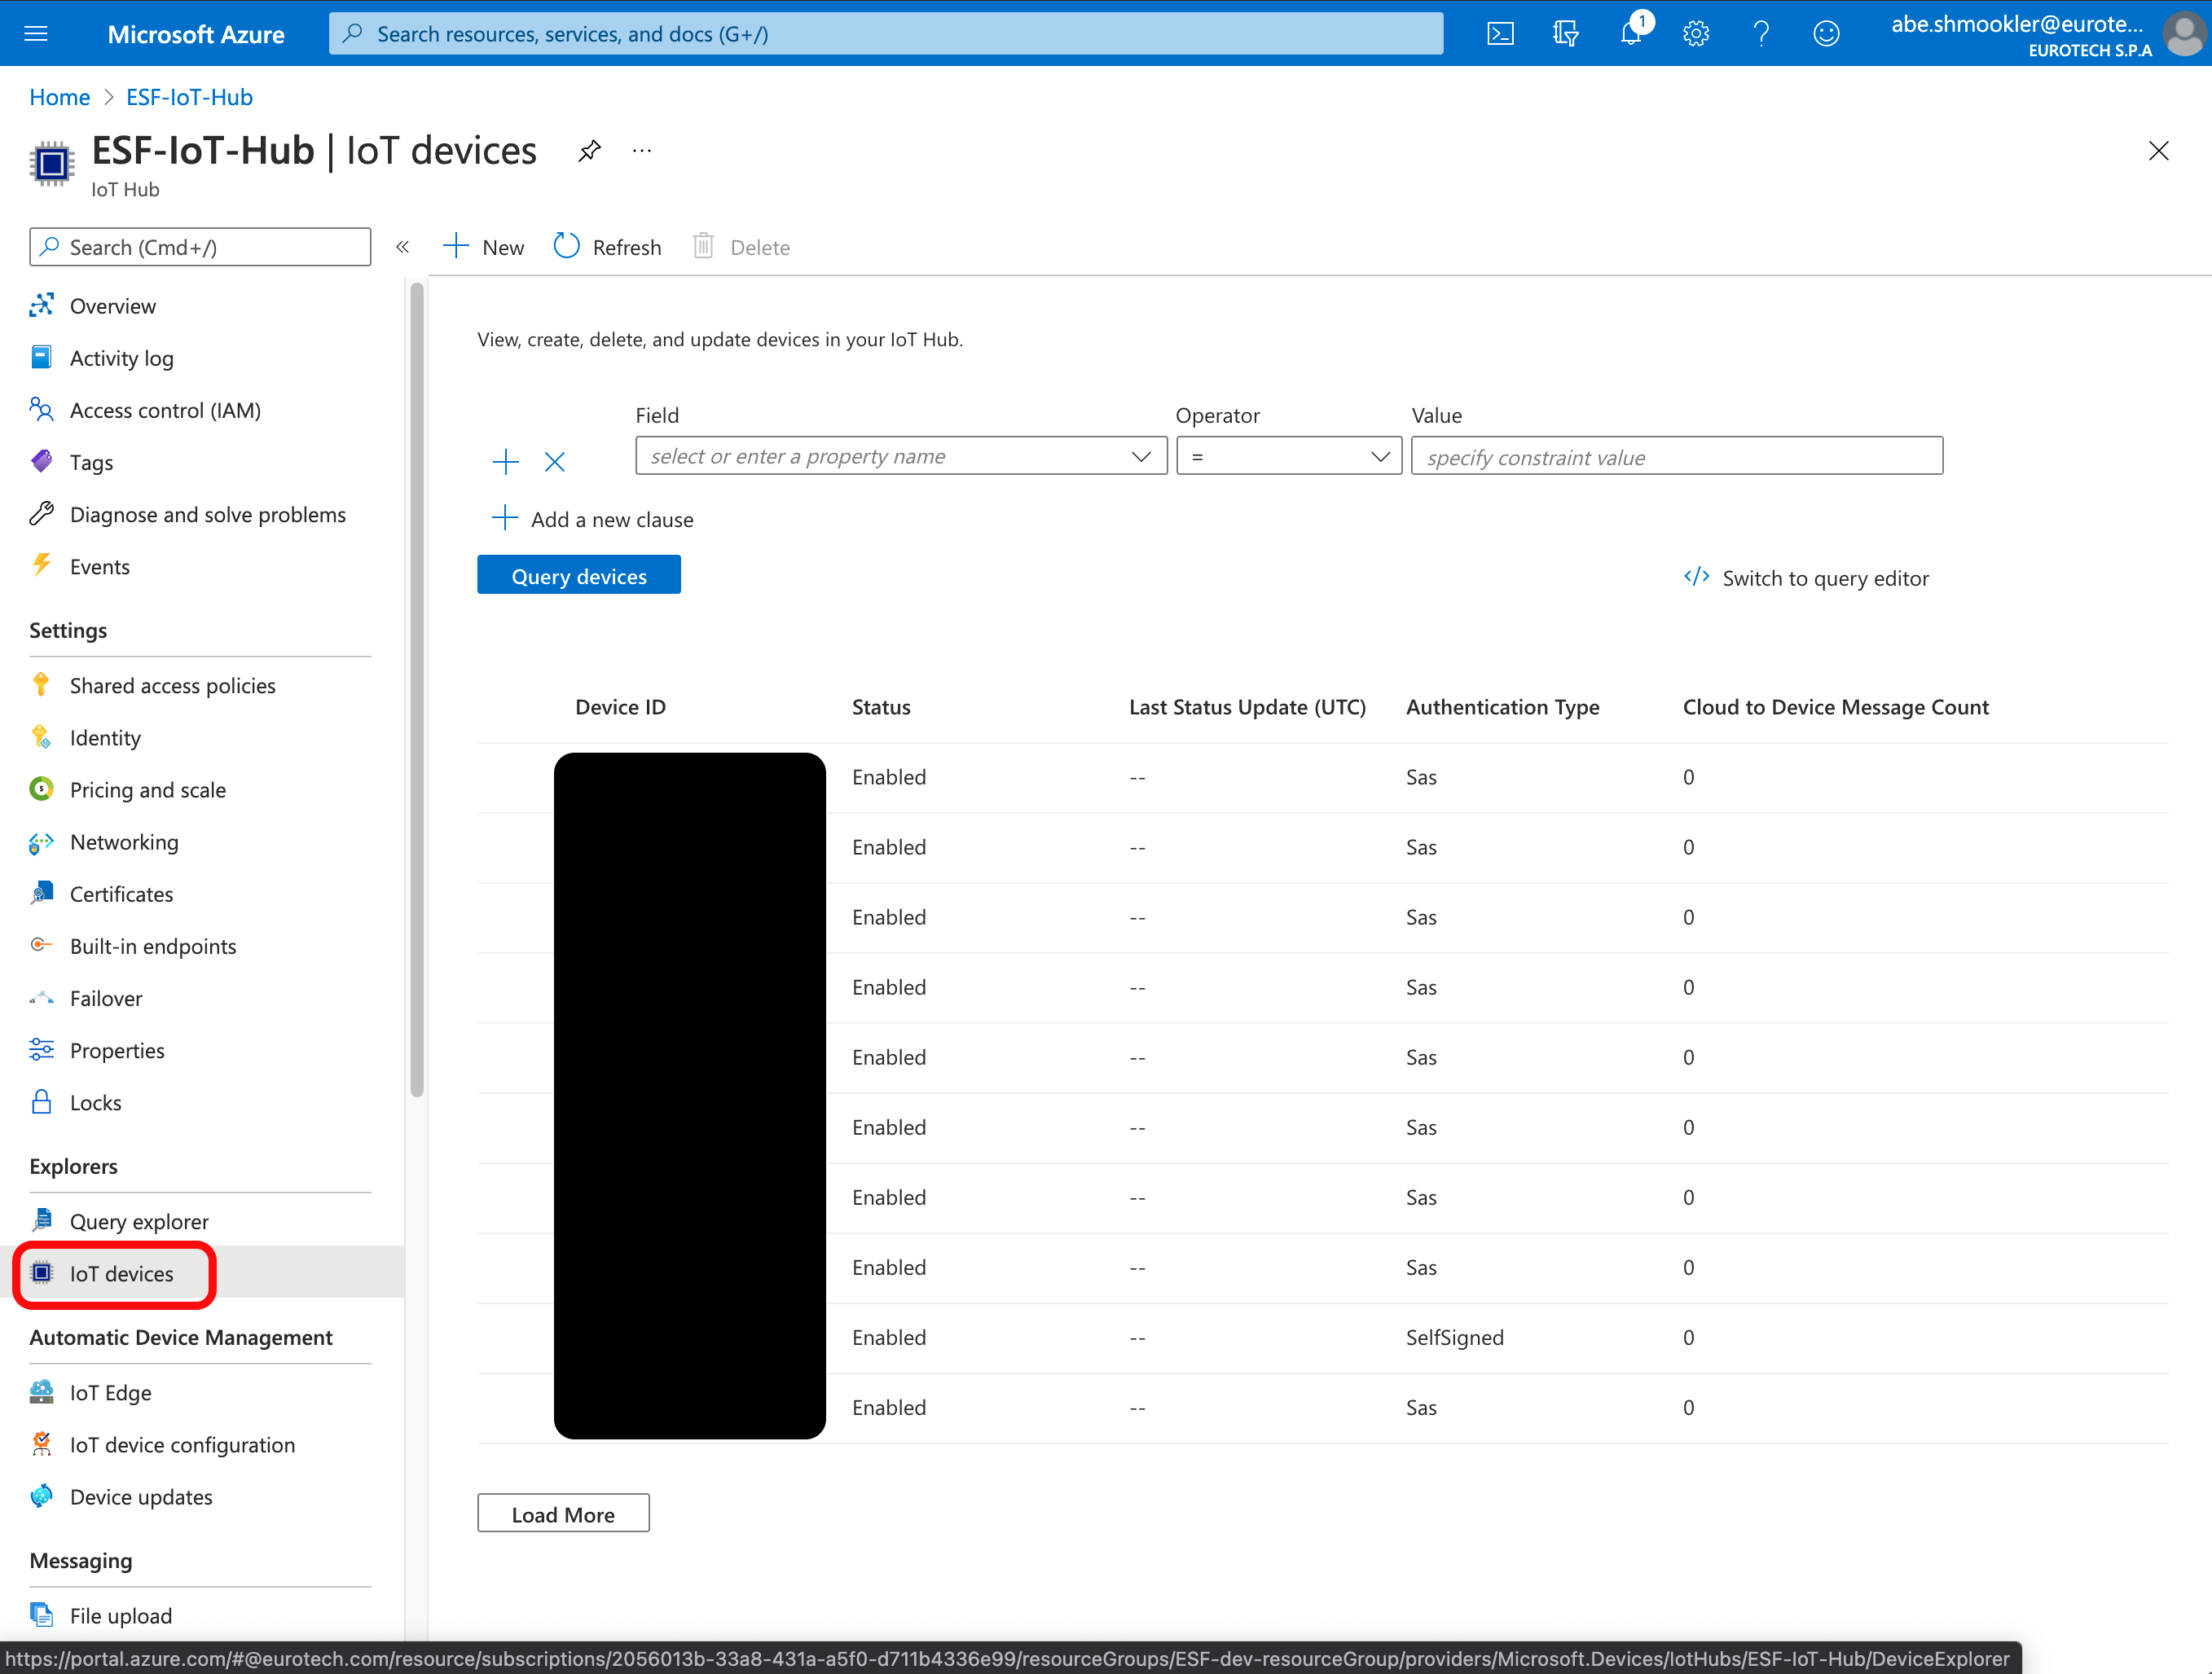
When the gateway connects for the first time, a Device will be created in the IoT Hub. Navigate to your IoT Hub in the Azure Portal. Go to the IoT Devices page and confirm the device is listed. The gateway will be listed under the Device ID you entered earlier.
The device is now connected.
Configure connection using IoT Hub DPS Enrollment Group
Copy the key created by the Azure CLI command (without the quote marks). Paste this into the Symmetric Key in ESF. Copy and paste the Device ID from the CLI command to the Registration ID in ESF.
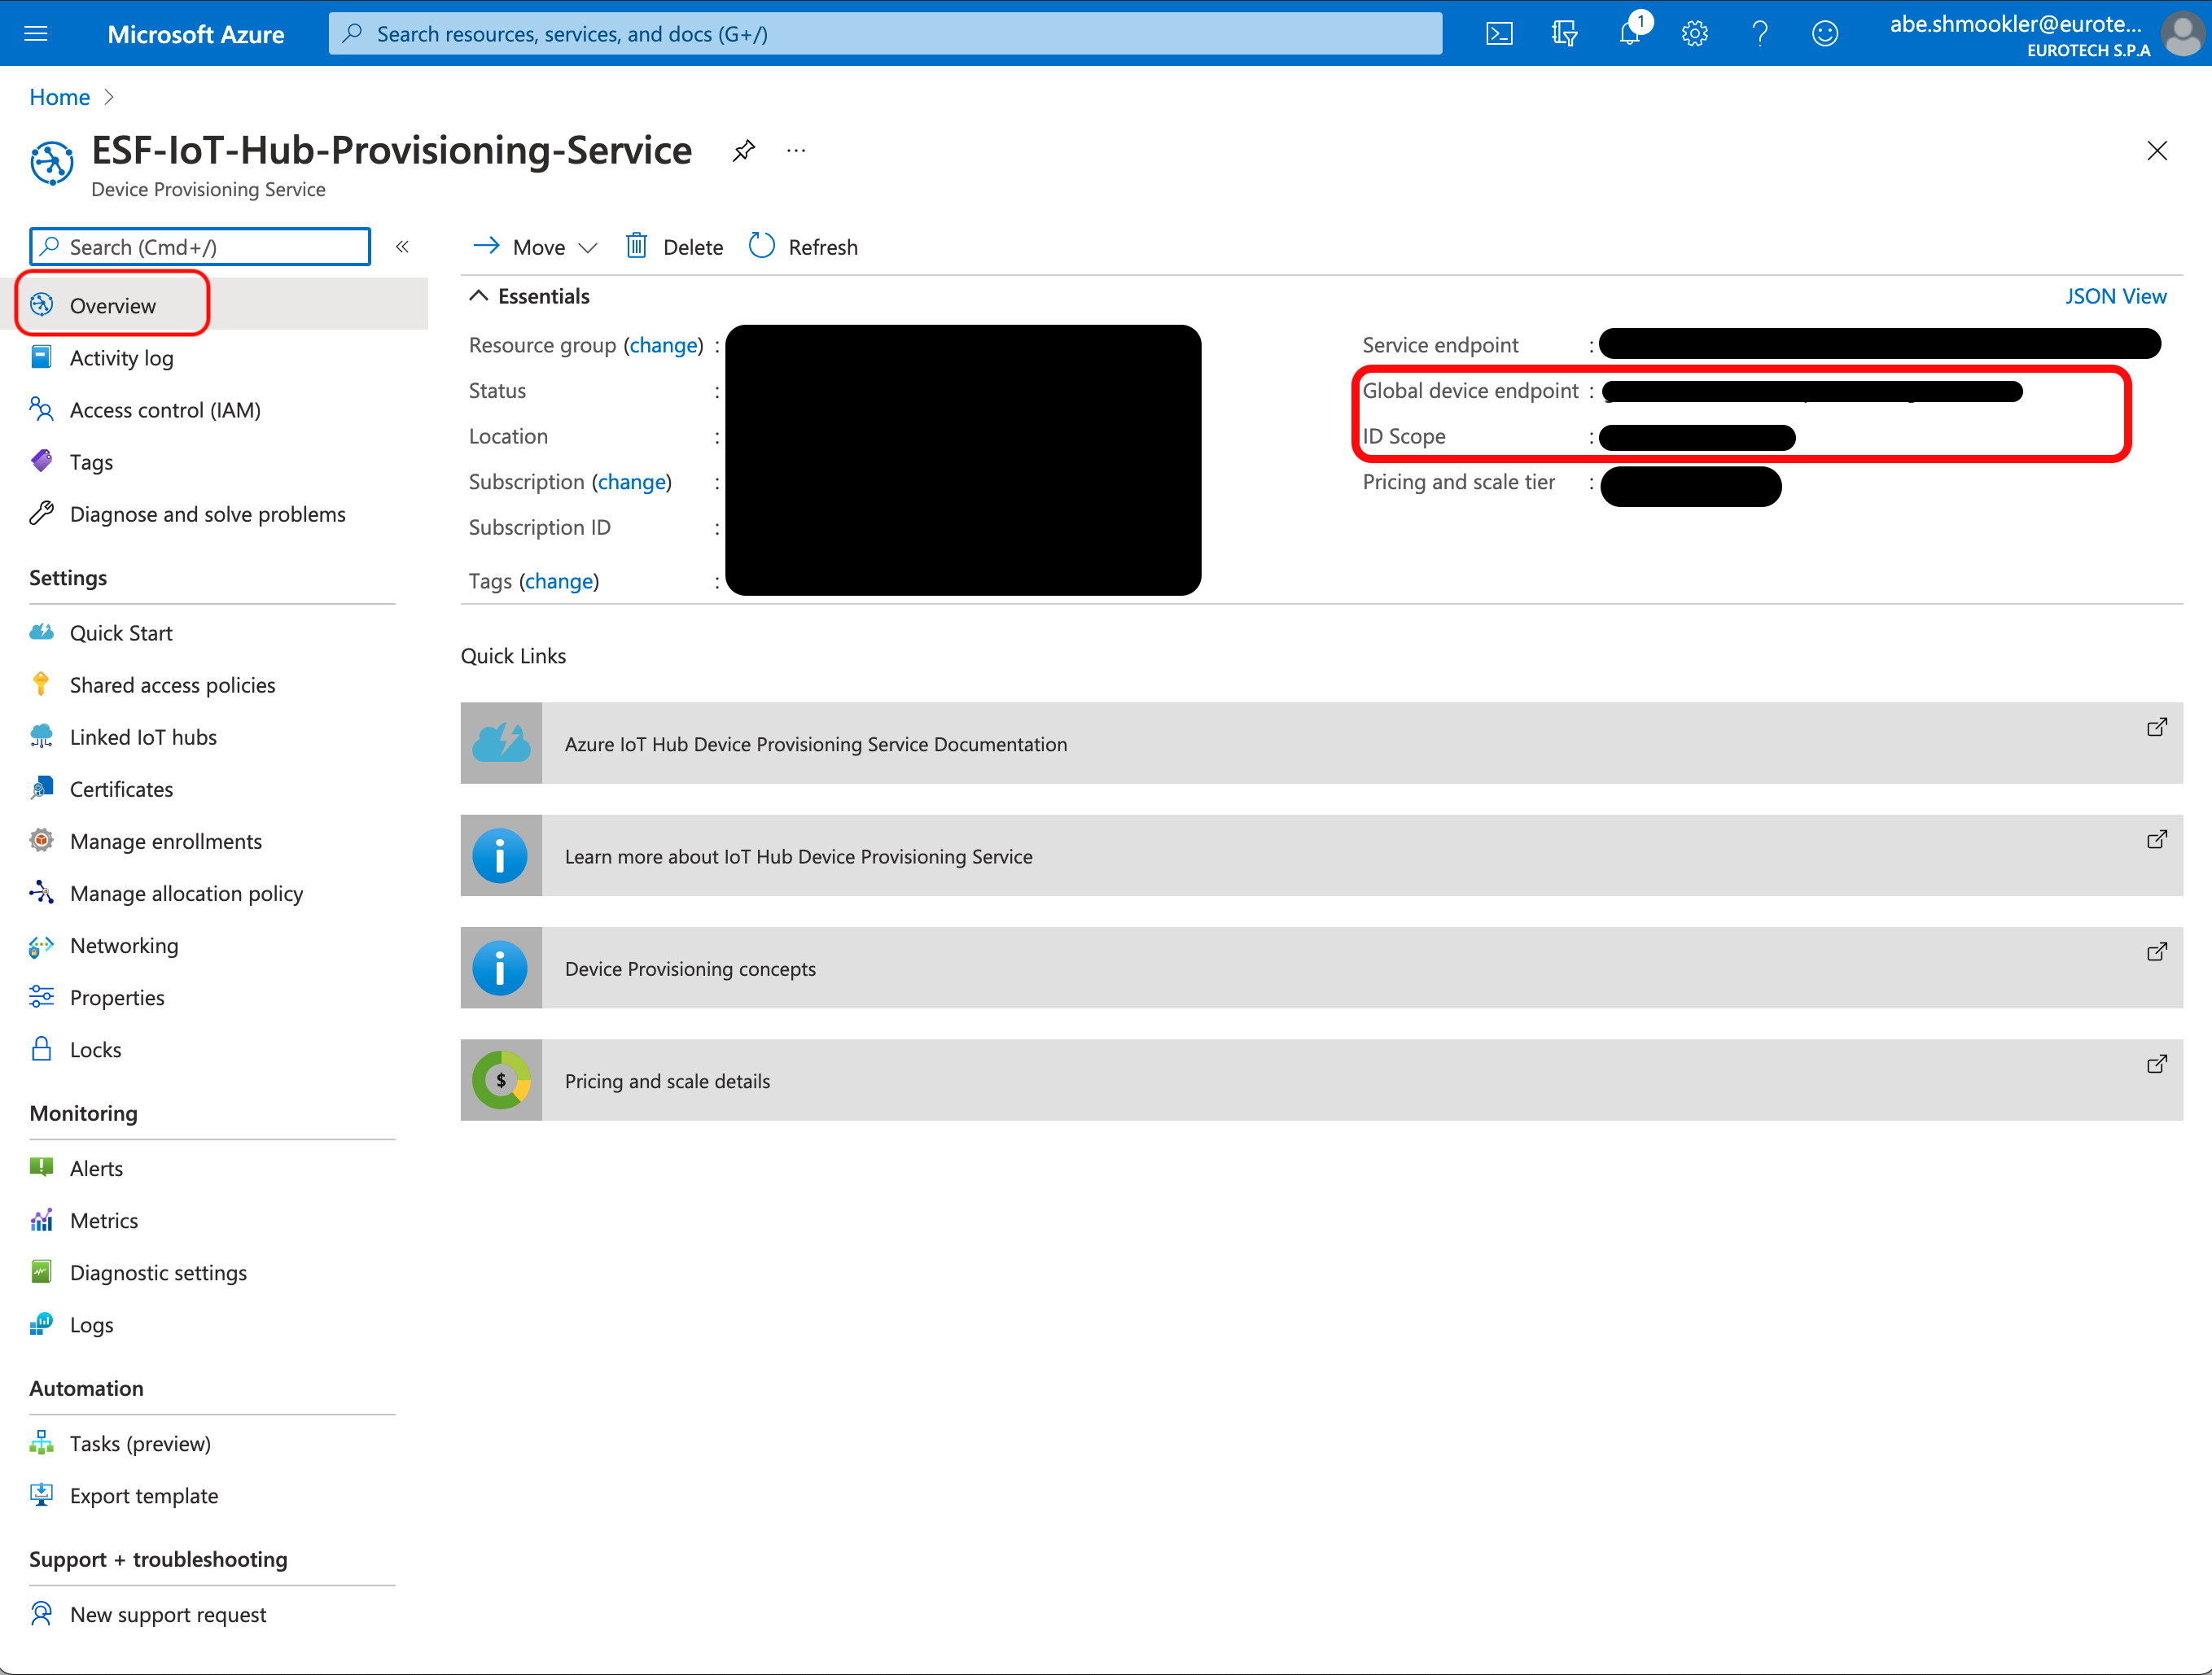
Navigate to the Overview page of the Azure DPS. Copy/paste the Global device endpoint and ID Scope into the Global Endpoint and Scope ID in ESF. Click Apply.
Click the Connect/Disconnect button. The Status should change to Connected. The connection process may take up to 30 seconds.
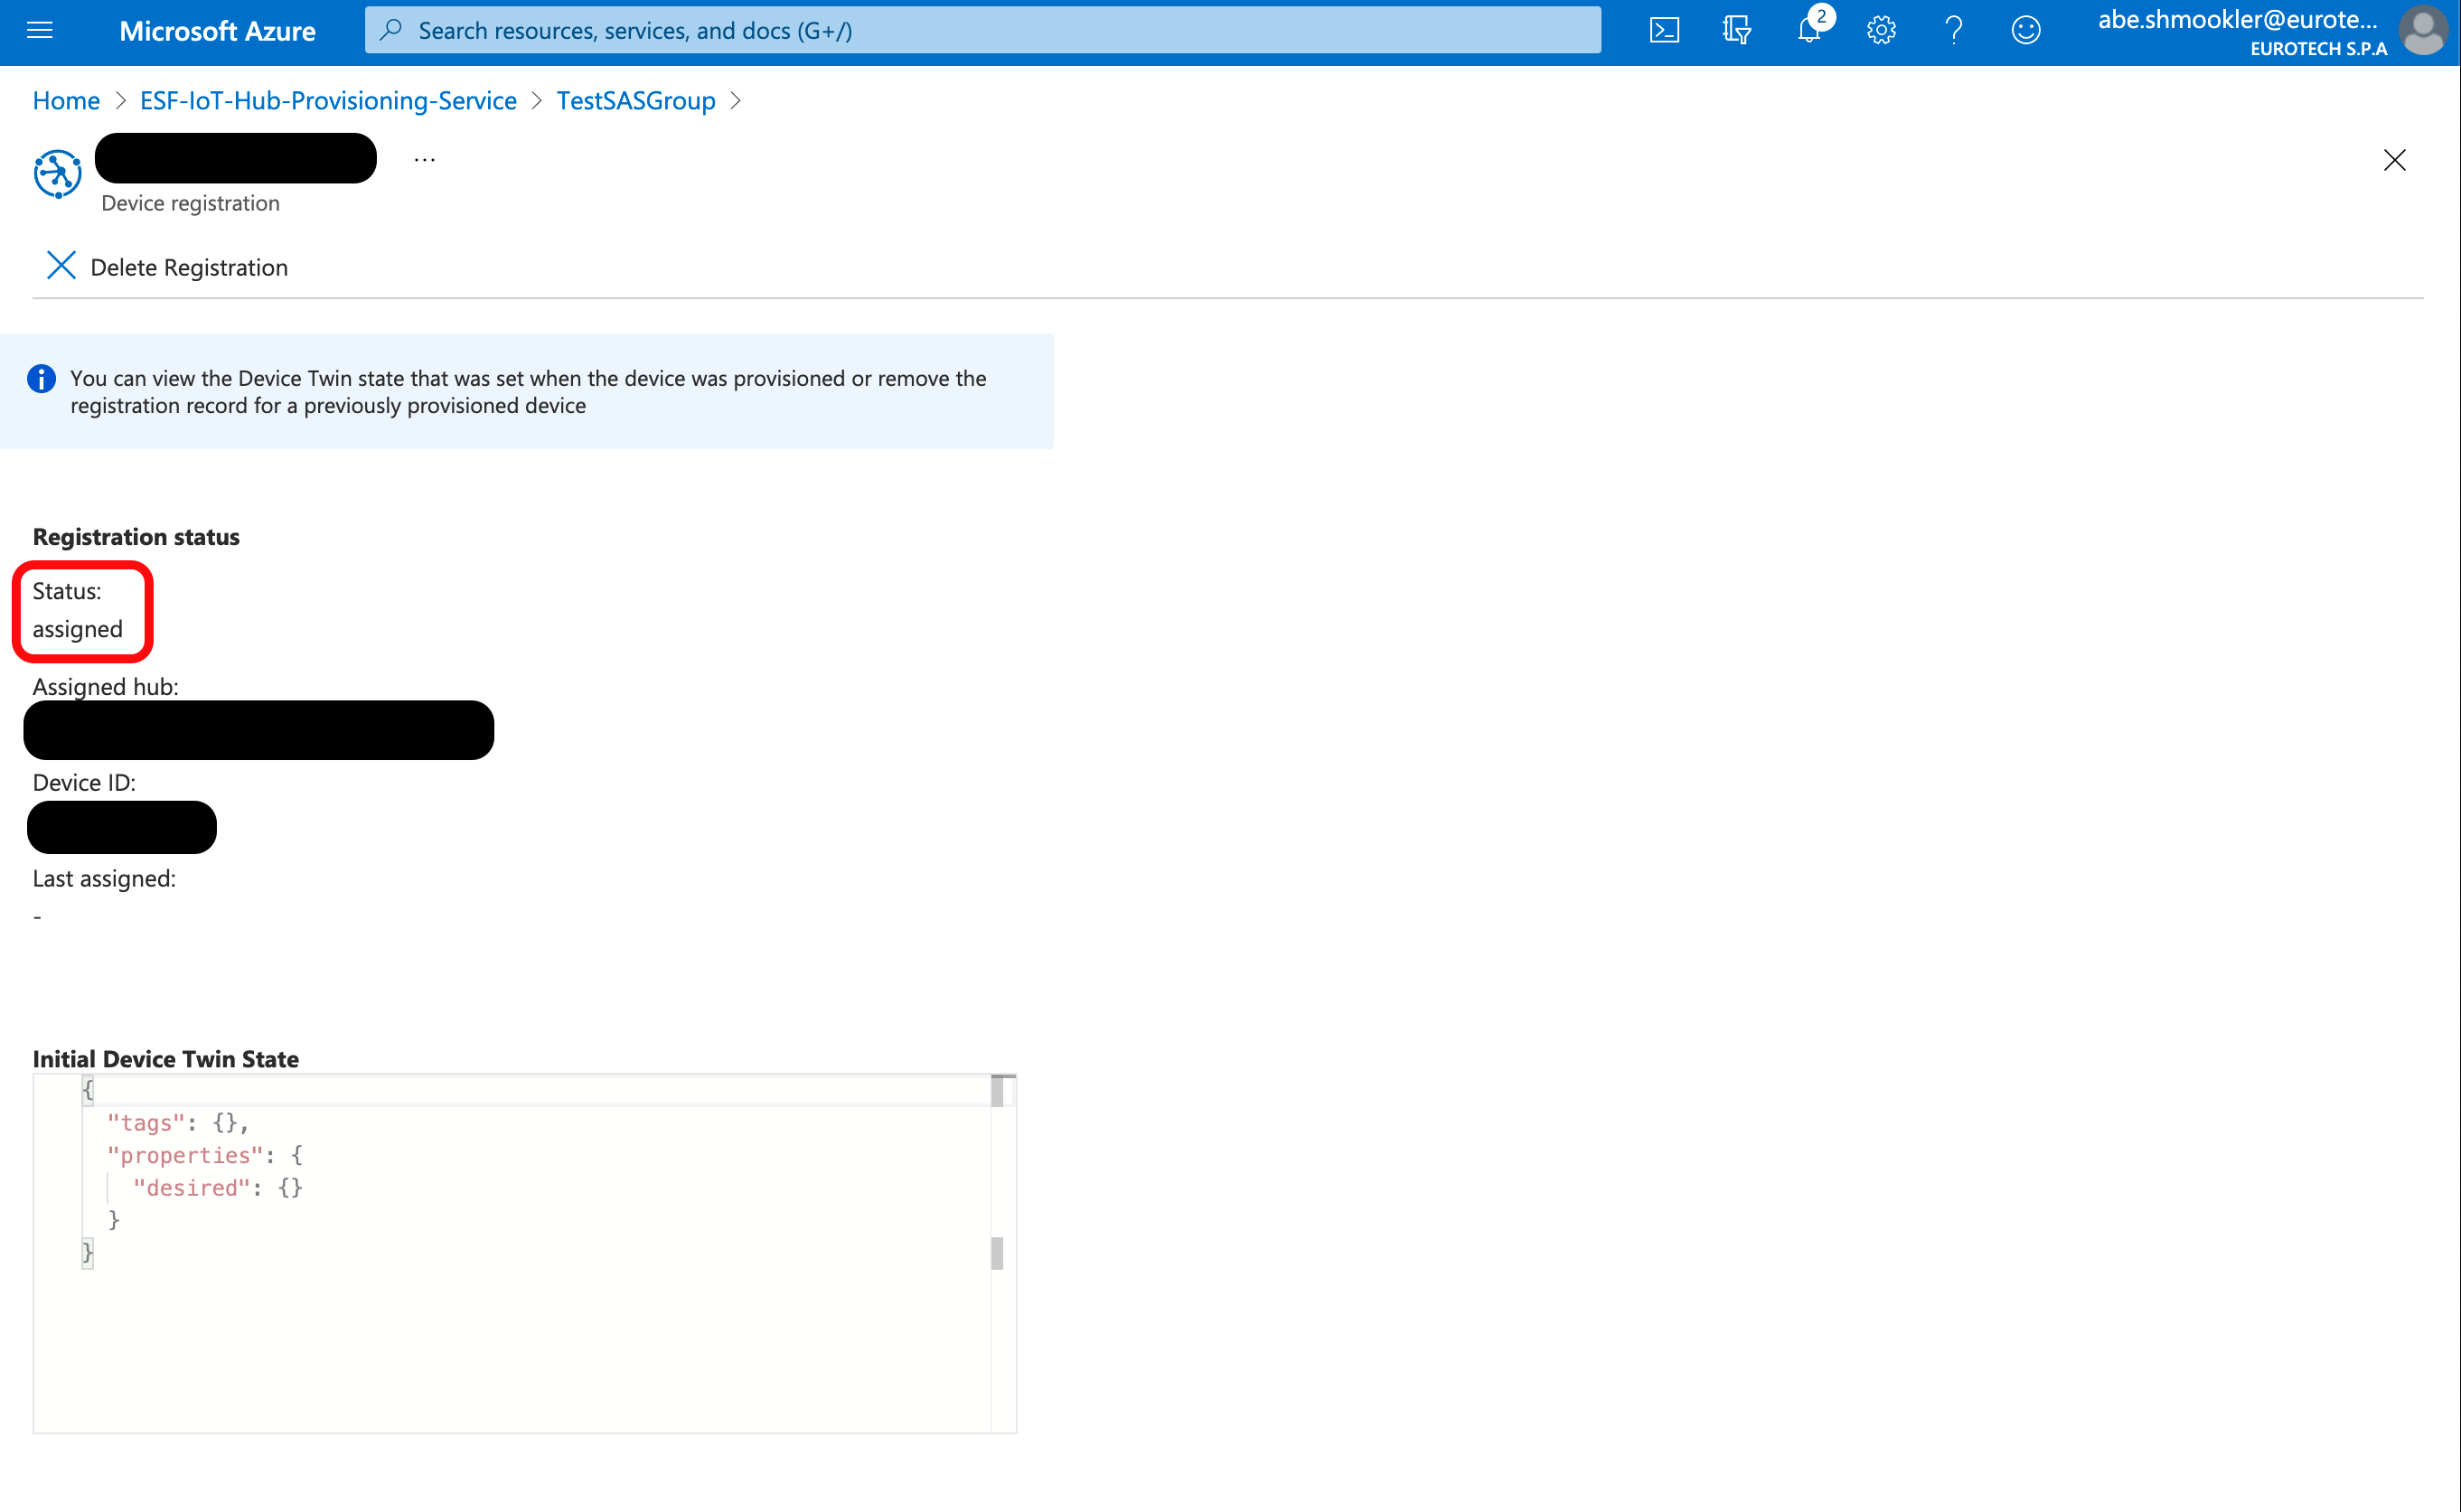
When the AzureDpsSas is connected, navigate to the Enrollment Group Details page in DPS (via Manage Enrollments/Enrollment Groups and click your Enrollment Group). Select the Registration Records tab.

Click your device to go to the Device Registration page. In the Registration Status section, confirm that the Status is "assigned." If the Status is still "unassigned" try refreshing the page in your browser (not the Azure Portal "refresh" button).
When the gateway connects for the first time, a Device will be created in the IoT Hub. Navigate to your IoT Hub in the Azure Portal. Go to the IoT Devices page and confirm the device is listed. In the IoT Hub the gateway will be listed under the Device ID you used in the Azure CLI.
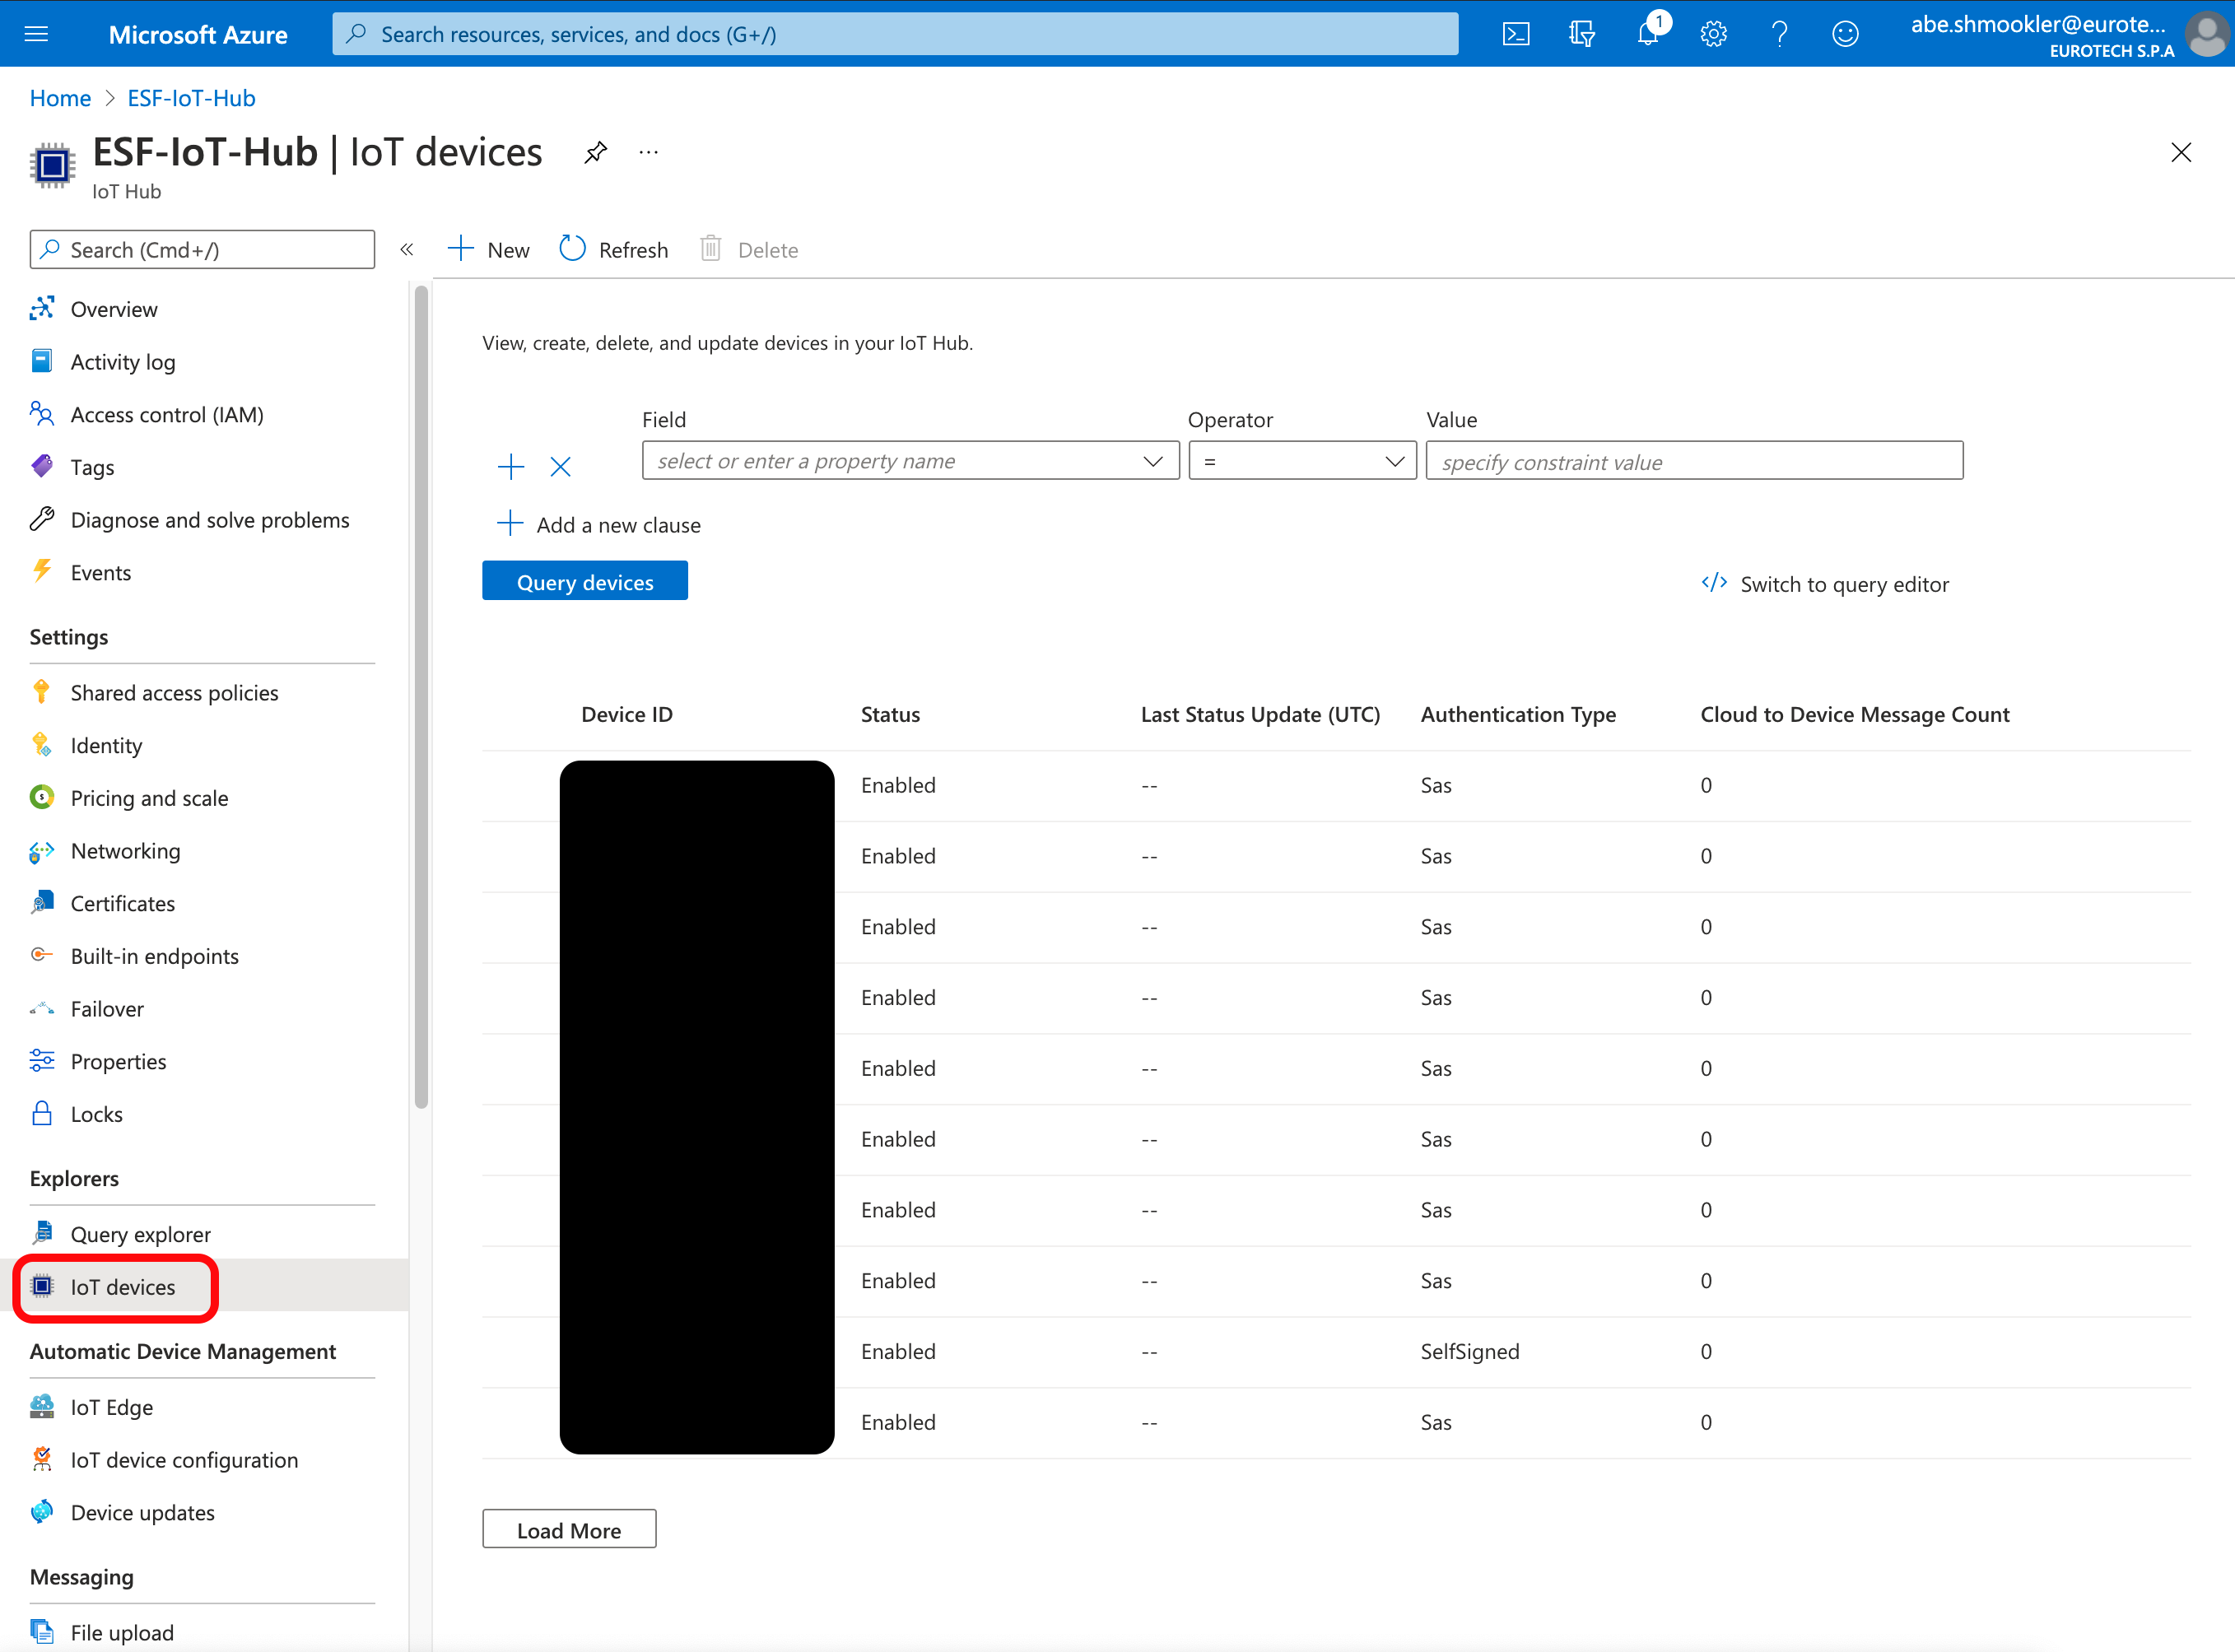
The device is now connected.
Configure connection using IoT Central Individual Enrollment
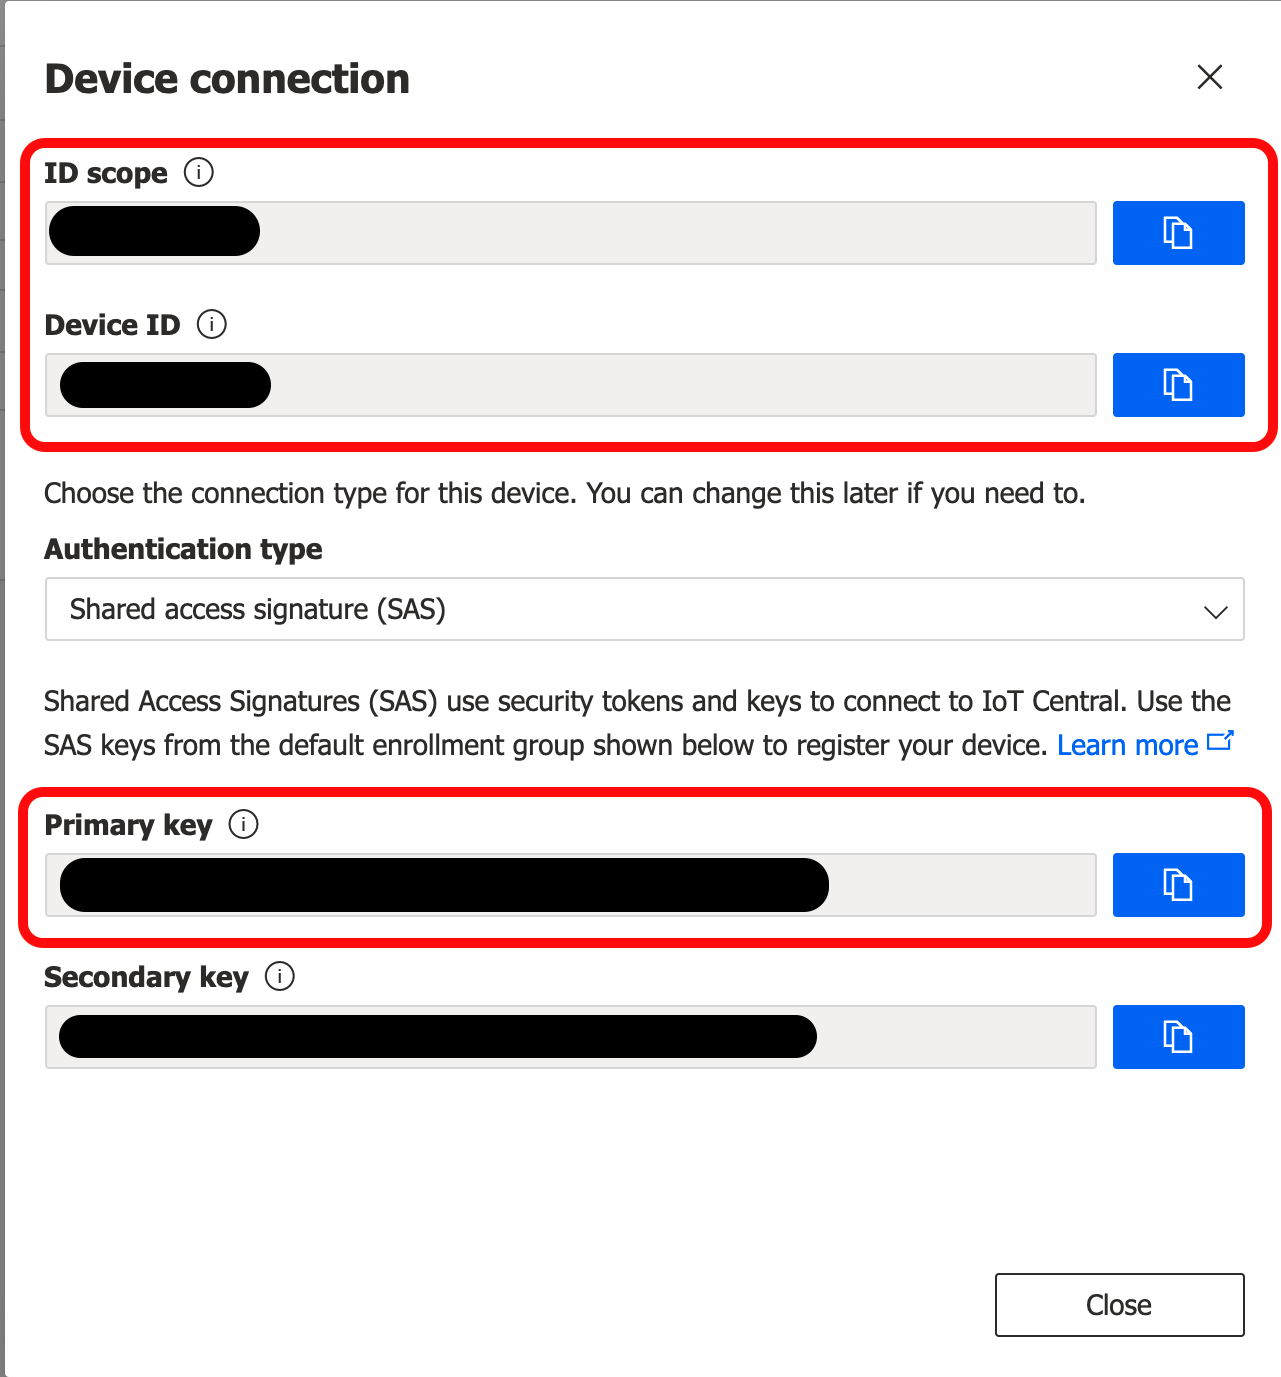
The Scope ID, Symmetric Key and Registration ID can be found on the Device Connection details page (Devices/[Device Name]/Connect).
Copy/paste the following items from the Device Connection details page to the ESF Cloud Connection Configuration:
Azure IoT Central Device Connection | ESF Cloud Connection Configuration |
|---|---|
ID Scope | Scope ID |
Device ID | Registration ID |
Primary Key | Symmetric Key |
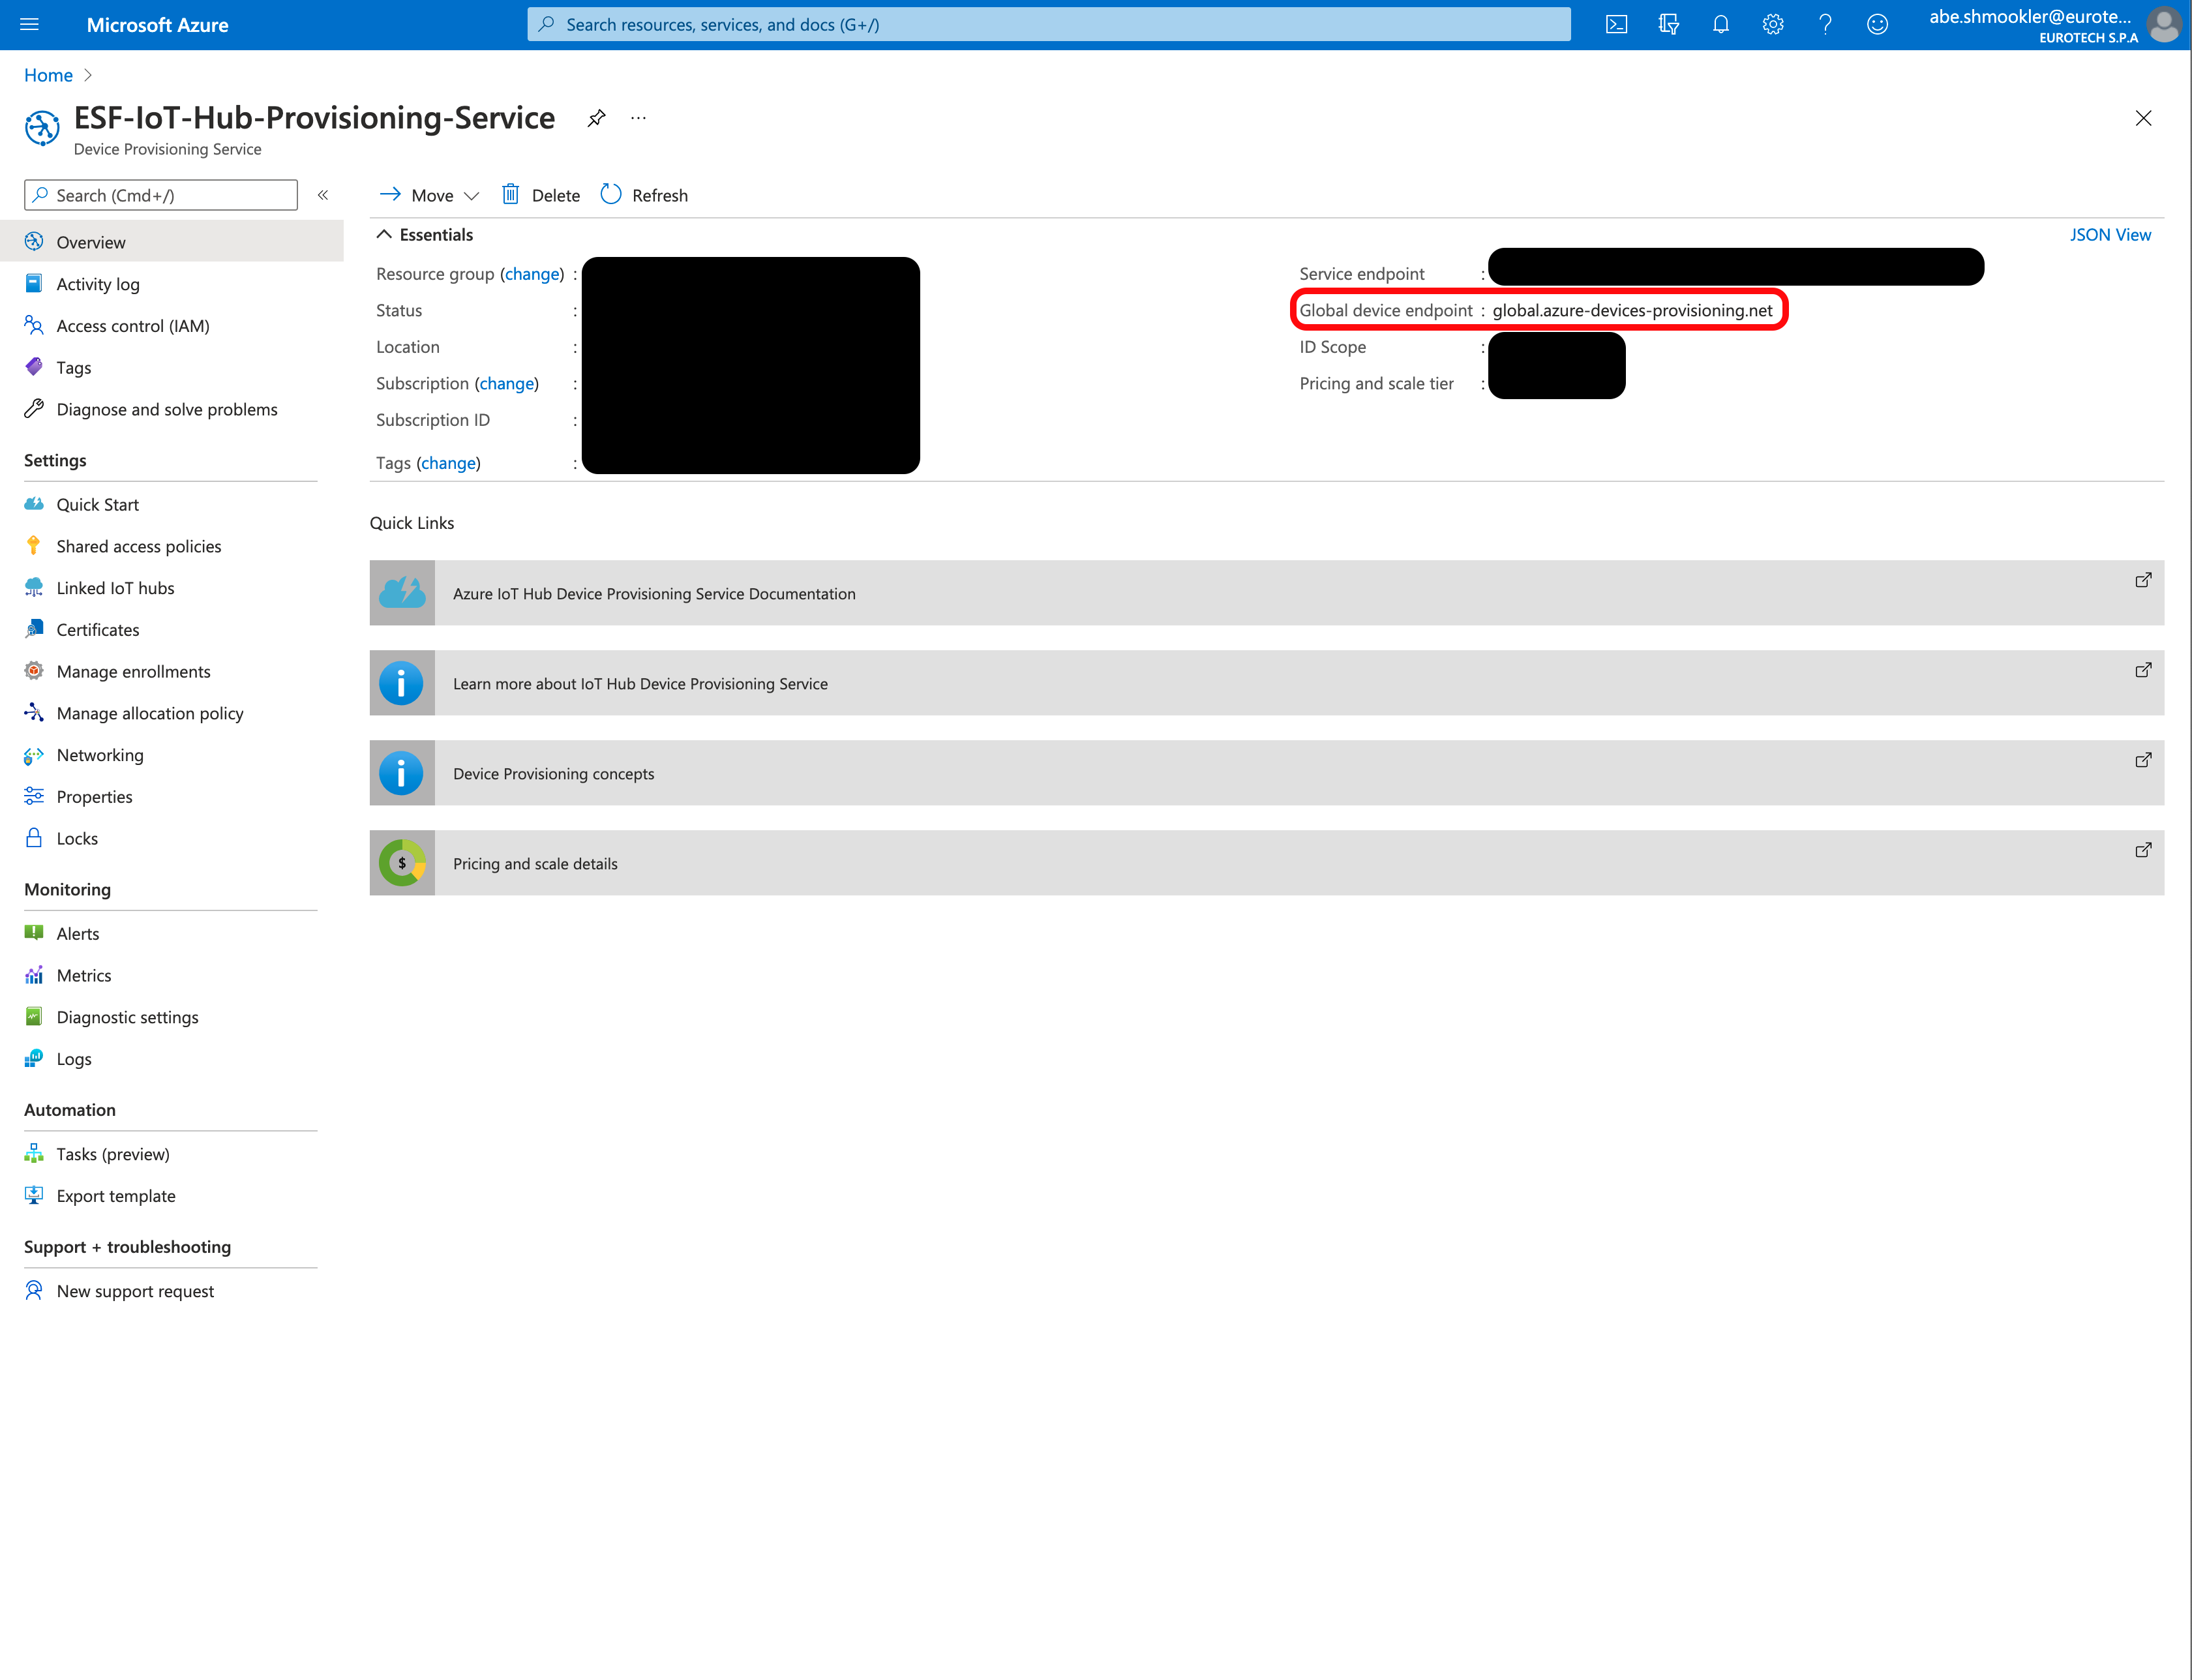
The Global Endpoint can be found in the DPS in the Azure Portal by navigating to the Overview page of your Azure DPS.
Copy/paste the Global device endpoint to the Global Endpoint in ESF and click Apply.
Click the Connect/Disconnect button. The Status should change to Connected. The connection process may take up to 30 seconds.
When the AzureDpsSas is connected, navigate to the Devices page in your IoT Central Application. Confirm the Device status is Provisioned.

The device is now connected.
Configure connection using IoT Central Enrollment Group
Copy the key created by the Azure CLI command (without the quote marks). Paste this into the Symmetric Key in ESF. Copy and paste the Device ID from the CLI command to the Registration ID in ESF.
Navigate to the Device connection section of the Administration page in your IoT Central Application. Copy the ID Scope and paste it in the Scope ID in ESF.

Navigate to the Overview page of the Azure DPS. Copy/paste the Global device endpoint into the Global Endpoint in ESF. Click Apply.
Click the Connect/Disconnect button. The Status should change to Connected. The connection process may take up to 30 seconds.
When the AzureDpsSas is connected, navigate to the Devices page in your IoT Central Application. Confirm the device is listed, and that Device status is Provisioned. If the device does not show up, refresh the page in your browser.

The device is now connected.
Updated 3 months ago
